<?xml version="1.0" encoding="utf-8"?><feed xmlns="http://www.w3.org/2005/Atom" xml:lang="en_US"><generator uri="https://jekyllrb.com/" version="3.10.0">Jekyll</generator><link href="https://prameshbajra.com/feed.xml" rel="self" type="application/atom+xml" /><link href="https://prameshbajra.com/" rel="alternate" type="text/html" hreflang="en_US" /><updated>2026-08-08T08:12:32+00:00</updated><id>https://prameshbajra.com/feed.xml</id><title type="html">Pramesh Bajracharya</title><subtitle>Pramesh Bajracharya is a software engineer in Hamburg, Germany. Writing about cloud architecture, self-hosted homelabs, networking, AWS, and 3D printing.</subtitle><author><name>Pramesh Bajracharya</name><email>pe.messh@gmail.com</email></author><entry><title type="html">DNS Under the Hood: Root Servers, Authoritative DNS, and Unbound</title><link href="https://prameshbajra.com/blog/dns-unbound/" rel="alternate" type="text/html" title="DNS Under the Hood: Root Servers, Authoritative DNS, and Unbound" /><published>2026-02-14T00:00:00+00:00</published><updated>2026-02-14T00:00:00+00:00</updated><id>https://prameshbajra.com/blog/dns-unbound</id><content type="html" xml:base="https://prameshbajra.com/blog/dns-unbound/"><![CDATA[<p><strong>I’ll be honest:</strong> In my last post about <strong>Pi-hole + Tailscale</strong>, I just simpley explained how to setup PI-hole with tailscale. Which works, amazing !! But, since I did not want the blog to be super long, I left out the nitty gritty details. This blog is like a second part to the first one, where I will explain the details of how everything works, some left out details and some of the concepts that I did not explain in the first blog post.</p>

<p>In this blog I will be covering things like:</p>

<ul>
  <li>
    <p><em>DNS servers</em></p>

    <ul>
      <li>
        <p><em>Resolvers</em></p>

        <ul>
          <li>
            <p>Stub Revolvers</p>
          </li>
          <li>
            <p>Recursive Resolvers</p>
          </li>
        </ul>
      </li>
      <li>
        <p><em>root servers</em></p>
      </li>
      <li>
        <p><em>TLD servers</em></p>
      </li>
      <li>
        <p><em>Authoritative Name Servers</em></p>
      </li>
    </ul>
  </li>
  <li>
    <p>“is Pi-hole a DNS server or not?”</p>
  </li>
  <li>
    <p>“who decides what a URL query like <code class="language-plaintext highlighter-rouge">example.com</code> resolves to?”</p>
  </li>
  <li>
    <p>“what does it mean when DNS ‘caches’ something?”</p>
  </li>
  <li>
    <p>Finally, what is Unbound and how does it fit into all of this?</p>
  </li>
</ul>

<p>Buckle up, this is gonna be a long read 😅 With some context and disclaimer out of the way, let’s get reading ! 📖</p>

<p><br /><br /></p>

<h2 id="how-the-flow-of-dns-resolution-works-the-basics">How the flow of DNS resolution works (the basics)</h2>

<p>If you already know about DNS basics, feel free to skip this section.</p>

<ul>
  <li>
    <p>Your device asks <strong>a resolver</strong>: “what is the IP for <code class="language-plaintext highlighter-rouge">www.example.com</code>?”.</p>
  </li>
  <li>
    <p>If the resolver has the answer cached, it replies immediately with the IP.</p>
  </li>
  <li>
    <p>If not, it has to <em>discover</em> the answer by walking this DNS hierarchy:</p>

    <ul>
      <li>
        <p>Ask a <strong>root server</strong>: “who handles <code class="language-plaintext highlighter-rouge">.com</code>?”</p>
      </li>
      <li>
        <p>Ask a <strong>TLD server</strong>: “who handles <code class="language-plaintext highlighter-rouge">example.com</code>?”</p>
      </li>
      <li>
        <p>Ask an <strong>authoritative server</strong>: “what is the record for <code class="language-plaintext highlighter-rouge">www.example.com</code>?”</p>
      </li>
    </ul>
  </li>
  <li>
    <p>The resolver caches the answer (for a while) and returns it to your device.
<br /><br /></p>
  </li>
</ul>

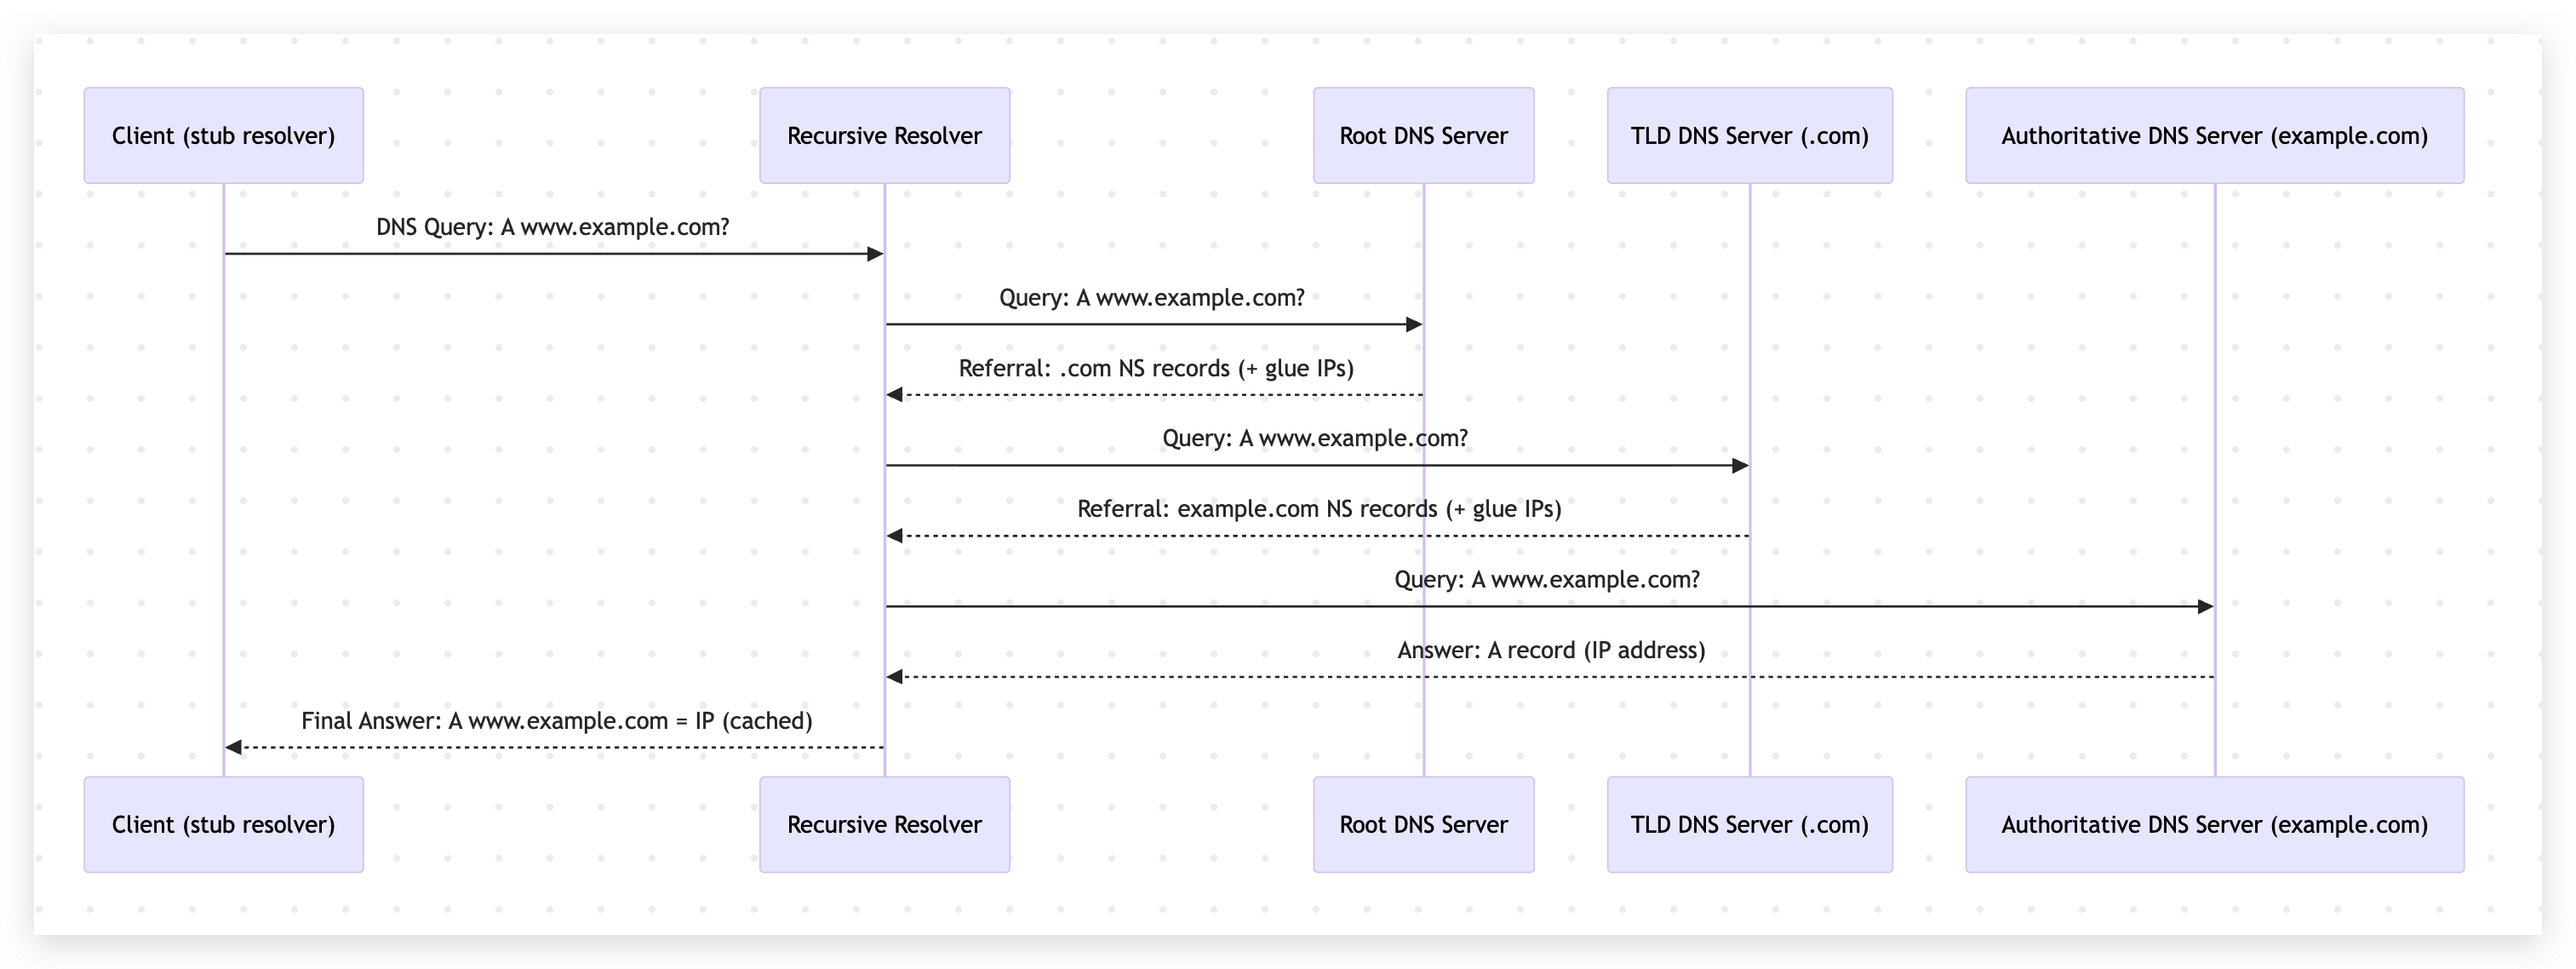
<p>That’s the whole story. With the IP you get from this your device can then connect to the web server hosting <code class="language-plaintext highlighter-rouge">www.example.com</code>. Here’s a quick diagram to visualize this:</p>

<p><img src="/static/assets/img/blog/pihole-tailscale/dnsresolution.png" alt="DNS resolution process" width="1600" height="602" style="width: 100%" loading="lazy" decoding="async" /></p>

<p><br /><br /></p>

<p>Now let’s break down the main players a bit more clearly.</p>

<p><br /></p>

<h2 id="dns-server-">DNS Server <br /><br /></h2>

<h2 id="resolvers-">Resolvers <br /><br /></h2>

<h3 id="stub-resolver">Stub resolver</h3>

<p>A <strong>stub resolver</strong> is the small DNS client on your device (phone, laptop, browser/OS stack).</p>

<p>Its job is simple:</p>

<ul>
  <li>
    <p>Take your query (for example, <code class="language-plaintext highlighter-rouge">www.example.com</code>)</p>
  </li>
  <li>
    <p>Send it to a configured DNS resolver</p>
  </li>
  <li>
    <p>Return the response to the app</p>
  </li>
</ul>

<p>It usually does <strong>not</strong> walk the whole DNS tree by itself.
<br /><br /></p>

<h3 id="recursive-resolver">Recursive resolver</h3>

<p>A <strong>recursive resolver</strong> is the one that does the heavy lifting. When you hear someone mention “resolver” in the context of DNS, they are usually referring to a recursive resolver.</p>

<p>already has the answer cached, it responds immediately.</p>

<p>If not, it performs the full lookup process:</p>

<ul>
  <li>
    <p>Root server</p>
  </li>
  <li>
    <p>TLD server</p>
  </li>
  <li>
    <p>Authoritative name server</p>
  </li>
</ul>

<p>Then it caches the answer and sends it back to your device. You can see the recursive resolver in the diagram above. 
<br /><br /></p>

<h3 id="root-servers">Root servers</h3>

<p>Root servers are the starting point of public DNS.</p>

<p>They do not usually know the final IP for <code class="language-plaintext highlighter-rouge">www.example.com</code>.</p>

<p>What they do know is: who is responsible for each top-level domain (<code class="language-plaintext highlighter-rouge">.com</code>, <code class="language-plaintext highlighter-rouge">.org</code>, <code class="language-plaintext highlighter-rouge">.net</code>, etc.).</p>

<p>So when asked about <code class="language-plaintext highlighter-rouge">www.example.com</code>, the root points the resolver to the <code class="language-plaintext highlighter-rouge">.com</code> TLD servers.
<br /><br /></p>

<h3 id="tld-servers">TLD servers</h3>

<p>TLD (Top Level Domain) servers manage domains under a specific TLD.</p>

<p>For example, <code class="language-plaintext highlighter-rouge">.com</code> TLD servers do not know every record for every <code class="language-plaintext highlighter-rouge">.com</code> domain, but they know
which <strong>authoritative name servers</strong> are responsible for <code class="language-plaintext highlighter-rouge">example.com</code>.</p>

<p>So they return something like: “ask these name servers next.”
<br /><br /></p>

<h3 id="authoritative-name-servers">Authoritative name servers</h3>

<p>Authoritative name servers are the final source of truth for a domain’s DNS records.</p>

<p>This is where records like <code class="language-plaintext highlighter-rouge">A</code>, <code class="language-plaintext highlighter-rouge">AAAA</code>, <code class="language-plaintext highlighter-rouge">CNAME</code>, <code class="language-plaintext highlighter-rouge">MX</code>, <code class="language-plaintext highlighter-rouge">TXT</code>, etc. are stored.</p>

<p>When the recursive resolver asks for <code class="language-plaintext highlighter-rouge">www.example.com</code>, the authoritative server provides the
actual answer and a TTL value.
<br /><br /></p>

<h2 id="is-pi-hole-a-dns-server-or-not">Is Pi-hole a DNS server or not?</h2>

<p>Short answer: <strong>yes</strong>.</p>

<p>But more specifically, Pi-hole is usually a <strong>filtering forwarder</strong> (a DNS sinkhole), not a full
recursive resolver by default.</p>

<p>In practice, Pi-hole does three important things:</p>

<ul>
  <li>
    <p>Receives DNS queries from your devices</p>
  </li>
  <li>
    <p>Blocks known ad/tracker domains based on blocklists</p>
  </li>
  <li>
    <p>Forwards allowed queries to an upstream resolver</p>
  </li>
</ul>

<p>So yes, Pi-hole is acting as your DNS server from the client point of view.</p>

<p>However, unless you pair it with something like Unbound, Pi-hole is typically forwarding those
queries to another DNS provider (Cloudflare, Google, Quad9, etc.) for final resolution.
<br /><br /></p>

<h2 id="dns-caching">DNS caching</h2>

<p>DNS caching means: “save the answer for some time so we do not have to ask again immediately.”</p>

<p>The authoritative server includes a <strong>TTL</strong> (time to live) with each DNS answer.</p>

<p>Resolvers cache that answer for TTL seconds.</p>

<p>If another request for the same name arrives before TTL expires, resolver returns the cached answer.</p>

<p>This improves speed and reduces load, but it also means DNS changes are not visible everywhere
instantly.</p>

<p>Caching can happen at multiple layers:</p>

<ul>
  <li>
    <p>Browser cache</p>
  </li>
  <li>
    <p>OS cache</p>
  </li>
  <li>
    <p>Local resolver cache (Pi-hole / router / enterprise DNS)</p>
  </li>
  <li>
    <p>Upstream recursive resolver cache</p>
  </li>
</ul>

<p>Also, negative results can be cached too (for example, “domain does not exist”), which is called
<strong>negative caching</strong>.
<br /><br /></p>

<h2 id="finally-unbound-and-where-does-it-fit">Finally: Unbound and where does it fit?</h2>

<p><strong>Unbound</strong> is a lightweight, validating, recursive DNS resolver.</p>

<p>If you run Pi-hole + Unbound together, the flow usually looks like this:</p>

<ol>
  <li>
    <p>Device asks Pi-hole</p>
  </li>
  <li>
    <p>Pi-hole blocks or allows query</p>
  </li>
  <li>
    <p>If allowed, Pi-hole forwards to local Unbound</p>
  </li>
  <li>
    <p>Unbound recursively resolves via root -&gt; TLD -&gt; authoritative</p>
  </li>
  <li>
    <p>Unbound returns answer to Pi-hole, Pi-hole returns answer to device</p>
  </li>
</ol>

<p>That setup gives you a few nice benefits:</p>

<ul>
  <li>
    <p>More privacy: fewer third-party public resolvers in the middle</p>
  </li>
  <li>
    <p>More control: your own recursive resolution path</p>
  </li>
  <li>
    <p>Local caching: faster repeat lookups</p>
  </li>
  <li>
    <p>DNSSEC validation support (when configured), which improves trust in responses</p>
  </li>
</ul>

<p>In other words, Pi-hole handles filtering and visibility, while Unbound handles recursive DNS work.
They complement each other really well.
<br /><br /></p>

<h2 id="putting-it-all-together-with-the-previous-post">Putting it all together with the previous post</h2>

<p>In the previous blog, we routed selected devices through Pi-hole using Tailscale.</p>

<p>Now, with this deeper DNS view, that setup should make much more sense:</p>

<ul>
  <li>
    <p>Tailscale decides <strong>which devices</strong> use your private DNS path</p>
  </li>
  <li>
    <p>Pi-hole decides <strong>which domains</strong> are blocked</p>
  </li>
  <li>
    <p>Unbound decides <strong>how allowed domains are resolved</strong> (recursively)</p>
  </li>
</ul>

<p>This separation keeps things clean and easy to reason about.
<br /><br /></p>

<h2 id="final-thoughts">Final thoughts</h2>

<p>If you made it this far, you now understand the most important DNS pieces people usually skip:
stub resolvers, recursive resolvers, root/TLD/authoritative hierarchy, caching, and where Pi-hole
and Unbound fit in.</p>

<p>Once these concepts click, DNS stops feeling “magical” and starts feeling predictable.</p>

<p>And that is exactly what you want when this is powering your home network.
<br /><br /></p>

<p>Feel free to reach out if you have any questions or want to discuss further! I hope this was helpful in demystifying DNS and how Pi-hole + Unbound work together.</p>

<p><br /><br /></p>]]></content><author><name>Pramesh Bajracharya</name><email>pe.messh@gmail.com</email></author><category term="networking" /><category term="homelab" /><category term="security" /><summary type="html"><![CDATA[How a DNS query actually resolves — root servers, authoritative nameservers, and running Unbound as your own recursive resolver behind Pi-hole.]]></summary><media:thumbnail xmlns:media="http://search.yahoo.com/mrss/" url="https://prameshbajra.com/static/assets/img/og/dns-unbound.png" /><media:content medium="image" url="https://prameshbajra.com/static/assets/img/og/dns-unbound.png" xmlns:media="http://search.yahoo.com/mrss/" /></entry><entry><title type="html">Pihole + Tailscale Setup Guide</title><link href="https://prameshbajra.com/blog/pihole-and-tailscale/" rel="alternate" type="text/html" title="Pihole + Tailscale Setup Guide" /><published>2026-01-11T00:00:00+00:00</published><updated>2026-01-11T00:00:00+00:00</updated><id>https://prameshbajra.com/blog/pihole-and-tailscale</id><content type="html" xml:base="https://prameshbajra.com/blog/pihole-and-tailscale/"><![CDATA[<p>I’ll be honest: this blog is mainly a form of documentation for myself, a record of what I did and what I learned while setting up an ad-blocking mechanism on my home server. While running Pi-hole is relatively straightforward, using it properly usually means changing your router’s DNS settings to point to the Pi-hole server. That’s a step I wasn’t entirely comfortable with.</p>

<p>The main issue is reliability. If your DNS server ever goes down, you’re suddenly stuck without internet access and forced to log into your router to fix things. In my case, that’s especially annoying because my router’s admin interface is entirely in German, with no option to change the language. It’s not a deal breaker, but it definitely adds unnecessary friction. On top of that, routing all your devices through Pi-hole isn’t always desirable. You may not want ad blocking on every single device in your network, right?</p>

<p>This is where Tailscale comes into the picture - and where the blog shifts from being just a “Pi-hole setup” to a “Pi-hole + Tailscale setup.” Instead of modifying router-level DNS settings, Tailscale allows you to selectively route only specific devices through Pi-hole. This gives you fine-grained control over which devices have ads blocked, without putting your entire network at risk if something goes wrong.
<br /><br /></p>

<h2 id="high-level-overview-of-what-we-are-going-to-do">High level overview of what we are going to do</h2>

<p>Before getting into the setup, here’s a quick overview of what we’re building. Pi-hole will run inside a Docker container on my home server and act as the DNS server. Tailscale will be used to securely connect selected devices to this server, allowing them to use Pi-hole for DNS without modifying any router-level settings.</p>

<p>For some quick context: Pi-hole is a network-level ad blocker. Instead of running inside a browser, it works by blocking requests to known ad and tracking domains at the DNS level. This means ads are filtered out before they ever reach your device, and the blocking applies to all apps and browsers that use DNS, without needing to install anything locally.
<br /><br /></p>

<h2 id="optional-how-everything-works-under-the-hood">Optional: How everything works under the hood</h2>

<p>This section is optional and a bit more technical. If you just want to get Pi-hole and Tailscale up and running, feel free to skip ahead to the next section.</p>

<p>If, however, you’d like a deeper understanding of how DNS resolution works, how devices get their network configuration, and how Tailscale and Pi-hole fit into the picture, this section walks through those concepts step by step.</p>

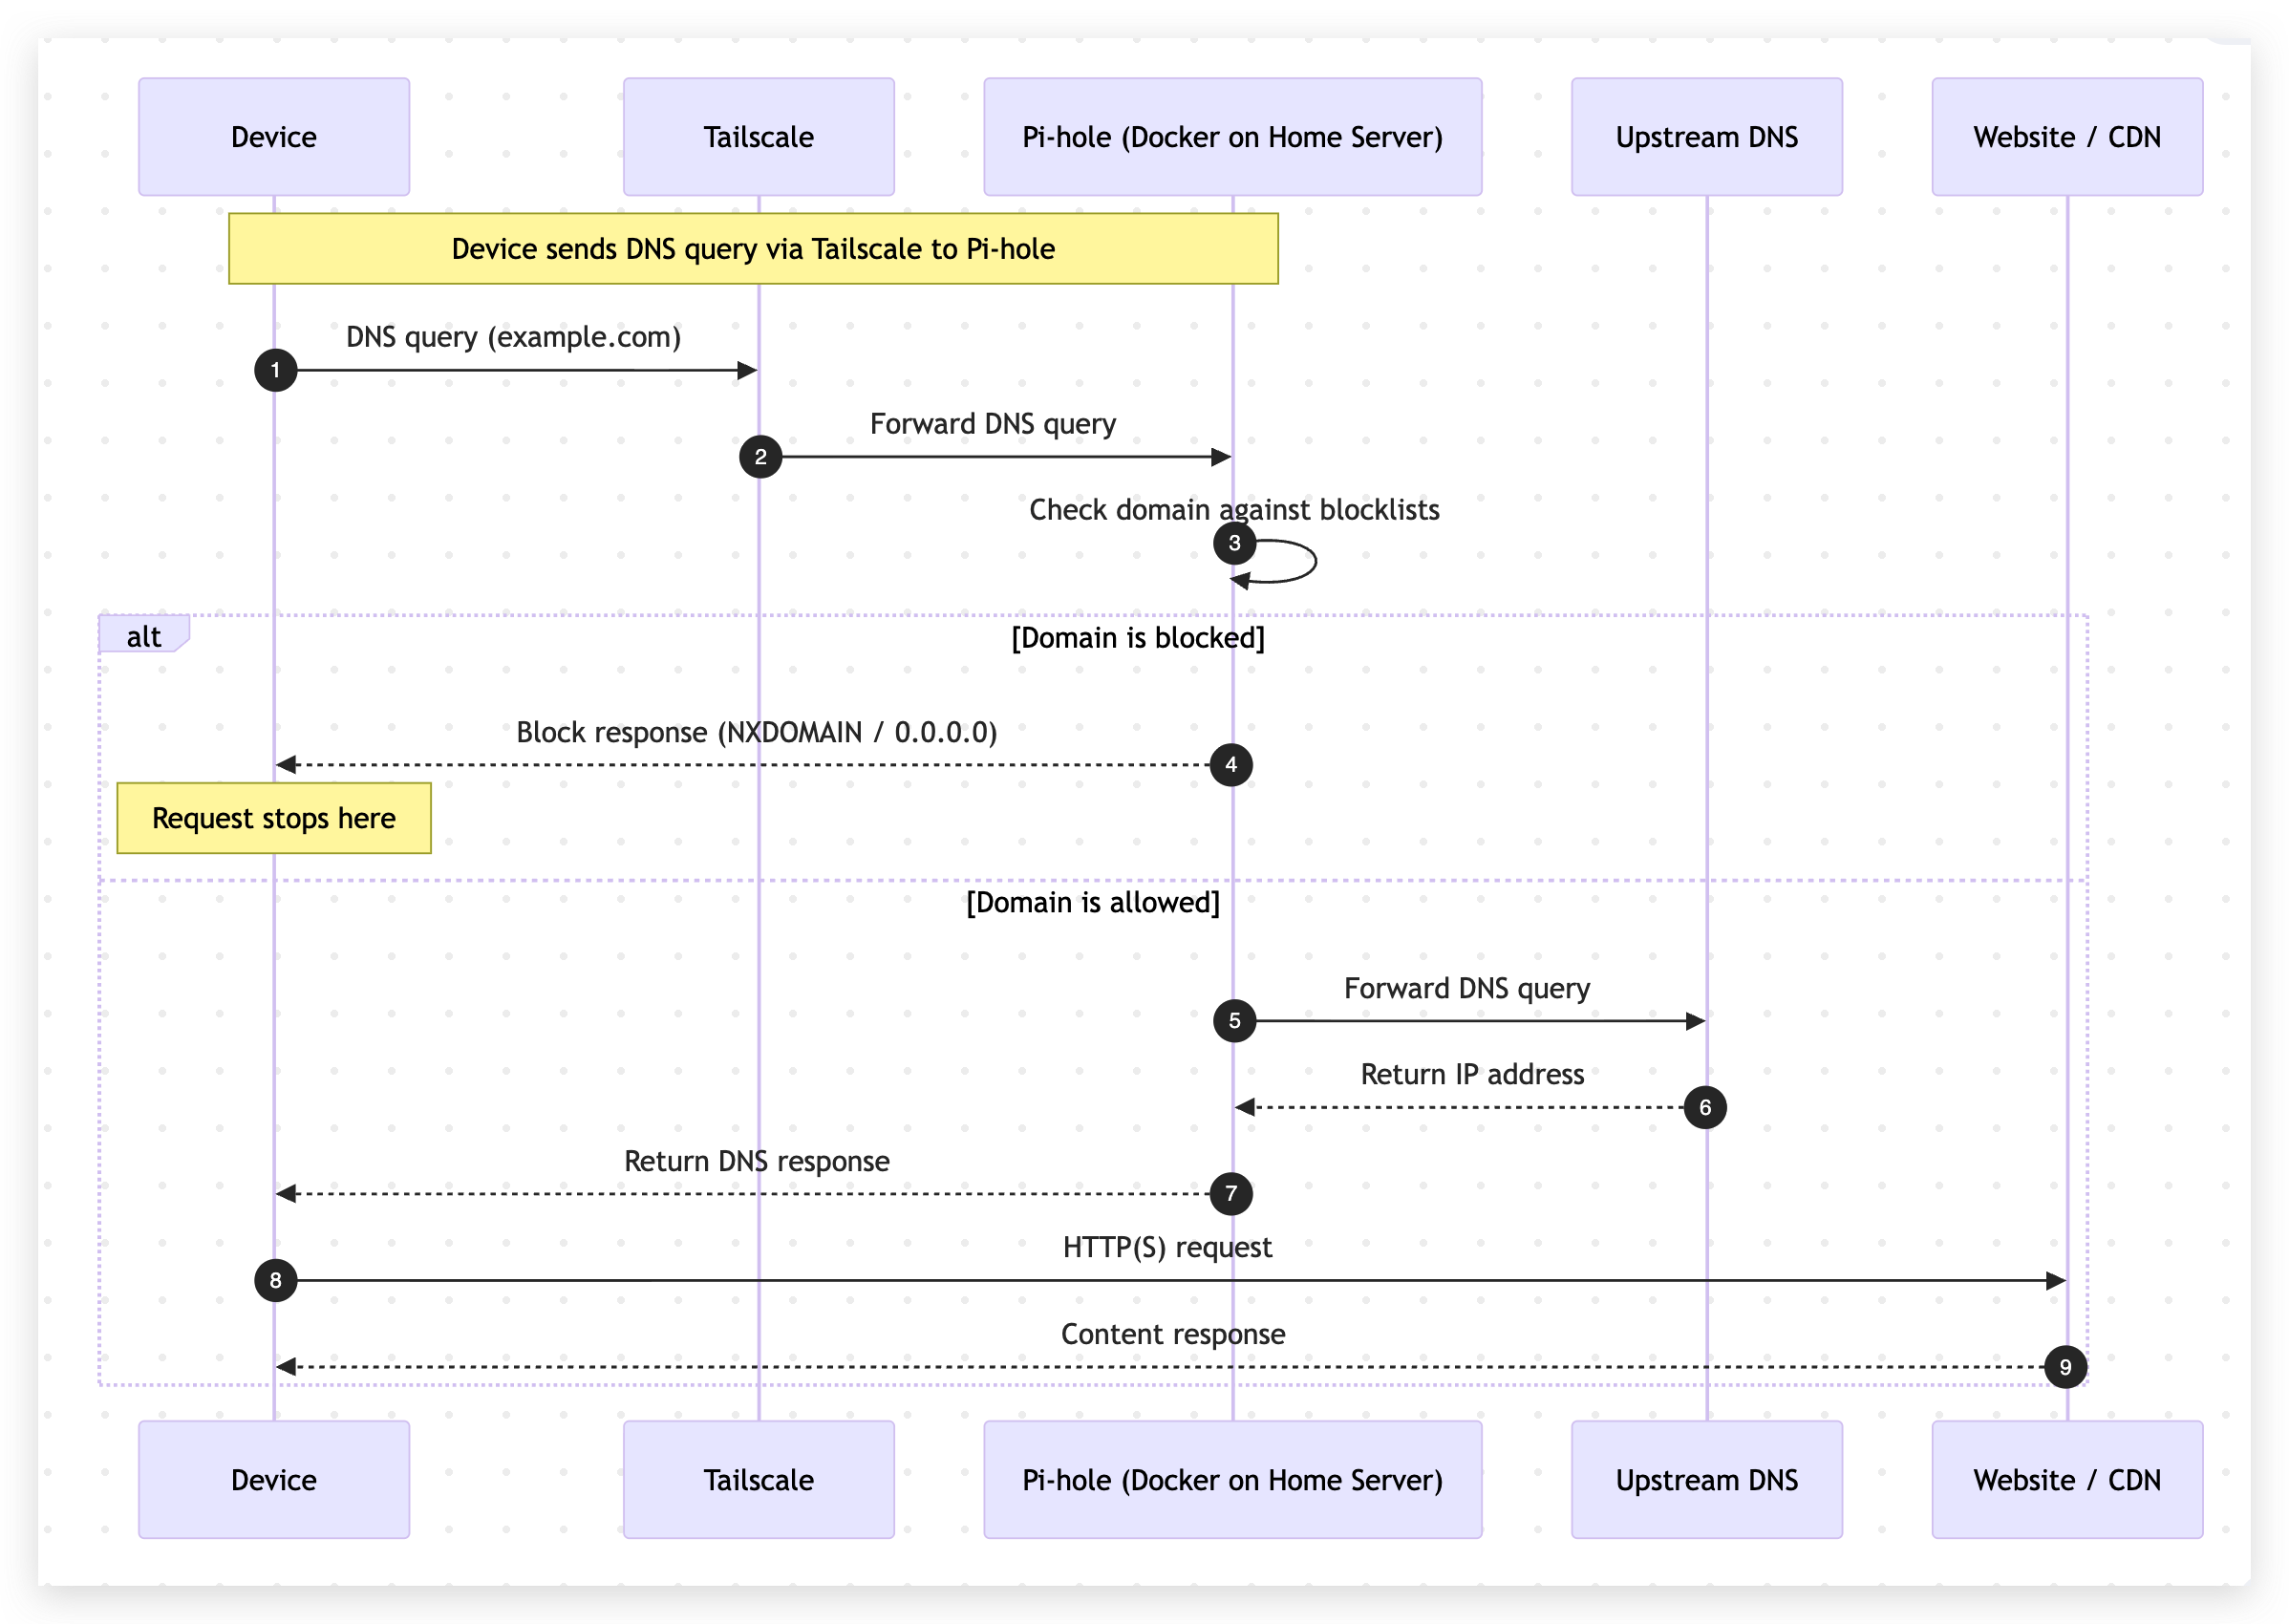
<p>Here is a small sequence diagram that illustrates the flow of DNS requests in this setup for requests that are blocked and allowed by Pi-hole:</p>

<p><img src="/static/assets/img/blog/pihole-tailscale/SequenceDiagram.png" alt="Sequence Diagram" width="1144" height="812" style="width: 50%" loading="lazy" decoding="async" /></p>

<p><br /><br /></p>

<h3 id="dns">DNS</h3>

<p>DNS (Domain Name System) is responsible for translating human-readable domain names (like <code class="language-plaintext highlighter-rouge">example.com</code>) into IP addresses that computers can communicate with.</p>

<p>Whenever a device wants to access a website, it performs a DNS lookup to determine where that service is hosted. If DNS stops working, most internet access effectively stops as well.</p>

<p>This makes DNS a critical component of any network and also a powerful place to apply filtering and control.
<br /><br /></p>

<h3 id="tailscale">Tailscale</h3>

<p>Tailscale is used in this setup to connect selected devices to the home server without exposing anything to the public internet or modifying the existing network configuration.</p>

<p>Under the hood, Tailscale creates a private network between all devices connected to the same account. Each device authenticates using your Tailscale identity, receives a stable Tailscale IP address, and can securely communicate with other devices in that network as if they were on the same local network. Even if they are physically located elsewhere.</p>

<p>Unlike traditional VPNs, Tailscale does not rely on a single central server to route all traffic. Instead, it forms a mesh network where devices connect directly to each other whenever possible. This reduces latency, improves reliability, and avoids unnecessary bottlenecks. From the perspective of the operating system, the connection behaves like a normal network interface.</p>

<p>One of the most useful features of Tailscale in this setup is its DNS integration. Tailscale allows you to define global DNS servers that apply only within the Tailscale network. This makes it possible to override DNS resolution for connected devices without touching router-level settings or affecting the rest of the network.</p>

<p>By pointing Tailscale’s DNS configuration to the home server, only devices connected through Tailscale will attempt to use Pi-hole for DNS. At the same time, fallback DNS servers can be configured to ensure that name resolution continues to work if the Pi-hole service is temporarily unavailable.</p>

<p>In practice, this means you get fine-grained control over which devices use Pi-hole, a stable and secure connection to the home server, and a setup that remains resilient even when parts of it are offline.
<br /><br /></p>

<h3 id="pi-hole">Pi-hole</h3>

<p>Pi-hole acts as the DNS server for selected devices in this setup, sitting between those devices and the wider internet. Instead of simply resolving domain names, it inspects DNS queries and decides whether a request should be allowed or blocked.</p>

<p>The core idea behind Pi-hole is simple: most ads, trackers, and many malicious services rely on well-known domain names. Pi-hole maintains curated block lists containing these domains. When a device makes a DNS request that matches one of them, Pi-hole responds with a blocking answer, preventing the connection from ever being established. Since the request is stopped at the DNS level, no ad content is downloaded and no client-side extensions are required.</p>

<p>Because this filtering happens at the network layer, it applies uniformly across browsers, applications, and even devices that do not support traditional ad blockers. From the client’s perspective, the request simply fails to resolve.</p>

<p>Pi-hole also provides detailed visibility into DNS activity through its query log. Every request, allowed or blocked, is recorded, making it easy to see which domains devices are attempting to reach. This is invaluable not only for understanding what is being blocked, but also for troubleshooting applications, identifying misbehaving devices, and gaining insight into overall network behavior.</p>

<p>In this setup, Pi-hole becomes more than just an ad blocker it serves as a centralized control and observability point for DNS traffic.
<br /><br /></p>

<p>With the background out of the way, it’s time to get our hands dirty and start the actual setup.
<br /><br /></p>

<h2 id="things-you-will-need-to-install">Things you will need to install</h2>

<ol>
  <li>
    <p>Docker<br />
Install Docker on your home server.</p>
  </li>
  <li>
    <p>Tailscale<br />
Install Tailscale on your home server and on the devices you want to use Pi-hole as a DNS server.<br />
Download link: https://tailscale.com/download
<br /><br /></p>
  </li>
</ol>

<h2 id="setup">Setup</h2>

<p>We’ll begin with Tailscale, as it forms the foundation for everything that follows. Getting connectivity and DNS routing in place first makes it easier to add Pi-hole and verify each step as we go.
<br /><br /></p>

<h3 id="tailscale-setup">Tailscale setup</h3>

<p>We will start by setting up Tailscale <strong>before</strong> Pi-hole is running. This is intentional and safe, and I’ll explain why later.</p>

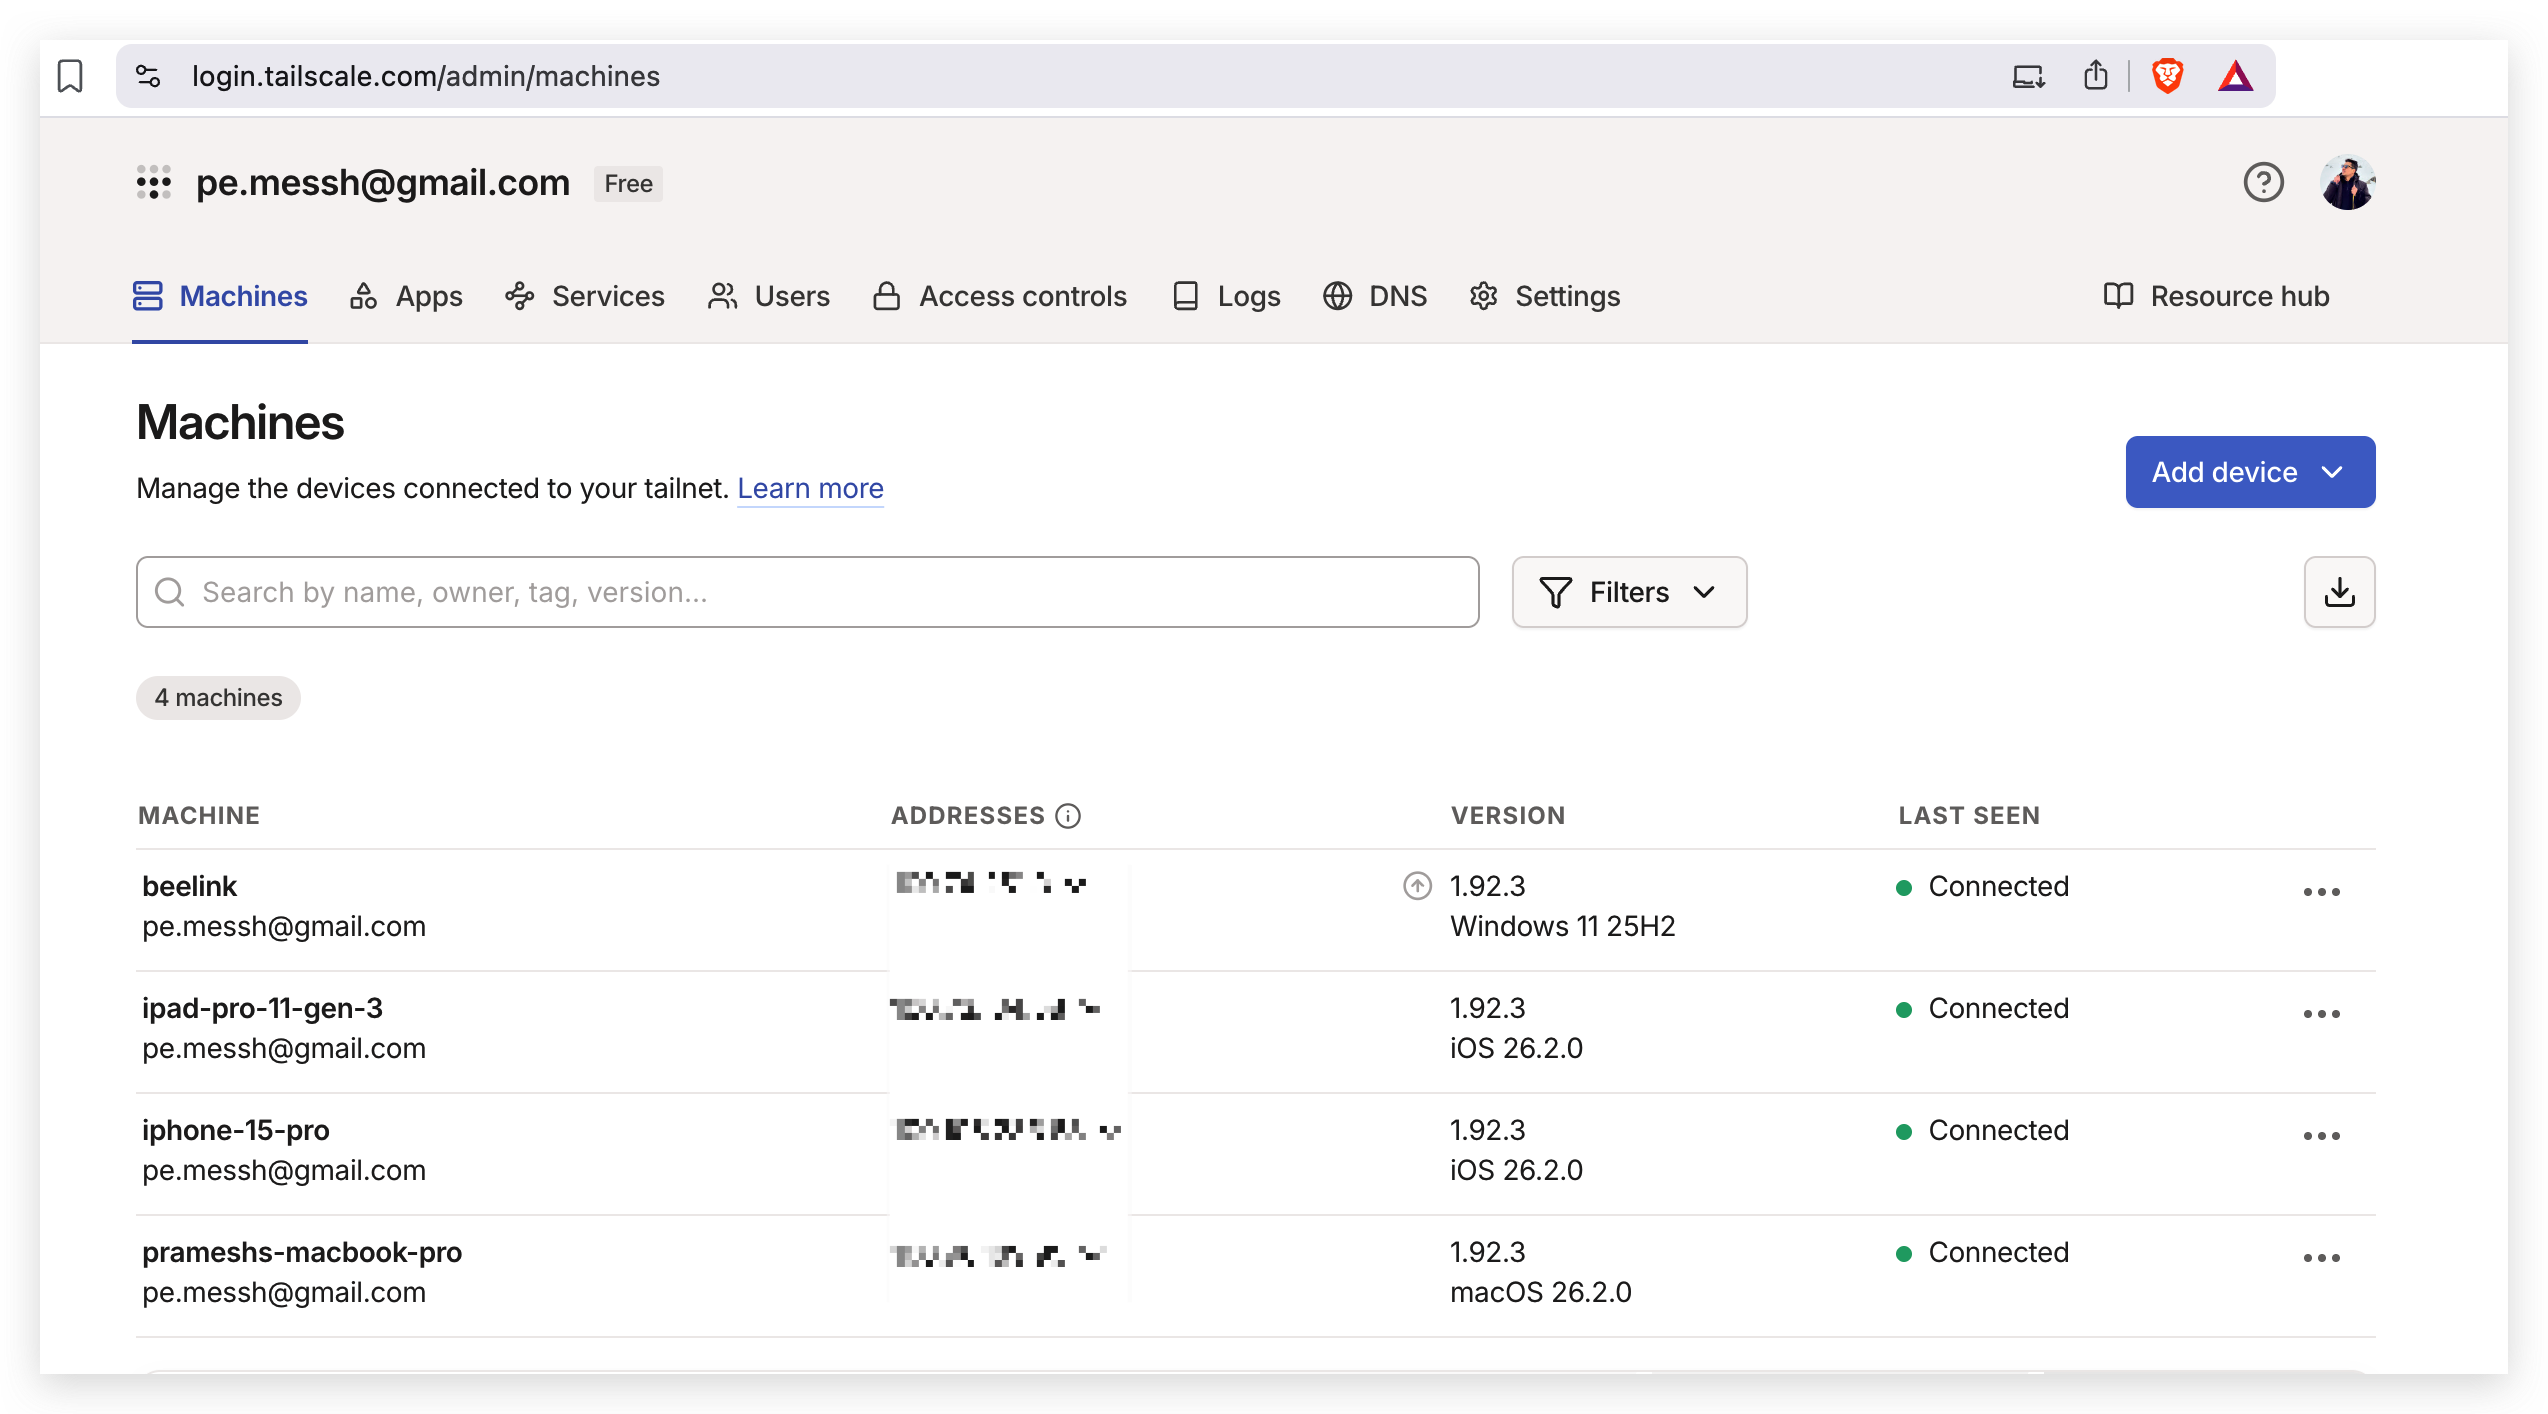
<p>Before we begin, this page is where you can see all your connected devices and their Tailscale IP addresses:<br />
<a href="https://login.tailscale.com/admin/machines" target="_blank">https://login.tailscale.com/admin/machines</a></p>

<p><img src="/static/assets/img/blog/pihole-tailscale/TailscaleDevices.png" alt="Tailscale Machines" width="915" height="508" style="width: 40%" loading="lazy" decoding="async" />
<br /><br /></p>

<p>Now, here’s what needs to be done.</p>

<ol>
  <li>
    <p>Head over to the Tailscale admin DNS settings. You can access it here:<br />
<a href="https://login.tailscale.com/admin/dns" target="_blank">https://login.tailscale.com/admin/dns</a></p>
  </li>
  <li>
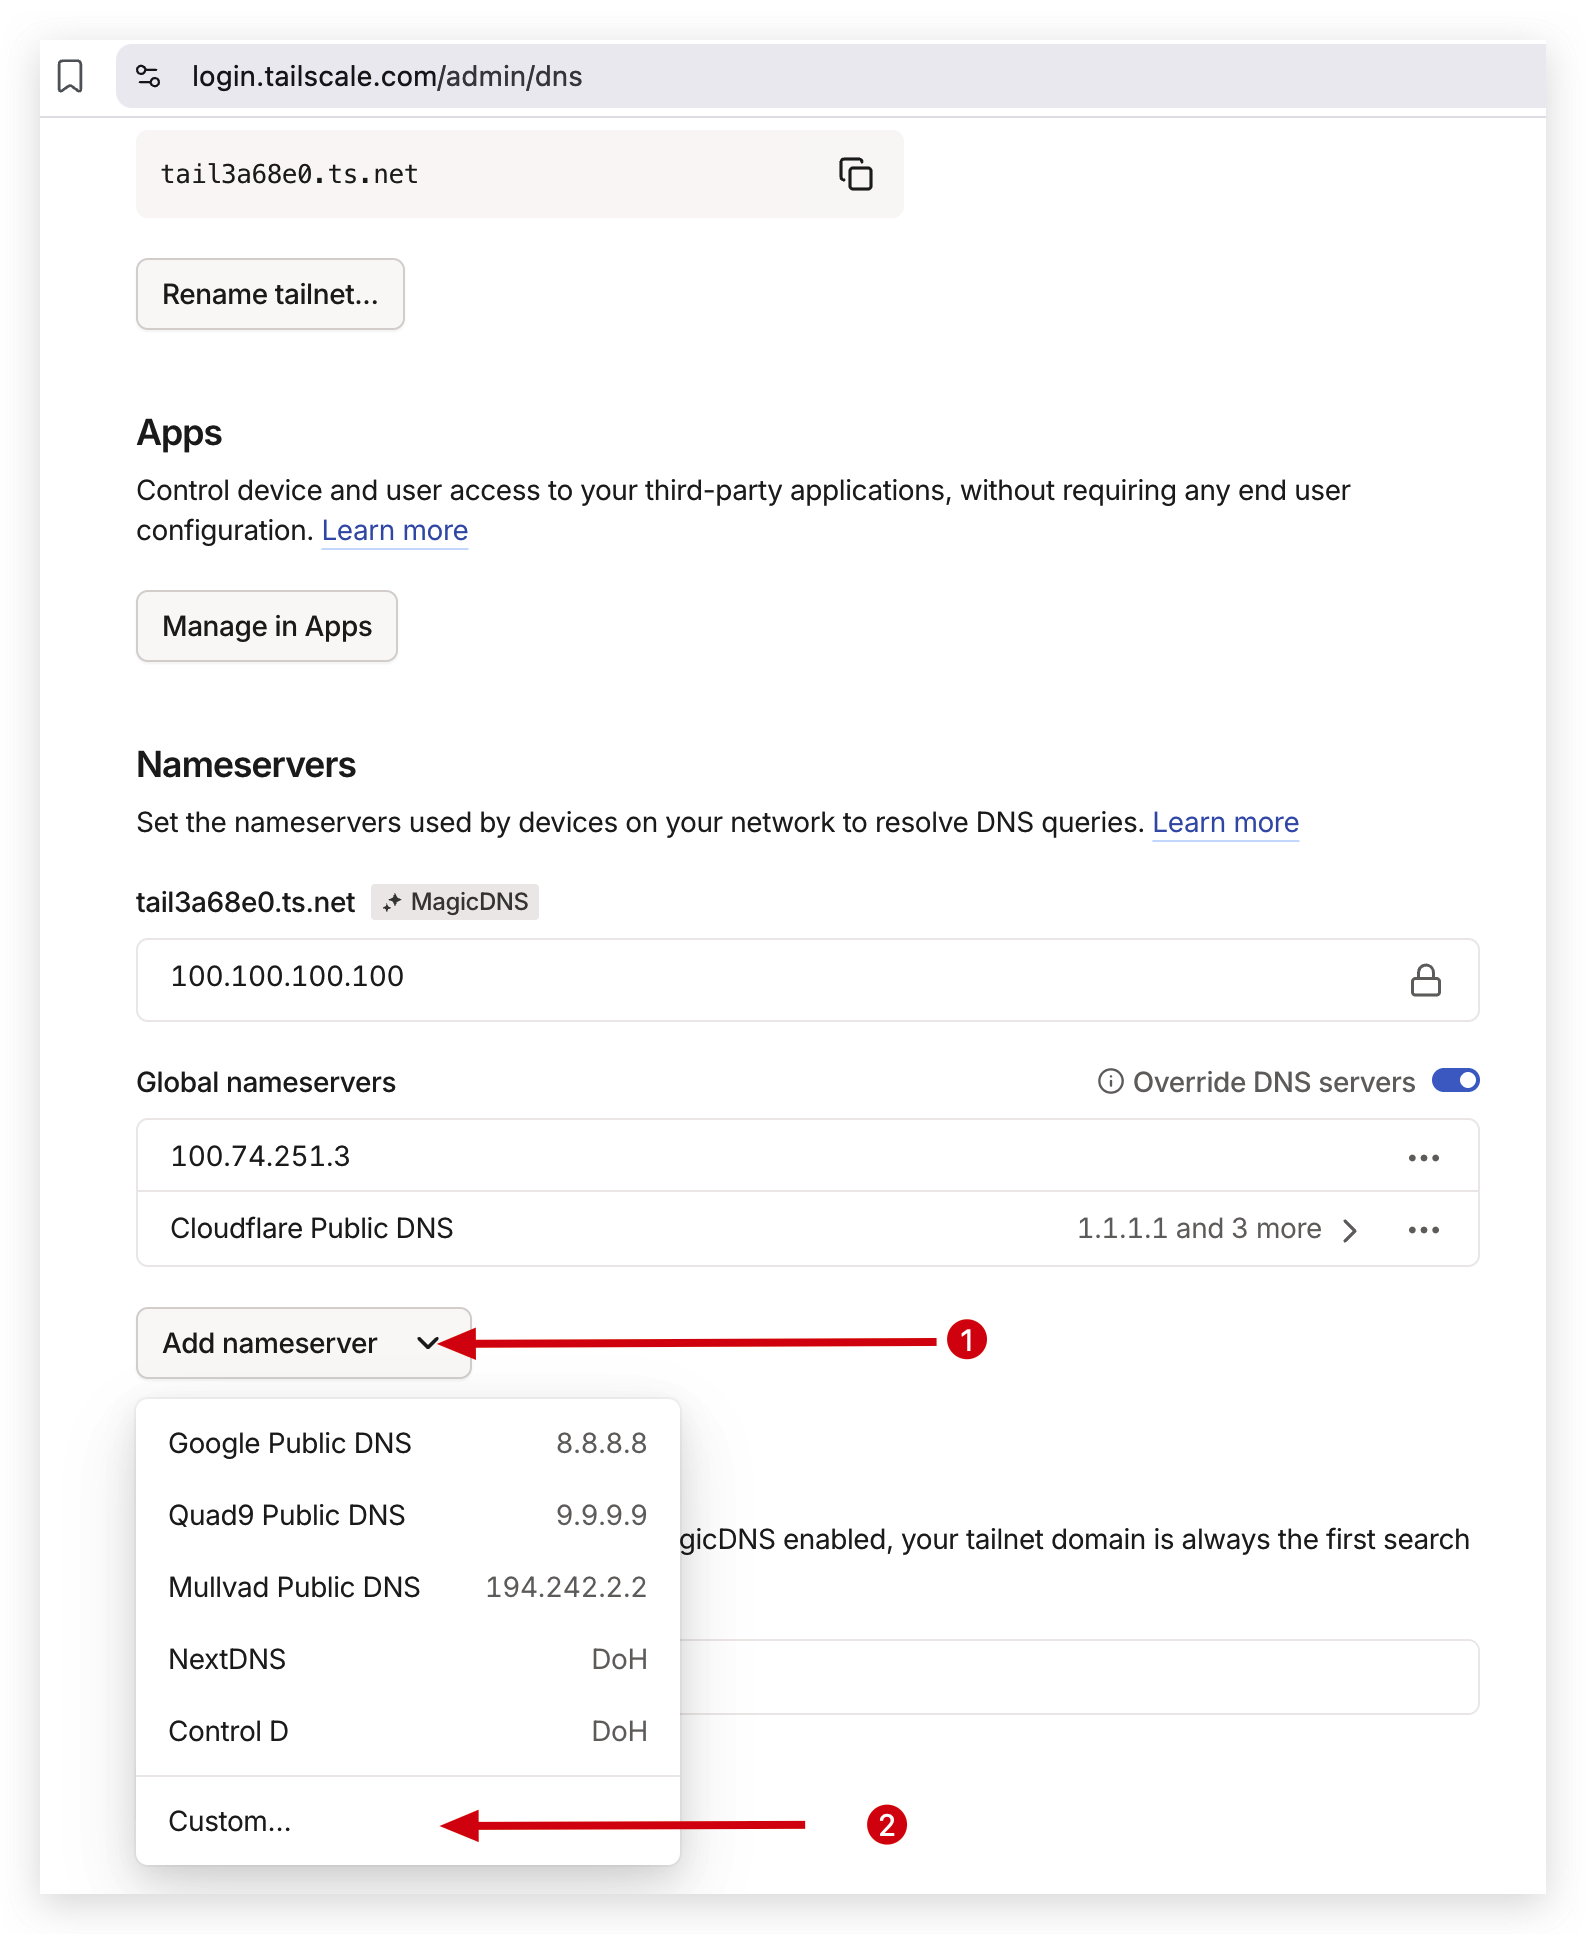
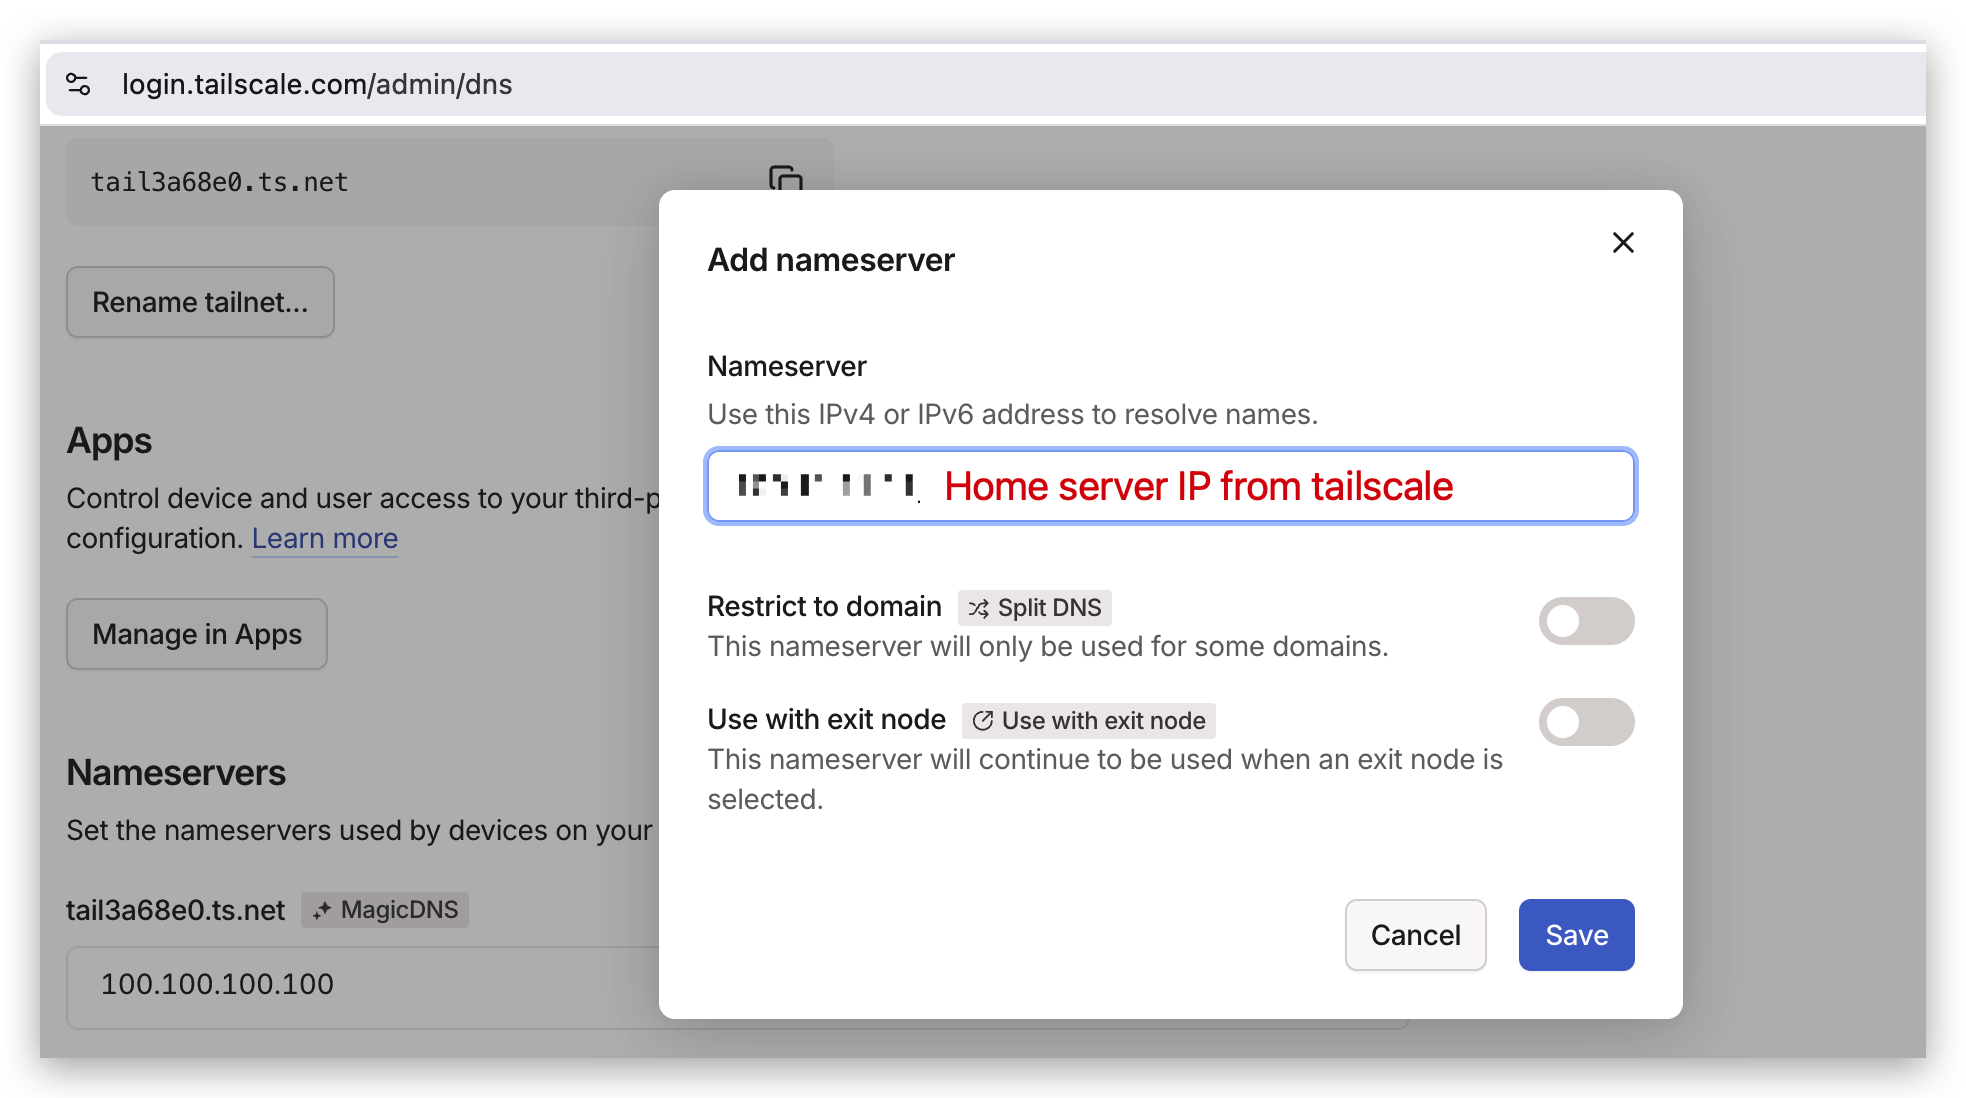
    <p>In the <strong>Global nameservers</strong> section, click <code class="language-plaintext highlighter-rouge">Add a global nameserver</code>.<br />
Select <code class="language-plaintext highlighter-rouge">Add nameserver &gt; Custom nameserver</code>, then enter your home server’s Tailscale IP address.</p>

    <p><img src="/static/assets/img/blog/pihole-tailscale/TailscaleStep1.png" alt="Tailscale DNS setup step 1" width="915" height="1116" style="width: 40%" loading="lazy" decoding="async" /></p>
  </li>
  <li>
    <p>The Tailscale IP address should look something like <code class="language-plaintext highlighter-rouge">100.10.1.12</code>.<br />
After entering the IP address, click <strong>Save</strong>.</p>

    <p><img src="/static/assets/img/blog/pihole-tailscale/TailscaleStep2.png" alt="Tailscale DNS setup step 2" width="915" height="511" style="width: 40%" loading="lazy" decoding="async" /></p>
  </li>
  <li>
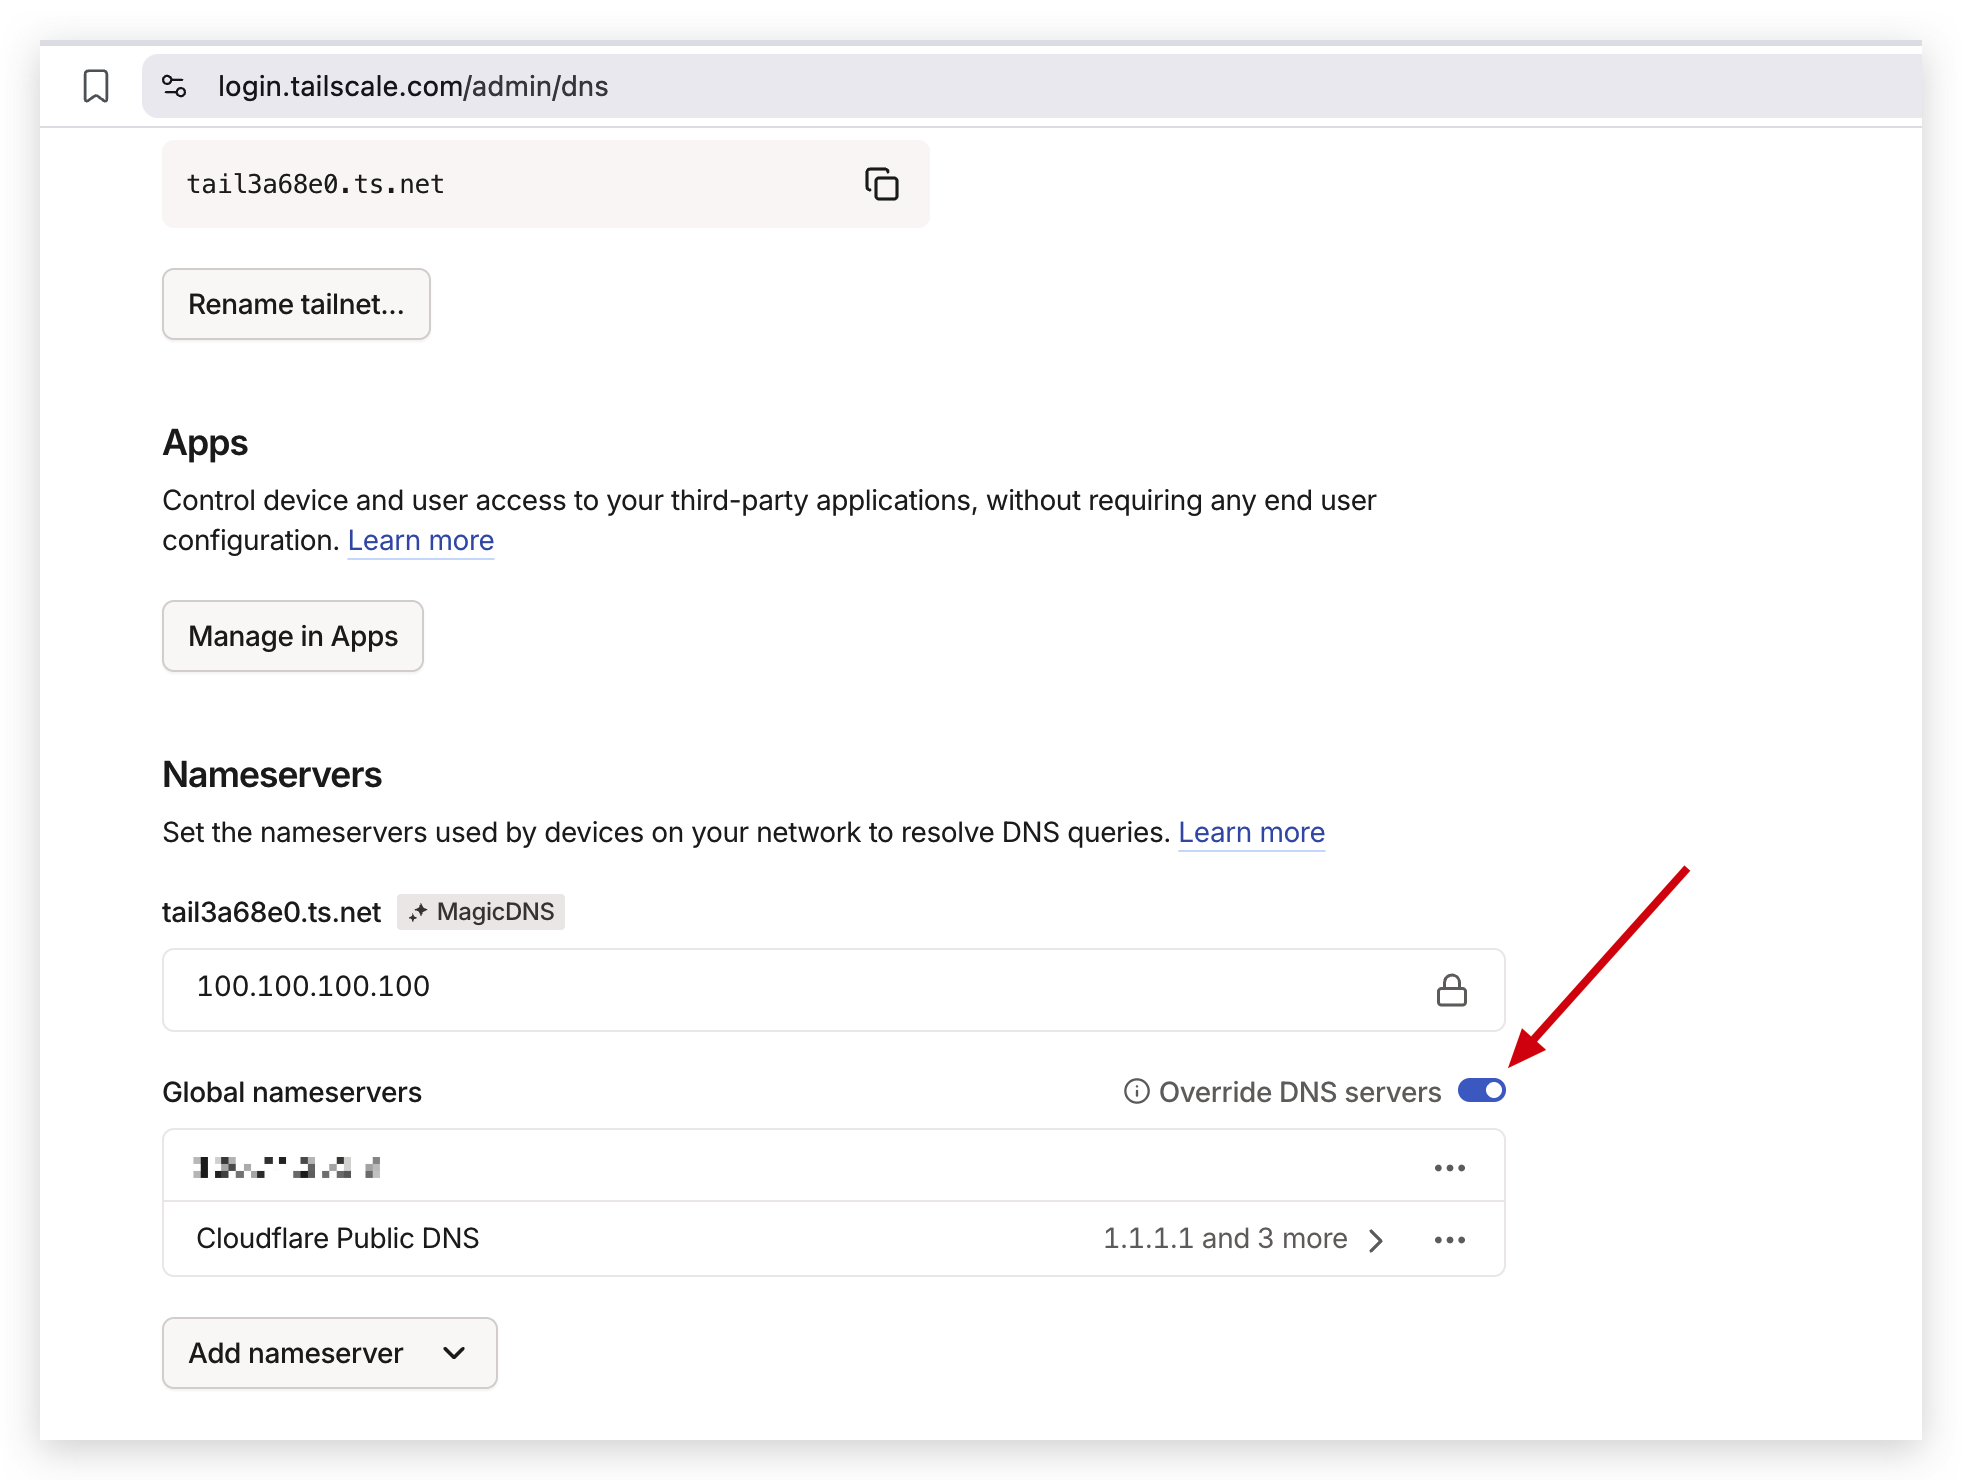
    <p>Add a second <strong>Global nameserver</strong> as a fallback.<br />
You can use <code class="language-plaintext highlighter-rouge">Google</code>, <code class="language-plaintext highlighter-rouge">Cloudflare</code>, or <code class="language-plaintext highlighter-rouge">Quad9</code>—any of them are fine.<br />
After that, enable the <code class="language-plaintext highlighter-rouge">Override DNS servers</code> option.</p>

    <p><img src="/static/assets/img/blog/pihole-tailscale/TailscaleStep3.png" alt="Tailscale DNS setup step 3" width="915" height="690" style="width: 40%" loading="lazy" decoding="async" /></p>
  </li>
</ol>

<p>This is all that’s required on the Tailscale side.</p>

<p>At this point, all devices connected to your Tailscale network will attempt to use the Pi-hole server as their DNS server. Since we’ve configured a fallback DNS provider, your internet connection will continue to work even though Pi-hole is not running yet. This is the reason why we set up Tailscale first—it ensures that your devices remain connected to the internet while we configure Pi-hole.
<br /><br /></p>

<h3 id="pi-hole-setup">Pi-hole setup</h3>

<p>With Tailscale configured, the next step is to set up Pi-hole on the home server.</p>

<p>Pi-hole will run inside a Docker container and act as the DNS server for devices connected via Tailscale. Since Tailscale is already configured to forward DNS queries to this machine, DNS resolution and ad blocking will start working as soon as Pi-hole is up and running.</p>

<p>It is very simple to get Pi-hole running using Docker. Here’s the command you need to run:</p>

<p>Create a <code class="language-plaintext highlighter-rouge">docker-compose.yml</code> file and copy and paste the content from this link: 
<a href="https://github.com/pi-hole/docker-pi-hole/#running-pi-hole-docker" target="_blank">https://github.com/pi-hole/docker-pi-hole/#running-pi-hole-docker</a></p>

<p>You can make modifications to the file as per your requirements in this file. This basically is the configuration file for Pi-hole.</p>

<p>After that, run <code class="language-plaintext highlighter-rouge">docker-compose up -d</code> to start the Pi-hole container.</p>

<p>And that’s it! Pi-hole should now be running and ready to accept DNS queries from your Tailscale-connected devices. To check if you can access the Pi-hole dashboard, open a web browser and navigate to <code class="language-plaintext highlighter-rouge">http://&lt;HOMESERVER_IP&gt;:&lt;PORT&gt;/admin</code> (if you want to access it from any other device) or  <code class="language-plaintext highlighter-rouge">localhost:80/admin</code> if you want to access it from the home server itself.</p>

<p><em>Note:</em> You can use the home server’s Tailscale IP address to access the Pi-hole dashboard from any device connected to your Tailscale network. For example, if you want to access the dashboard from your phone, simply make sure the device is connected to Tailscale. You can then open the Pi-hole admin interface using the server’s Tailscale IP address.</p>

<p>Tailscale IP addresses typically look like <code class="language-plaintext highlighter-rouge">100.x.x.x</code>, so the dashboard would be accessible at a URL like:</p>

<p><code class="language-plaintext highlighter-rouge">http://100.x.x.x/admin</code></p>

<p>This works because Tailscale places all devices connected to the same account into a private mesh network, allowing them to communicate with each other as if they were on the same local network.
<br /><br /></p>

<h3 id="assigning-a-static-ip-to-your-home-server">Assigning a static IP to your home server</h3>

<p>This is the nice part of the setup. Since we’re using Tailscale, we don’t actually need to assign a static IP address to the home server at the router level.</p>

<p>Tailscale automatically assigns a stable IP address to every device connected to the same account. This IP remains consistent across reboots and network changes, and it’s the address used by our devices when sending DNS queries to Pi-hole. As long as Tailscale is running, the home server is always reachable at the same IP, without any additional router configuration.
<br /><br /></p>

<h2 id="final-thoughts">Final thoughts</h2>

<p>At this point, the setup is complete. We now have a Pi-hole instance running on a home server, selectively providing DNS-based ad blocking to chosen devices via Tailscale—without modifying any router-level settings.</p>

<p>This approach keeps the network flexible and resilient. Devices that should use Pi-hole can opt in simply by connecting to Tailscale, while everything else continues to function as before. If Pi-hole ever goes down, fallback DNS ensures connectivity, and the rest of the network remains unaffected.</p>

<p>More importantly, this setup avoids many of the common pitfalls of network-wide DNS changes. There’s no risk of accidentally taking the entire network offline, no need to fight router interfaces, and no requirement for static LAN IPs thanks to Tailscale’s stable addressing.</p>

<p>From here, there’s plenty of room to extend the setup by adding Unbound for recursive DNS resolution, fine-tuning block lists, or using Pi-hole’s query logs to better understand network traffic. But even without those extras, this configuration already strikes a good balance between control, reliability, and simplicity.
<br /><br /></p>

<blockquote>
  <p><strong>WITH THAT SAY GOODBYE TO ADS! 😉</strong></p>
</blockquote>

<p><br />
If this guide helped you, consider experimenting further and adapting it to your own needs. If you run into issues while setting this up or have questions about adapting it to your own environment, feel free to reach out. I’m happy to help where I can and would love to hear how this setup works for you.
<br /><br /></p>]]></content><author><name>Pramesh Bajracharya</name><email>pe.messh@gmail.com</email></author><category term="homelab" /><category term="networking" /><category term="security" /><summary type="html"><![CDATA[A detailed guide on setting up Pi-hole with Tailscale for ad-blocking and DNS management.]]></summary><media:thumbnail xmlns:media="http://search.yahoo.com/mrss/" url="https://prameshbajra.com/static/assets/img/og/pihole-and-tailscale.png" /><media:content medium="image" url="https://prameshbajra.com/static/assets/img/og/pihole-and-tailscale.png" xmlns:media="http://search.yahoo.com/mrss/" /></entry><entry><title type="html">Bastion Servers: Jump Hosts</title><link href="https://prameshbajra.com/blog/bastion-servers/" rel="alternate" type="text/html" title="Bastion Servers: Jump Hosts" /><published>2026-01-04T00:00:00+00:00</published><updated>2026-01-04T00:00:00+00:00</updated><id>https://prameshbajra.com/blog/bastion-servers</id><content type="html" xml:base="https://prameshbajra.com/blog/bastion-servers/"><![CDATA[<p>I was recently talking to my friend, and we were discussing a couple of things about system architectures and cloud in general. 
He then uttered a heavy word “bastion servers” in the conversation, and I realized I didn’t actually know what that was. He did a 
super good job explaining it, but I wanted to solidify my understanding further.</p>

<p>So today, I looked it up and thought I’d share what a bastion server is—and what I was initially confusing it with.</p>

<p><br /></p>

<h2 id="️-bastion-server-aka-jump-host-">🛡️ Bastion Server (a.k.a. Jump Host) <br /><br /></h2>

<p>What is a “Bastion”?</p>

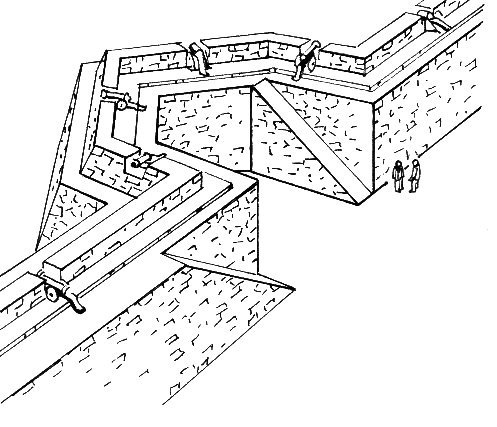
<p>A “bastion” is basically a fortified stronghold or a defensive position used to protect a larger area. Something like this.</p>

<p><img src="/static/assets/img/blog/bastion/bastion.jpg" alt="Bastion fortress image" width="497" height="427" style="width: 40%" loading="lazy" decoding="async" /></p>

<p><br /></p>

<p>In the context of IT and cloud computing, a bastion server is a secure entry point for administrators/developers to access internal systems.</p>

<p>Instead of exposing all your servers to the internet, you expose one highly secured machine. Admins/developers first connect to this bastion (usually via SSH or RDP), and from there, they “jump” into private servers that are otherwise unreachable from outside. Think of it as a fortified entry point that admins must pass through to access internal servers. Instead of exposing your entire network to the internet, you expose just this one server. From there, admins can “jump” into the internal systems safely. It’s all about providing a controlled and logged way for humans to do administrative work without opening up your entire environment.</p>

<p><strong>Key points:</strong></p>

<ul>
  <li>
    <p>Used mainly by humans (admins, SREs, developers)</p>
  </li>
  <li>
    <p>Focused on secure access, not traffic routing</p>
  </li>
  <li>
    <p>Heavily hardened and audited</p>
  </li>
  <li>
    <p>Common in cloud setups with private subnets</p>
  </li>
</ul>

<p><strong>Important:</strong> Think of it as a security checkpoint, not a traffic manager.</p>

<p><br /></p>

<h2 id="-api-gateway-">🚪 API Gateway <br /><br /></h2>

<p>This is where my confusion initially came from.</p>

<p>An API gateway is an entry point for application traffic, not admin access. In many microservice architectures, all services are accessible only through the API gateway.</p>

<p><strong>What it typically does:</strong></p>

<ul>
  <li>
    <p>Authentication &amp; authorization (users, roles, tokens)</p>
  </li>
  <li>
    <p>Routing requests to the correct microservice</p>
  </li>
  <li>
    <p>Rate limiting, logging, versioning, etc.</p>
  </li>
</ul>

<p><br /></p>

<p>Even though both a bastion server and an API gateway act as “gatekeepers,” they protect very different things:</p>

<p>Bastion → protects infrastructure access</p>

<p>API Gateway → protects application APIs</p>

<p><br /></p>

<h2 id="️-load-balancer-">⚖️ Load Balancer <br /><br /></h2>

<p>A load balancer has yet another job:</p>

<ul>
  <li>
    <p>Distribute incoming traffic across multiple servers</p>
  </li>
  <li>
    <p>Improve availability and reliability</p>
  </li>
  <li>
    <p>Prevent any single server from being overwhelmed</p>
  </li>
</ul>

<p>It doesn’t care who the user is (that’s auth), and it doesn’t care how admins log in. It just spreads traffic efficiently.</p>

<p><br /></p>

<h2 id="-simple-mental-model-">🧠 Simple Mental Model <br /><br /></h2>

<p>Bastion Server → “How do admins get into private servers safely?”</p>

<p>API Gateway → “How do users access my APIs securely?”</p>

<p>Load Balancer → “How do I spread traffic across servers?”</p>

<p><br /></p>

<p>Each solves a different problem, and they often coexist in the same architecture.</p>

<p>This was a great reminder for me that similar-sounding components can have very different responsibilities.</p>

<p>Hope this helps someone else who might be mixing these up too 🙂</p>]]></content><author><name>Pramesh Bajracharya</name><email>pe.messh@gmail.com</email></author><category term="cloud" /><category term="networking" /><category term="security" /><summary type="html"><![CDATA[What a bastion server (jump host) actually does, and how it differs from an API gateway and a load balancer.]]></summary><media:thumbnail xmlns:media="http://search.yahoo.com/mrss/" url="https://prameshbajra.com/static/assets/img/og/bastion-servers.png" /><media:content medium="image" url="https://prameshbajra.com/static/assets/img/og/bastion-servers.png" xmlns:media="http://search.yahoo.com/mrss/" /></entry><entry><title type="html">Google Photos Self-Hosted Alternative: Immich + Tailscale Setup</title><link href="https://prameshbajra.com/blog/google-photos-self-hosted-alternative-immich-tail-scale-setup/" rel="alternate" type="text/html" title="Google Photos Self-Hosted Alternative: Immich + Tailscale Setup" /><published>2025-12-28T00:00:00+00:00</published><updated>2025-12-28T00:00:00+00:00</updated><id>https://prameshbajra.com/blog/google-photos-self-hosted-alternative-immich-tail-scale-setup</id><content type="html" xml:base="https://prameshbajra.com/blog/google-photos-self-hosted-alternative-immich-tail-scale-setup/"><![CDATA[<h2 id="what-am-i-trying-to-do-and-why">What am I trying to do and why?</h2>

<p>This post is about replacing Google Photos with something I own and control. I like the
experience, but the free tier is too small and I do not want to keep paying for more storage.
Google gives you only 15 GB for free, and iCloud is even worse at 5 GB. Amazon Photos offers
unlimited photos storage and comes with a Prime subscription, but it only has limited video uploads 
of 5 GB.</p>

<p>Those tradeoffs pushed me toward a setup that feels like Google Photos, runs on my home server,
and is still reachable when I am away. Immich gives me the product, and Tailscale gives me
secure access without opening ports to the public internet.</p>

<p><br /></p>

<h2 id="why-this-setup">Why this setup</h2>

<p>I wanted a self-hosted photo library that feels modern, works flawlessly, and stays secure from
anywhere. The combo of Immich and Tailscale delivers that with minimal friction.</p>

<p><br /></p>

<h2 id="what-immich-is-for">What Immich is for</h2>

<p>Immich is an open-source, self-hosted alternative to Google Photos. It handles photo uploads
from your phone, organizes everything into a timeline, and gives you albums and search without
handing your library to a third party. For me, Immich is where all my photos will live going
forward.</p>

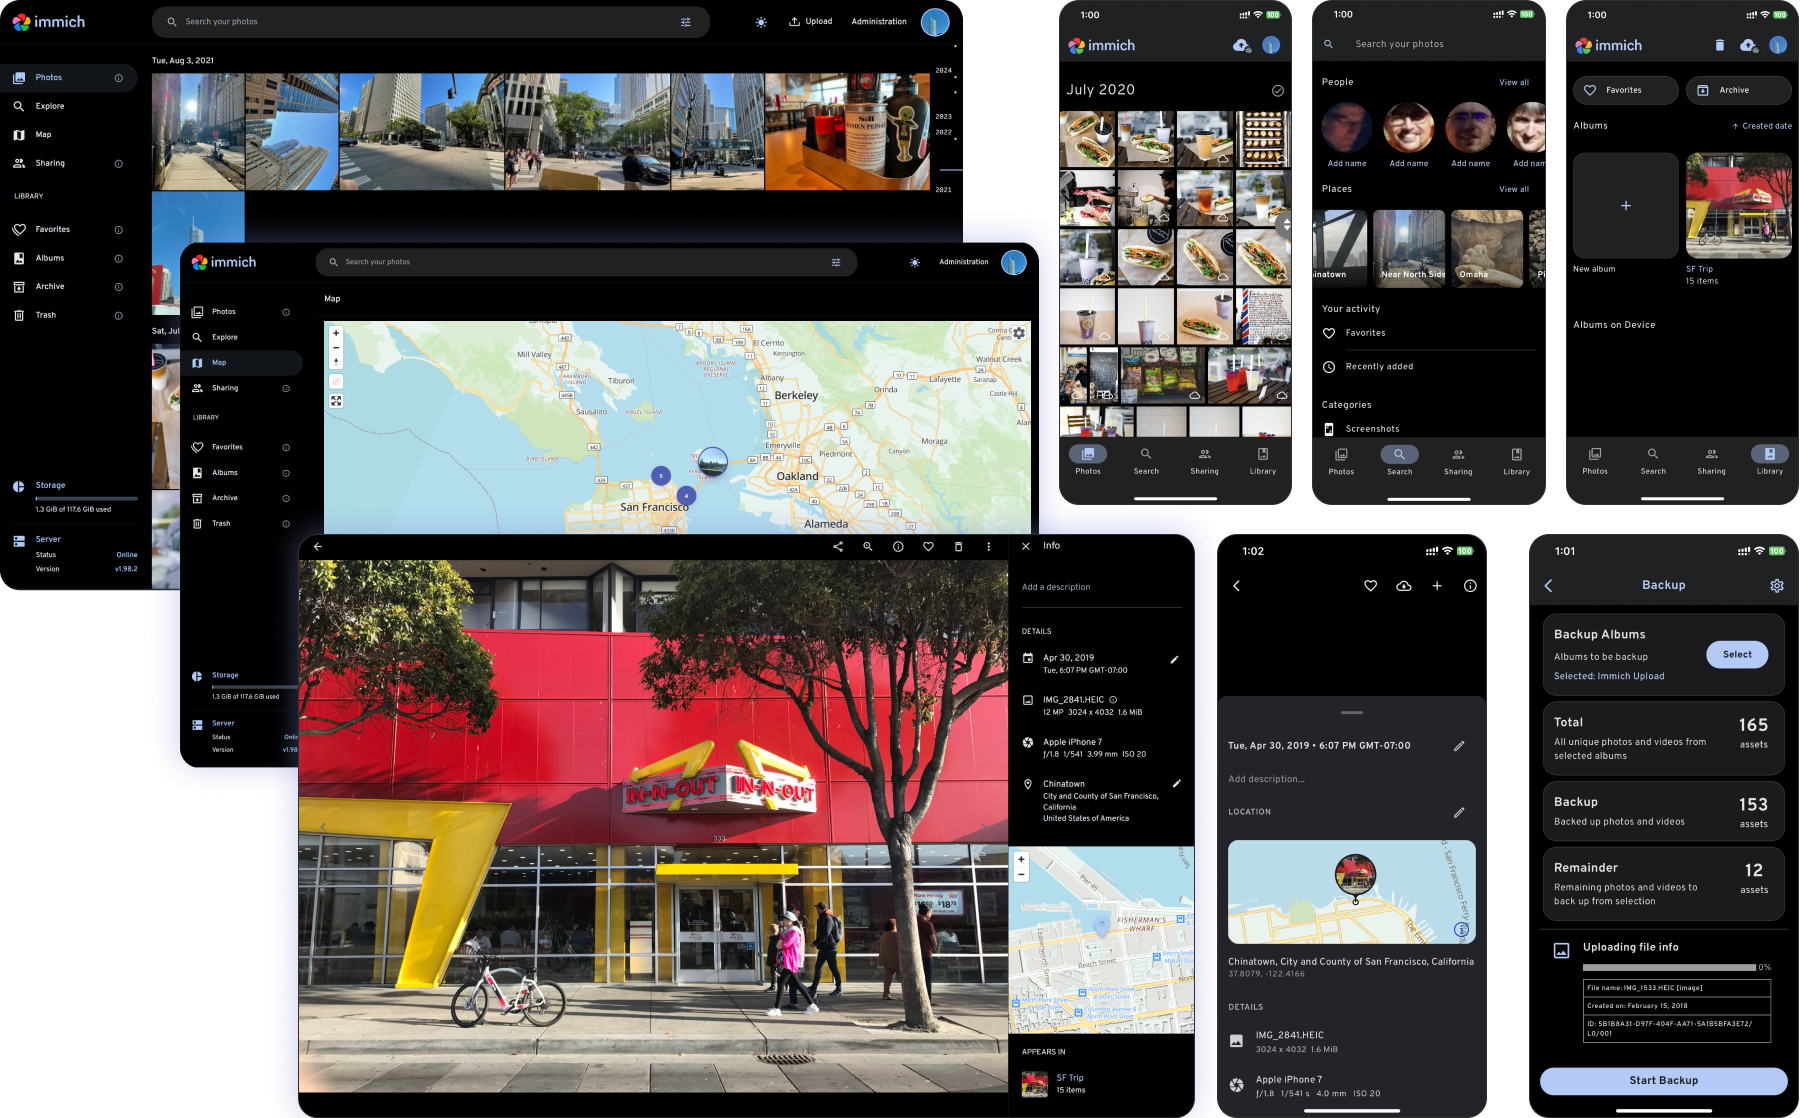
<p>This is what Immich looks like. It should feel familiar if you use Google Photos, just
self-hosted.</p>

<p><img src="/static/assets/img/blog/immich/immich-screenshots.png" alt="Immich web interface screenshot" width="1600" height="993" style="width: 95%" loading="lazy" decoding="async" /></p>

<p><em>Immich web UI showing the timeline and albums.</em></p>

<p><br /></p>

<h2 id="basic-immich-setup">Basic Immich setup</h2>

<p>I will not bore you with every installation detail since it is a couple of commands. Here is
the short version I followed, and the official docs are worth skimming for updates.</p>

<ol>
  <li>
    <p>To run immich, you will need to have Docker installed.</p>
  </li>
  <li>
    <p>Download the Immich <code class="language-plaintext highlighter-rouge">docker-compose.yml</code> and <code class="language-plaintext highlighter-rouge">.env</code> files.</p>
  </li>
  <li>
    <p>Set your photo storage location in the environment file.</p>
  </li>
  <li>
    <p>Start the containers.</p>
  </li>
</ol>

<div class="language-bash highlighter-rouge"><div class="highlight"><pre class="highlight"><code><span class="nb">mkdir </span>immich <span class="o">&amp;&amp;</span> <span class="nb">cd </span>immich
wget <span class="nt">-O</span> docker-compose.yml https://github.com/immich-app/immich/releases/latest/download/docker-compose.yml
wget <span class="nt">-O</span> .env https://github.com/immich-app/immich/releases/latest/download/example.env
<span class="c"># Edit .env to set UPLOADS_PATH to your desired photo storage location</span>
docker compose up <span class="nt">-d</span>
</code></pre></div></div>

<p><a href="https://docs.immich.app/overview/quick-start" target="_blank">Immich quick start guide</a></p>

<p><br /></p>

<h2 id="what-tailscale-is-for">What Tailscale is for</h2>

<p>Tailscale is for secure remote access. It creates a private network between my devices so I
can reach Immich from my phone or laptop when I am away from home. It runs on top of WireGuard,
handles device authentication, and keeps traffic encrypted without me touching port forwarding.</p>

<p>If you are new to it, the flow is simple: install Tailscale on the server and your devices,
authenticate, and then use the Tailnet IP or MagicDNS hostname to reach Immich.</p>

<p><a href="https://tailscale.com/" target="_blank">Tailscale official site</a></p>

<p>Tailscale is excellent, and the free tier is surprisingly generous.</p>

<p><br /></p>

<h2 id="high-level-setup">High-level setup</h2>

<p>Here is the simple version of what I did:</p>

<ul>
  <li>
    <p>My home server runs Docker and hosts the Immich containers.</p>
  </li>
  <li>
    <p>Photos are stored on the server.</p>
  </li>
  <li>
    <p>Tailscale runs on the server and on my personal devices allowing me to securely and seamlessly
access Immich from anywhere.</p>
  </li>
</ul>

<div class="language-text highlighter-rouge"><div class="highlight"><pre class="highlight"><code>[Phone/Laptop] --(Tailscale)--&gt; [Home Server: Immich]
</code></pre></div></div>

<p><em>Access path from devices to Immich storage.</em></p>

<p><br /></p>

<h2 id="my-setup-details">My setup details</h2>

<p>Use this as a reference and swap in your exact specs:</p>

<ul>
  <li>
    <p>Hardware: Beelink (Ryzen 6500U/32GB RAM/1TB SSD)</p>
  </li>
  <li>
    <p>OS: WSL2 on Windows (I know I should move to Linux someday, but this works for now)</p>
  </li>
  <li>
    <p>Storage layout: Immich uploads on docker volume mapped to my storage path.</p>
  </li>
</ul>

<p><br /></p>

<h2 id="trade-offs-vs-google-photos">Trade-offs vs Google Photos</h2>

<ul>
  <li>
    <p>You own updates, backups, and uptime.</p>
  </li>
  <li>
    <p>Remote access is on you (Tailscale makes this easy).</p>
  </li>
  <li>
    <p>The upside is full control and predictable costs.</p>
  </li>
</ul>

<p><br /></p>

<h2 id="backups-do-not-skip-this">Backups (do not skip this)</h2>

<p>Immich stores photos on disk and metadata in a database, so I plan to back up both:</p>

<ul>
  <li>
    <p>The photo storage directory (files).</p>
  </li>
  <li>
    <p>The database volume (so search, albums, and metadata are preserved).</p>
  </li>
</ul>

<p>A simple starting point is a nightly sync to an external disk plus a weekly copy to an object
store like S3 Glacier Deep Archive. Just make sure the database and uploads are backed up
consistently.</p>

<p><br /></p>

<h2 id="what-i-want-to-improve-next">What I want to improve next</h2>

<p>This is the first step, not the final step. My next priorities are automated backups,
monitoring, and a clear recovery runbook.</p>

<p>If you are also building a home server, this setup is a great way to make it feel instantly
useful. I will keep iterating as I go.</p>]]></content><author><name>Pramesh Bajracharya</name><email>pe.messh@gmail.com</email></author><category term="homelab" /><category term="networking" /><summary type="html"><![CDATA[Self-hosted photo library on a home server using Immich and Tailscale]]></summary><media:thumbnail xmlns:media="http://search.yahoo.com/mrss/" url="https://prameshbajra.com/static/assets/img/og/google-photos-self-hosted-alternative-immich-tail-scale-setup.png" /><media:content medium="image" url="https://prameshbajra.com/static/assets/img/og/google-photos-self-hosted-alternative-immich-tail-scale-setup.png" xmlns:media="http://search.yahoo.com/mrss/" /></entry><entry><title type="html">Terms to know when buying a house in Nepal - Kathmandu</title><link href="https://prameshbajra.com/blog/terms-real-estate/" rel="alternate" type="text/html" title="Terms to know when buying a house in Nepal - Kathmandu" /><published>2024-08-13T00:00:00+00:00</published><updated>2024-08-13T00:00:00+00:00</updated><id>https://prameshbajra.com/blog/terms-real-estate</id><content type="html" xml:base="https://prameshbajra.com/blog/terms-real-estate/"><![CDATA[<p>So, you decide to buy a house but you have no idea what the process is like?</p>

<p>In this write up I will try to give you a brief overview of the terms that you will come across when you are buying a house in Kathmandu, Nepal. I will try to keep it as simple as possible. As usual, if you have any questions, please feel free to reach out. I will try to answer them to the best of my knowledge.</p>

<p><strong>Brokers (दलाल)</strong></p>

<p>When searching for a house to buy, you’ll likely need a broker since finding the right property can be a challenging task. I recommend contacting as many brokers as possible, as most don’t charge buyers for their services—they charge the seller instead. However, it’s important to clarify this with the broker before engaging their services. A great advantage of working with brokers is that they can guide you through the entire process, explaining how everything works. I was fortunate enough to find a helpful broker who assisted me throughout the process without charging me a single rupee. He even negotiated on my behalf with the sellers 😀. If you’d like his contact information, just let me know.</p>

<p><br /></p>

<p>Speaking of negotiating, once you find a house you like and are ready to proceed with the purchase, BARGAIN HARD! If the seller asks for 3 crores, politely counter with a price around 2.50 or 2.60 crores. This gives you some wiggle room. I know it sounds like a big difference, but sellers typically keep a significant margin. Trust me, when you finally agree on a price, you’ll be glad you started low.</p>

<p>Once you’ve successfully negotiated, make sure you do your due diligence. This includes verifying ownership, determining whether the land is guthi or raikad, and understanding the land’s history. You can do this by obtaining a photocopy of the Lalpurja from the owner and visiting the Malpot office, where they’ll provide all necessary information. Additionally, ask for photocopies of the house’s design/maps and consult an engineer to ensure everything is in order. For newer houses built in Kathmandu, you’re generally safe, as construction is only approved after meeting certain criteria (Mapdanda - मापदण्ड).</p>

<p>Remember, there are three critical documents you’ll need to obtain for any house:</p>

<ol>
  <li>
    <p>DPC Completion and Construction Completion Certificate (डीपीसी तल सम्म भवन निर्माण स्विक्रिति पत्र)</p>
  </li>
  <li>
    <p>Construction Permission Certificate (निर्माण ईजाजत पत्र)</p>
  </li>
  <li>
    <p>Construction Completion Certification (निर्माण सम्पन्न पत्र)</p>
  </li>
</ol>

<p><br /></p>

<p>Now time to be familiar with some more terms:</p>

<p><strong>Government malpot rate of land (सरकारी मूल्यांकन)</strong>:</p>

<p>This is the minimum valuation of the land/house set by the government, and it’s often much lower than the actual market value. For example, if the purchase price is 3 crores, the government rate might be less than 70 lakhs. Sellers and buyers typically prefer to use this lower amount in official documents to save on taxes, as the tax on this lower amount is minimal. I’ll explain more about this in the sections on profit tax (लाव कर) and property buying tax (राजस्व).</p>

<p><strong>Thaili rakam (थैली रकम)</strong>:</p>

<p>This is the amount you show in the documents as the total purchase price, including the token amount. It’s the amount on which you’ll pay taxes to the government. This amount is agreed upon by both the buyer and the seller and can range between the government Malpot rate (सरकारी मूल्यांकन) and the actual purchase price. For instance, if the house costs 3 crores and the government rate is 70 lakhs, you could show 2 crores in the documents, reducing your tax burden. This is a common practice in Nepal.</p>

<p>In my case, I chose to pay taxes on the full amount, and I’d recommend you do the same. This way, you’ll have peace of mind and won’t need to worry about potential legal issues later. Imagine if, years down the line, someone claims the land as part of their inheritance (अंश). Legally, you’d only be entitled to the thaili rakam, not the full purchase price. So, it’s better to play it safe and pay taxes on the full amount.</p>

<p><strong>Profit tax (लाव कर)</strong>:</p>

<p>This tax is paid to the government at the Malpot office when selling a house, usually by the seller. Currently, the profit tax is 7%, but it’s only applied to the profit, not the total sale price. The higher the thaili rakam, the higher the tax. This is why sellers often prefer to show the government Malpot rate in the documents. However, in Nepal, things are rarely straightforward. Sometimes, sellers might ask buyers to pay the profit tax, so clarify this point before proceeding with the token amount (बैना).</p>

<p><strong>Property buying tax (भवन खरिद राजस्व)</strong>:</p>

<p>This tax is also paid at the Malpot office when buying a house, usually by the buyer. The tax rate varies depending on whose name the property is being transferred to — 2.5% for senior citizens, 5% for men and 3.75% for women. This is why many people buy property in their grandparents’ names for significant tax savings. Again, this tax is calculated based on the thaili rakam. If the thaili rakam is lower, the taxes are lower too. Please note that these taxes are lower for sub-metropolitan (उप-महानगरपालिका) cities, muncipalities (नगरपालिका) and rural muncipalities (गाउँपालिका) and only apply to Metropolitan cities (महानगरपालिका) like Kathmandu. The taxes are also tad bit lower if the buyer and the seller are relatives.</p>

<p>Before moving forward, I highly recommend watching this video: <a href="https://www.youtube.com/watch?v=PVSAyvvHpwk" target="_blank">https://www.youtube.com/watch?v=PVSAyvvHpwk</a></p>

<p><strong>Baina/Baina batta (बैना बट्टा) (Token amount)</strong></p>

<p>Once you’re satisfied with the house, you can proceed with the baina, a token amount paid to the seller to show your commitment to buying the house. This amount is decided between you and the seller and must be clearly mentioned in a document. This document should be written on Nepali paper (नेपाली कागज) by a lawyer (लेखनदास) and signed by both parties. It’s also essential to have this document verified and signed at the ward office (वडा कार्यालय). This step is crucial, as it serves as proof that the token amount was paid and received, and can help resolve any legal disputes that may arise in the future. Additionally, the government of Nepal has made this verification process mandatory.</p>

<p>The baina document typically includes:</p>

<ol>
  <li>
    <p>Details of the buyer and seller, including their parents’ and grandparents’ names, citizenship numbers, and current addresses.</p>
  </li>
  <li>
    <p>The token amount paid to the seller.</p>
  </li>
  <li>
    <p>The total purchase price of the house, including the token amount. For example, if you’re buying a house for 3 crores and have paid 10 lakhs as the token, the document will show 3 crores, and the remaining 2.90 crores will be paid later.</p>
  </li>
  <li>
    <p>The seller’s agreement to sell the house exclusively to you.</p>
  </li>
  <li>
    <p>The timeframe for completing the sale, usually 35 days, which can be extended if both parties agree.</p>
  </li>
  <li>
    <p>The cheque number and bank name used for the token payment.</p>
  </li>
  <li>
    <p>A clause stating that no further negotiations on the house price will be made.</p>
  </li>
  <li>
    <p>A penalty clause for breaking the agreement, as per the law.</p>
  </li>
</ol>

<p>In some cases I have seen token amount (बैना) being returned if the buyer or seller changes his/her mind. However, I have never experienced this myself. Depending on how close you are with the seller, there may or may not be a legal dispute. So it is always better to be cautious and not to pay the baina amount unless you are 100% sure that you want to buy the house.</p>

<p>By the way, let me know if you are looking for a lawyer (लेखनदास). I can recommend you one. He is a nice guy and charges a very small reasonable amount. He helped me with the entire process and I’m incredibly thankful for his help.</p>

<p><strong>Malpot (मालपोत)</strong></p>

<p>Finally, the big day has arrived—the day you’ll officially become the owner of your new house, and the seller will receive the full payment.</p>

<p>You might be wondering how such a large payment is made. The answer is a <strong>Good For Payment cheque</strong>. This is a regular cheque with additional bank stamps, guaranteeing that you have the funds in your account. The bank freezes this amount, assuring the seller that the money is ready to be transferred to his account. With this guarantee, the seller can confidently transfer the house to your name at the Malpot office and cash the cheque. This method is the most common way to pay for a house, and I recommend getting this cheque a day before your Malpot visit for peace of mind since banks in Nepal can be unpredictable.</p>

<blockquote>
  <p>Please note that good for payment cheque can be used for any kind of transaction. It is not limited to house buying only.</p>
</blockquote>

<p>Here are a few things to prepare before your Malpot office visit:</p>

<ol>
  <li>
    <p>Source of Fund (आयो स्व्रोत): This document proves how you obtained the money to buy the house, whether from stocks, bank loans, salary, or remittance slips. If you borrowed the money from friends or family, you’ll need to get it verified at the ward office (वडा कार्यालय). This process is part of the Department of Money Laundering Investigation (सम्पत्ति शुद्धीकरण अनुसन्धान विभाग) to ensure the money wasn’t obtained illegally.</p>
  </li>
  <li>
    <p>All Heirs/Claimants (हकवाला): Make sure all heirs/claimants are present at the Malpot office along with the seller. This ensures that the house is being sold with the consent of all heirs, preventing potential legal disputes in the future.</p>
  </li>
  <li>
    <p>Baina Document: Bring the baina document with you for verification at the Malpot office. This document is crucial as proof that the token amount was paid and received.</p>
  </li>
  <li>
    <p>Good For Payment Cheque: Bring the Good For Payment cheque to hand over to the seller at the Malpot office. Multiple cheques can be issued in different denominations, as long as they total the thaili rakam. If the actual amount is higher than the thaili rakam, the remaining amount can be paid separately as agreed with the seller.</p>
  </li>
</ol>

<p>Once all documents are signed, and your fingerprints are taken, you’ll receive a new Lalpurja with your name on it, usually within a few hours or by the next day.</p>

<p><strong>Congratulations, you are now the owner of the house!</strong></p>]]></content><author><name>Pramesh Bajracharya</name><email>pe.messh@gmail.com</email></author><category term="money" /><category term="life" /><summary type="html"><![CDATA[A plain-English glossary of the terms you hit when buying land or a house in Kathmandu — ropani, aana, lalpurja, and the rest.]]></summary><media:thumbnail xmlns:media="http://search.yahoo.com/mrss/" url="https://prameshbajra.com/static/assets/img/og/terms-real-estate.png" /><media:content medium="image" url="https://prameshbajra.com/static/assets/img/og/terms-real-estate.png" xmlns:media="http://search.yahoo.com/mrss/" /></entry><entry><title type="html">Deploy WhisperAI, FFMpeg and OpenAI in AWS Lambda using Docker Container</title><link href="https://prameshbajra.com/blog/deploy-lambda-container/" rel="alternate" type="text/html" title="Deploy WhisperAI, FFMpeg and OpenAI in AWS Lambda using Docker Container" /><published>2023-05-22T00:00:00+00:00</published><updated>2023-05-22T00:00:00+00:00</updated><id>https://prameshbajra.com/blog/deploy-lambda-container</id><content type="html" xml:base="https://prameshbajra.com/blog/deploy-lambda-container/"><![CDATA[<p>Let’s talk about working with AI, Docker and AWS Lambda. Sounds exciting, right? Maybe?</p>

<p>But let me slide in a quick disclaimer: AWS Lambda might not be your first choice for AI tasks.</p>

<p>These AI tasks are resource-intensive and sometimes prefer their tasks to be run on a GPU. But hey, who doesn’t like a bit of challenge and fun?</p>

<p>As we start with this journey, let’s keep few points in our mind:</p>

<ol>
  <li>
    <p>Lambda functions can run for a 15-minute run, MAX. Default is 3 seconds. You might want to configure that.</p>
  </li>
  <li>
    <p>When it comes to using docker containers as lambda functions, they have a “10GB max” size limit. No more. I tried ! :/</p>
  </li>
  <li>
    <p>As of this date, Lambda doesn’t support GPU, so remember this when you’re tinkering around.</p>
  </li>
</ol>

<p>Alright, gear up, let’s dive in.
<br /><br /></p>

<p>First off, ensure you have docker running on your trusty laptop/PC.</p>

<p>You’ll need three major files to get this show going:</p>

<p>A <strong>handler.py</strong> file - <em>our command center</em> - looking something like this:</p>

<div class="language-python highlighter-rouge"><div class="highlight"><pre class="highlight"><code><span class="kn">import</span> <span class="nn">os</span>
<span class="kn">import</span> <span class="nn">time</span>
<span class="kn">import</span> <span class="nn">boto3</span>
<span class="kn">import</span> <span class="nn">openai</span>
<span class="kn">import</span> <span class="nn">whisper</span>

<span class="n">start</span> <span class="o">=</span> <span class="n">time</span><span class="p">.</span><span class="n">time</span><span class="p">()</span>
<span class="c1"># Load the model outside for a warm lambda executions... Seriously !! This helps !!
</span><span class="n">model</span> <span class="o">=</span> <span class="n">whisper</span><span class="p">.</span><span class="n">load_model</span><span class="p">(</span><span class="s">"base"</span><span class="p">,</span> <span class="n">download_root</span><span class="o">=</span><span class="s">'/tmp/'</span><span class="p">)</span>
<span class="n">end</span> <span class="o">=</span> <span class="n">time</span><span class="p">.</span><span class="n">time</span><span class="p">()</span>
<span class="k">print</span><span class="p">(</span><span class="s">"Time it took Whisper Model to load: "</span><span class="p">,</span> <span class="n">end</span> <span class="o">-</span> <span class="n">start</span><span class="p">)</span>

<span class="n">session</span> <span class="o">=</span> <span class="n">boto3</span><span class="p">.</span><span class="n">session</span><span class="p">.</span><span class="n">Session</span><span class="p">()</span>
<span class="n">s3_client</span> <span class="o">=</span> <span class="n">boto3</span><span class="p">.</span><span class="n">client</span><span class="p">(</span><span class="s">'s3'</span><span class="p">)</span>
<span class="c1"># Security 101: Always keep your secrets ... You know .. SECRETS !! ...
</span><span class="n">client</span> <span class="o">=</span> <span class="n">session</span><span class="p">.</span><span class="n">client</span><span class="p">(</span><span class="n">service_name</span><span class="o">=</span><span class="s">'secretsmanager'</span><span class="p">,</span> <span class="n">region_name</span><span class="o">=</span><span class="s">'&lt;YOUR_AWS_REGION&gt;'</span><span class="p">)</span>
<span class="n">openai</span><span class="p">.</span><span class="n">api_key</span> <span class="o">=</span> <span class="n">client</span><span class="p">.</span><span class="n">get_secret_value</span><span class="p">(</span>
    <span class="n">SecretId</span><span class="o">=</span><span class="s">'&lt;SECRETIDHERE_SHHH!!&gt;'</span><span class="p">)[</span><span class="s">'SecretString'</span><span class="p">]</span>


<span class="k">def</span> <span class="nf">handler</span><span class="p">(</span><span class="n">event</span><span class="p">,</span> <span class="n">context</span><span class="p">):</span>
    <span class="c1"># To run your lambda on a batch, consider iterating the records...
</span>    <span class="c1"># My lambda executes when a file is uploaded to a S3 bucket... Tweak this according to your needs ...
</span>    <span class="n">bucket</span> <span class="o">=</span> <span class="n">event</span><span class="p">[</span><span class="s">'Records'</span><span class="p">][</span><span class="mi">0</span><span class="p">][</span><span class="s">'s3'</span><span class="p">][</span><span class="s">'bucket'</span><span class="p">][</span><span class="s">'name'</span><span class="p">]</span>
    <span class="n">key</span> <span class="o">=</span> <span class="n">event</span><span class="p">[</span><span class="s">'Records'</span><span class="p">][</span><span class="mi">0</span><span class="p">][</span><span class="s">'s3'</span><span class="p">][</span><span class="s">'object'</span><span class="p">][</span><span class="s">'key'</span><span class="p">]</span>

    <span class="k">print</span><span class="p">(</span><span class="s">"Commencing download: "</span><span class="p">,</span> <span class="n">bucket</span><span class="p">,</span> <span class="n">key</span><span class="p">)</span>
    <span class="n">download_path</span> <span class="o">=</span> <span class="n">os</span><span class="p">.</span><span class="n">path</span><span class="p">.</span><span class="n">join</span><span class="p">(</span><span class="s">'/tmp'</span><span class="p">,</span> <span class="n">os</span><span class="p">.</span><span class="n">path</span><span class="p">.</span><span class="n">basename</span><span class="p">(</span><span class="n">key</span><span class="p">))</span>
    <span class="n">s3_client</span><span class="p">.</span><span class="n">download_file</span><span class="p">(</span><span class="n">bucket</span><span class="p">,</span> <span class="n">key</span><span class="p">,</span> <span class="n">download_path</span><span class="p">)</span>
    <span class="k">print</span><span class="p">(</span><span class="s">"Done downloading. Wow internet!"</span><span class="p">)</span>
    <span class="n">start</span> <span class="o">=</span> <span class="n">time</span><span class="p">.</span><span class="n">time</span><span class="p">()</span>
    <span class="n">result</span> <span class="o">=</span> <span class="n">model</span><span class="p">.</span><span class="n">transcribe</span><span class="p">(</span><span class="n">download_path</span><span class="p">)</span>
    <span class="n">end</span> <span class="o">=</span> <span class="n">time</span><span class="p">.</span><span class="n">time</span><span class="p">()</span>
    <span class="k">print</span><span class="p">(</span><span class="s">"Transcription time: "</span><span class="p">,</span> <span class="n">end</span> <span class="o">-</span> <span class="n">start</span><span class="p">)</span>
    <span class="k">return</span> <span class="p">{</span>
        <span class="s">"statusCode"</span><span class="p">:</span> <span class="mi">200</span><span class="p">,</span>
        <span class="s">"result"</span><span class="p">:</span> <span class="n">result</span><span class="p">,</span>
    <span class="p">}</span>
</code></pre></div></div>
<p><br /></p>

<p>The <strong>requirements.txt</strong> file - tending to the dependencies:</p>
<div class="language-text highlighter-rouge"><div class="highlight"><pre class="highlight"><code>boto3==1.26.137
openai==0.27.7
openai-whisper==20230314
</code></pre></div></div>
<p><br /></p>

<p>And last but not least, the <strong>Dockerfile</strong> - our docker container creator, soon-to-be Lambda function core:</p>
<div class="language-Dockerfile highlighter-rouge"><div class="highlight"><pre class="highlight"><code><span class="k">FROM</span><span class="s"> public.ecr.aws/lambda/python:3.10-arm64</span>

<span class="k">RUN </span>yum <span class="nt">-y</span> update <span class="o">&amp;&amp;</span> <span class="se">\
</span>    yum <span class="nt">-y</span> <span class="nb">install tar gzip </span>xz <span class="o">&amp;&amp;</span> <span class="se">\
</span>    yum clean all <span class="o">&amp;&amp;</span> <span class="se">\
</span>    <span class="nb">rm</span> <span class="nt">-rf</span> /var/cache/yum

<span class="k">RUN </span>curl https://johnvansickle.com/ffmpeg/releases/ffmpeg-release-arm64-static.tar.xz <span class="nt">-o</span> ffmpeg.tar.xz <span class="o">&amp;&amp;</span> <span class="se">\
</span>    <span class="nb">tar</span> <span class="nt">-xf</span> ffmpeg.tar.xz <span class="o">&amp;&amp;</span> <span class="se">\
</span>    <span class="nb">mv </span>ffmpeg-<span class="k">*</span><span class="nt">-static</span>/ffmpeg /usr/local/bin/ <span class="o">&amp;&amp;</span> <span class="se">\
</span>    <span class="nb">rm</span> <span class="nt">-r</span> ffmpeg.tar.xz ffmpeg-<span class="k">*</span><span class="nt">-static</span>

<span class="k">COPY</span><span class="s"> requirements.txt  .</span>
<span class="k">RUN </span>pip3 <span class="nb">install</span> <span class="nt">-r</span> requirements.txt <span class="nt">--target</span> <span class="s2">"</span><span class="k">${</span><span class="nv">LAMBDA_TASK_ROOT</span><span class="k">}</span><span class="s2">"</span>

<span class="c"># Copy function code</span>
<span class="k">COPY</span><span class="s"> handler.py ${LAMBDA_TASK_ROOT}</span>

<span class="c"># Set the CMD to your handler </span>
<span class="k">CMD</span><span class="s"> [ "handler.handler" ]</span>
</code></pre></div></div>
<p><br />
Customize these files to meet your requirements, and voila! You’re ready to launch your code into the AWS Lambda.
<br /><br /></p>

<h2 id="unleash-the-deployment-">Unleash the Deployment !!</h2>

<p>Kick things off by building the docker image:</p>
<div class="language-shell highlighter-rouge"><div class="highlight"><pre class="highlight"><code>docker build <span class="nt">-t</span> image-name <span class="nb">.</span>   
</code></pre></div></div>

<p>To check if your creation is functioning as expected, put it through a local test run:</p>
<div class="language-shell highlighter-rouge"><div class="highlight"><pre class="highlight"><code>docker run <span class="nt">-p</span> 9000:8080 image-name 
</code></pre></div></div>

<p>And hope it works:</p>
<div class="language-shell highlighter-rouge"><div class="highlight"><pre class="highlight"><code>curl <span class="nt">-XPOST</span> <span class="s2">"http://localhost:9000/2015-03-31/functions/function/invocations"</span> <span class="nt">-d</span> <span class="s1">'{}'</span>
</code></pre></div></div>

<p>At this point, your terminal should return you with an output.</p>

<p>Your docker image, now ready and waiting, needs to be uploaded to ECR (Elastic Container Registry) for its Lambda adventure.</p>

<p>To do this, you’ll need an ECR repository. If you have one, use it by all means. If not, create an ECR repo with this command:</p>
<div class="language-shell highlighter-rouge"><div class="highlight"><pre class="highlight"><code>aws ecr create-repository <span class="nt">--repository-name</span> docker-image-ecr-repository <span class="nt">--region</span> &lt;YOUR_AWS_REGION&gt; <span class="nt">--image-scanning-configuration</span> <span class="nv">scanOnPush</span><span class="o">=</span><span class="nb">true</span> <span class="nt">--image-tag-mutability</span> MUTABLE
</code></pre></div></div>

<p>Your terminal will reward you with a response like this. COPY that <code class="language-plaintext highlighter-rouge">repositoryUri</code>. We’ll need it to upload our docker image to the repository:</p>
<div class="language-json highlighter-rouge"><div class="highlight"><pre class="highlight"><code><span class="p">{</span><span class="w">
    </span><span class="nl">"repository"</span><span class="p">:</span><span class="w"> </span><span class="p">{</span><span class="w">
        </span><span class="nl">"repositoryArn"</span><span class="p">:</span><span class="w"> </span><span class="s2">"arn:aws:ecr:&lt;YOUR_AWS_REGION&gt;:XXXXXXXXXX:repository/docker-image"</span><span class="p">,</span><span class="w">
        </span><span class="nl">"registryId"</span><span class="p">:</span><span class="w"> </span><span class="s2">"XXXXXXXXXX"</span><span class="p">,</span><span class="w">
        </span><span class="nl">"repositoryName"</span><span class="p">:</span><span class="w"> </span><span class="s2">"docker-image"</span><span class="p">,</span><span class="w">
        </span><span class="nl">"repositoryUri"</span><span class="p">:</span><span class="w"> </span><span class="s2">"XXXXXXXXXX.dkr.ecr.&lt;YOUR_AWS_REGION&gt;.amazonaws.com/docker-image"</span><span class="p">,</span><span class="w">
        </span><span class="nl">"createdAt"</span><span class="p">:</span><span class="w"> </span><span class="s2">"2023-03-09T10:39:01+00:00"</span><span class="p">,</span><span class="w">
        </span><span class="nl">"imageTagMutability"</span><span class="p">:</span><span class="w"> </span><span class="s2">"MUTABLE"</span><span class="p">,</span><span class="w">
        </span><span class="nl">"imageScanningConfiguration"</span><span class="p">:</span><span class="w"> </span><span class="p">{</span><span class="w">
            </span><span class="nl">"scanOnPush"</span><span class="p">:</span><span class="w"> </span><span class="kc">true</span><span class="w">
        </span><span class="p">},</span><span class="w">
        </span><span class="nl">"encryptionConfiguration"</span><span class="p">:</span><span class="w"> </span><span class="p">{</span><span class="w">
            </span><span class="nl">"encryptionType"</span><span class="p">:</span><span class="w"> </span><span class="s2">"AES256"</span><span class="w">
        </span><span class="p">}</span><span class="w">
    </span><span class="p">}</span><span class="w">
</span><span class="p">}</span><span class="w">
</span></code></pre></div></div>

<p>But wait, there’s more! Before you can upload the images to the repository, you need to prove your identity. Authenticate by executing this:</p>
<div class="language-shell highlighter-rouge"><div class="highlight"><pre class="highlight"><code>aws ecr get-login-password <span class="nt">--region</span> &lt;YOUR_AWS_REGION&gt; | docker login <span class="nt">--username</span> AWS <span class="nt">--password-stdin</span> &lt;YOUR_AWS_ACCOUNT_ID&gt;.dkr.ecr.&lt;YOUR_AWS_REGION&gt;.amazonaws.com
</code></pre></div></div>

<p>Just one more teeny step. To guide it to the right ECR repository, you need to tag your docker image with the repository name, like so:</p>
<div class="language-shell highlighter-rouge"><div class="highlight"><pre class="highlight"><code>docker tag docker-image:latest &lt;YOUR_AWS_ACCOUNT_ID&gt;.dkr.ecr.&lt;YOUR_AWS_REGION&gt;.amazonaws.com/docker-image-ecr-repository:latest
</code></pre></div></div>

<p>Trust me !! this is the final step! Now it’s time to push the image.</p>
<div class="language-shell highlighter-rouge"><div class="highlight"><pre class="highlight"><code>docker push &lt;YOUR_AWS_ACCOUNT_ID&gt;.dkr.ecr.&lt;YOUR_AWS_REGION&gt;.amazonaws.com/docker-image-ecr-repository:latest
</code></pre></div></div>

<p>With your image now in ECR you are ready to deploy it to AWS Lambda. Here, you have a lots of choices. You can create lambda functions from the console or from tools like AWS SAM, CDK, Terraform, and more.</p>

<p>As always, if you hit any roadblocks or need some guidance, don’t hesitate to give me a shout.</p>

<p><strong>Happy Coding!</strong></p>]]></content><author><name>Pramesh Bajracharya</name><email>pe.messh@gmail.com</email></author><category term="cloud" /><category term="ai" /><summary type="html"><![CDATA[Deploy WhisperAI, FFMpeg and OpenAI into AWS Lambda Containers]]></summary><media:thumbnail xmlns:media="http://search.yahoo.com/mrss/" url="https://prameshbajra.com/static/assets/img/og/deploy-lambda-container.png" /><media:content medium="image" url="https://prameshbajra.com/static/assets/img/og/deploy-lambda-container.png" xmlns:media="http://search.yahoo.com/mrss/" /></entry><entry><title type="html">AWS Codewhisperer VS Codium</title><link href="https://prameshbajra.com/blog/codewhisperer_vs_codium/" rel="alternate" type="text/html" title="AWS Codewhisperer VS Codium" /><published>2023-05-07T00:00:00+00:00</published><updated>2023-05-07T00:00:00+00:00</updated><id>https://prameshbajra.com/blog/codewhisperer_vs_codium</id><content type="html" xml:base="https://prameshbajra.com/blog/codewhisperer_vs_codium/"><![CDATA[<p><strong>TLDR;</strong> AWS CodeWhisperer falls short! Go use Codium.</p>

<p><br />
For those looking to explore these two options, here are the links and instructions for getting started:</p>

<p><strong>AWS CodeWhisperer</strong></p>

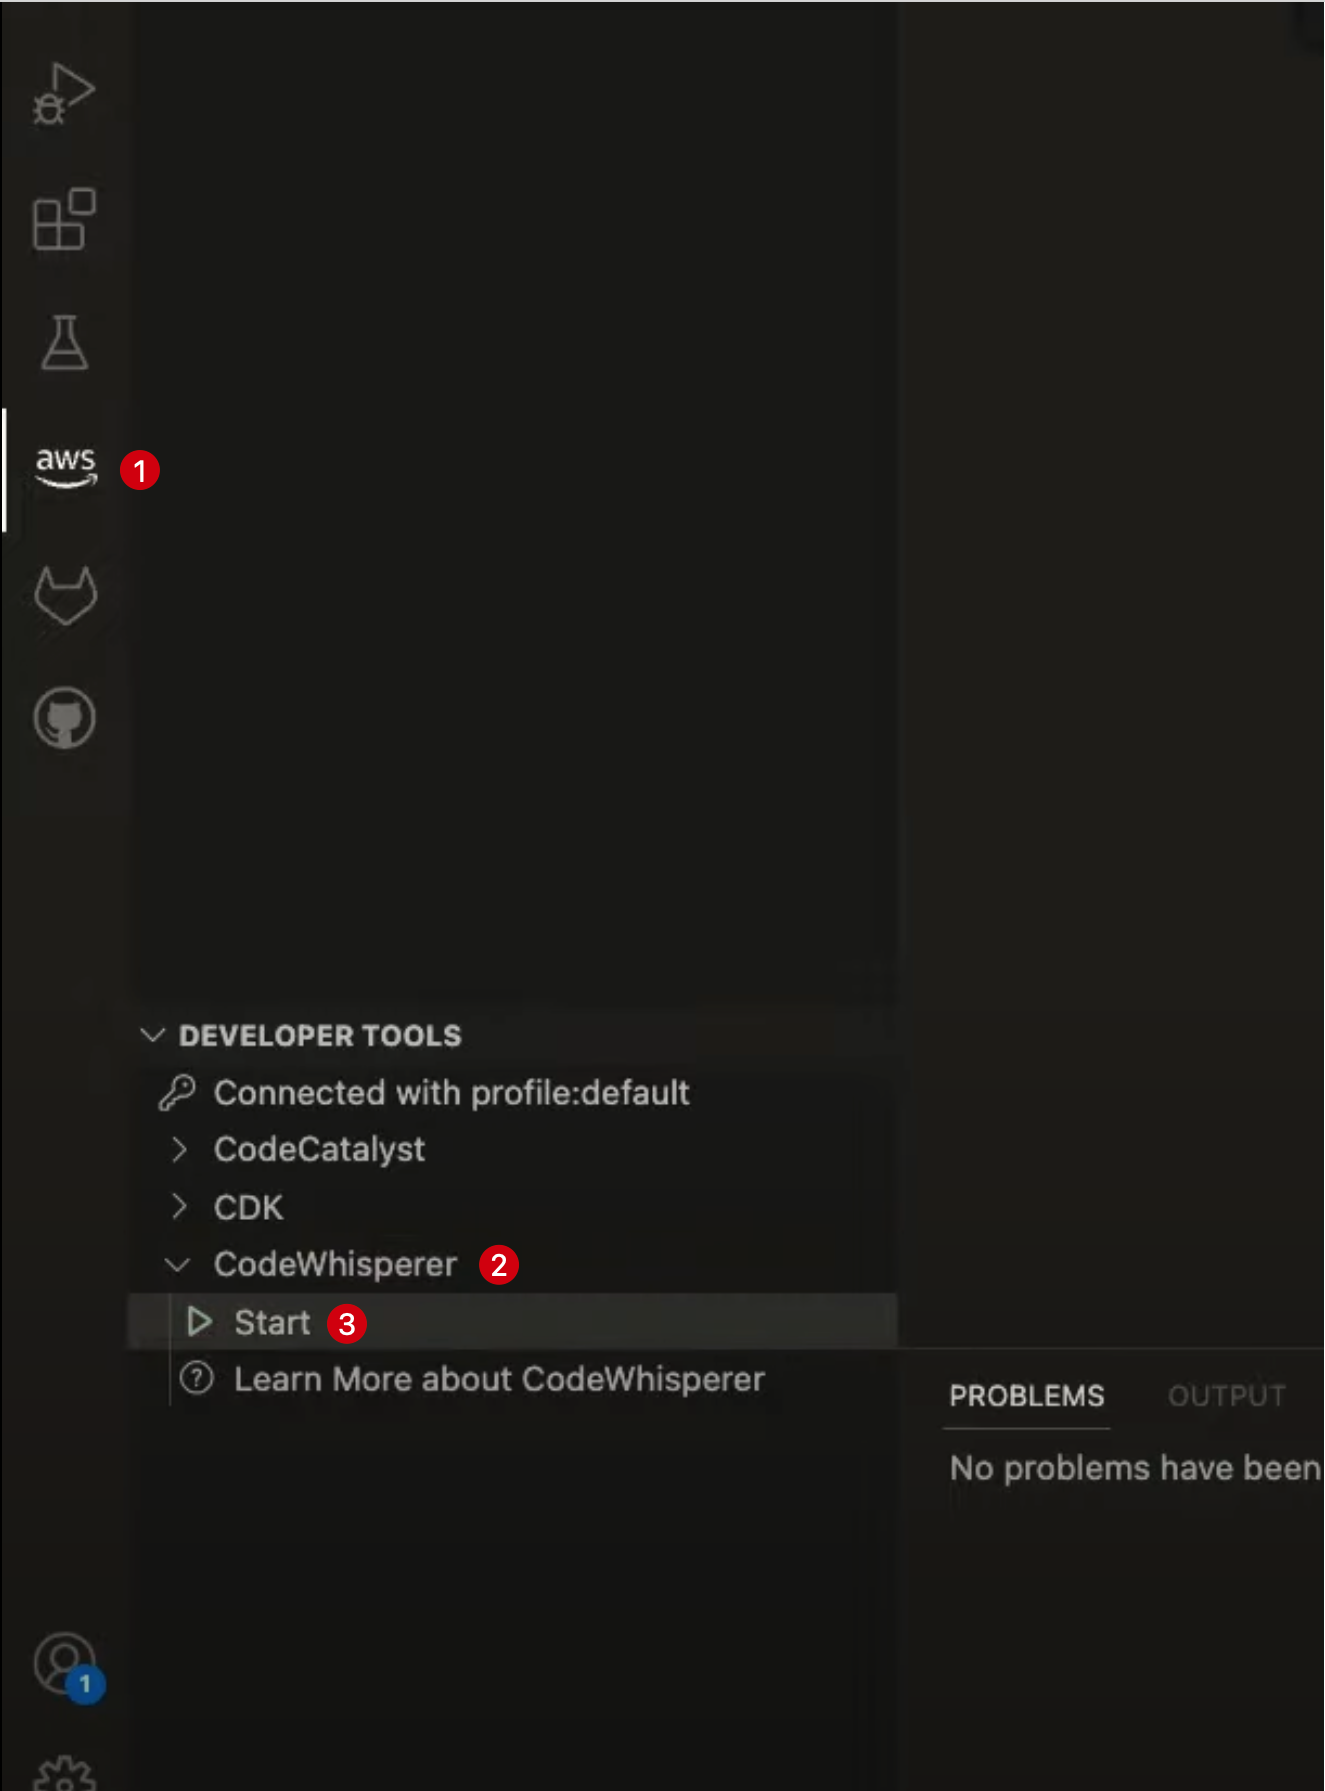
<p>To begin with AWS CodeWhisperer, first install the <a href="https://marketplace.visualstudio.com/items?itemName=AmazonWebServices.aws-toolkit-vscode">AWS toolkit</a>. Once the installation is complete, navigate to the sidebar, select the AWS toolkit, and click on CodeWhisperer. Simply follow a series of user-friendly steps, and the coding assistant will be up and running in no time.</p>

<p><img src="/static/assets/img/blog/codevcode/cw1.png" alt="AWS CodeWhisperer setup screenshot" width="686" height="927" style="width: 30%" loading="lazy" decoding="async" /></p>

<p><br /></p>

<p><strong>Codium</strong></p>

<p>To start using Codium, install the extension via the link <a href="https://codeium.com/vscode_tutorial">https://codeium.com/vscode_tutorial</a>. Upon completion, you will be prompted with a login popup. After the login, you’re all set to experience the benefits of Codium.</p>

<hr />

<p><br />
Allow me to cut to the chase and highlight the advantages of Codium over CodeWhisperer, which makes it the preferable choice for many developers:</p>

<ul>
  <li>
    <p>The <strong>autocomplete/suggestions in Codium are far more advanced</strong>. They exhibit a higher level of understanding, better grasping developers’ intentions and rarely suggesting irrelevant or nonsensical code snippets. This is where I found CodeWhisperer to be very annoying. It seriously has a long way to go.</p>
  </li>
  <li>
    <p><strong>Consistent updates</strong> from the developers ensure that Codium stays at the forefront of the rapidly evolving AI. With new features and fixes being released almost daily, I think this it is getting better daily.</p>
  </li>
  <li>
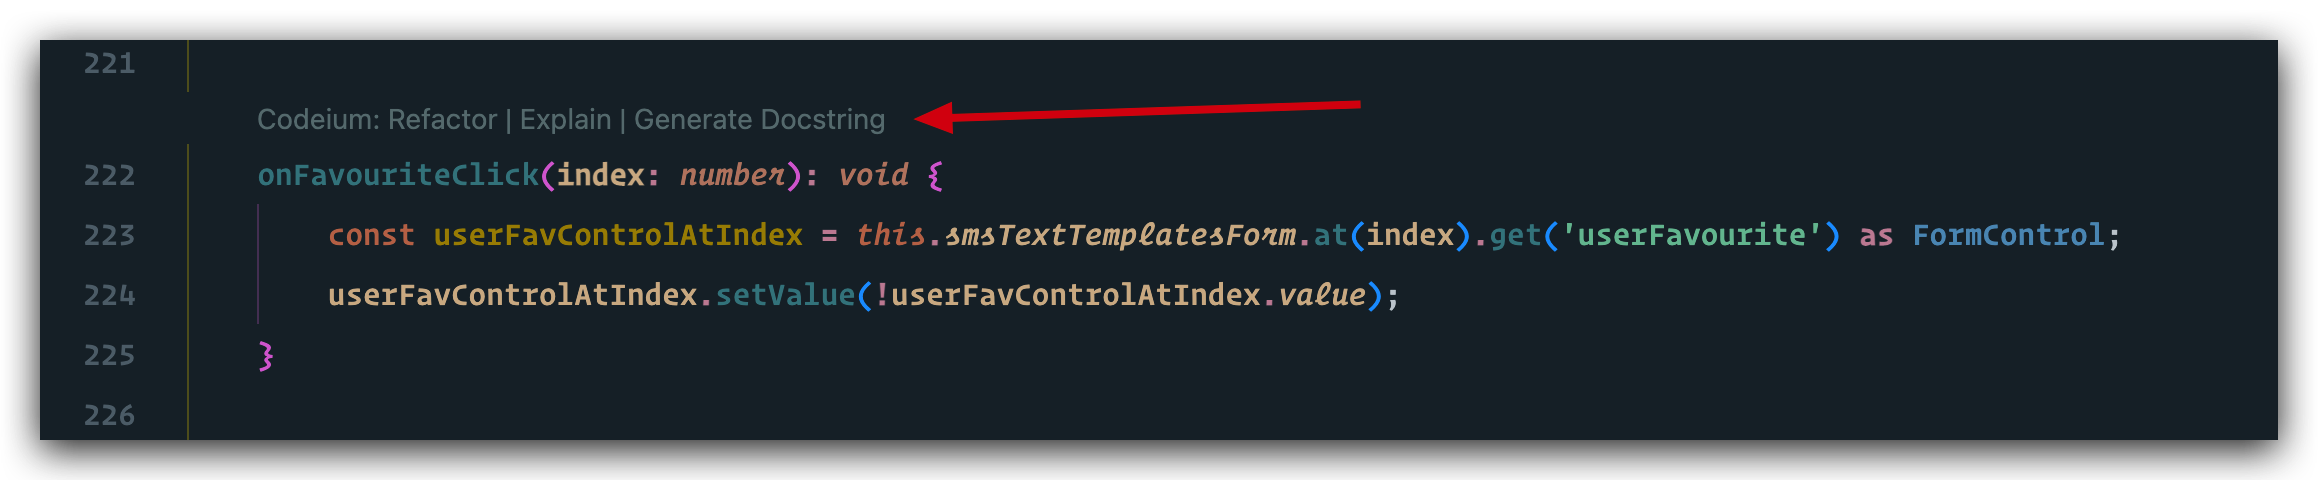
    <p>Codium provides an intuitive set of option displayed above each function, adding a layer of convenience and ease for users. However, for some it might take a while to get used to. Here’s an example:</p>
  </li>
</ul>

<p><img src="/static/assets/img/blog/codevcode/codium1.png" alt="Codium feature overlay in VS Code" width="1373" height="284" style="width: 60%" loading="lazy" decoding="async" /></p>

<p><br />
Moreover, Codium boasts an impressive array of features that cater to a variety of users and development environments.</p>

<ol>
  <li>
    <p>It <strong>integrates seamlessly with a wide range of IDEs</strong>, including VSCode, JetBrains, IntelliJ, Jupyter / Colab / Deepnote / Databricks Notebooks, Chrome, Vim / Neovim, Emacs, and VSCode Web IDEs (e.g., Gitpod).</p>
  </li>
  <li>
    <p>With support for an extensive list of <strong>70+ programming languages</strong>, Codium has more capabilities than other code assistants on the market. It also has better support for languages than Github Co-pilot.</p>
  </li>
  <li>
    <p>Users can rest assured that their code remains private, as it is <strong>not utilized to train models</strong> or for any other purpose. The developers maintain a strict policy against training generative models on private codebases.</p>
  </li>
</ol>

<p><br /><br />
Although Codium has a clear edge, <strong>CodeWhisperer</strong> does possess two intriguing features: the <strong>code scan feature</strong>, which identifies potential bugs and vulnerabilities, and the <code class="language-plaintext highlighter-rouge">cmd+c</code> shortcut trigger for code completions.
<br /><br /></p>

<p><strong>Looking ahead ….</strong></p>

<p>There is another prominent contender in the coding assistant arena: <strong>GitHub Copilot</strong>. Hearning significant praise from developers on platforms like Twitter and Reddit, it boasts low-latency code completions, even in complex scenarios. I start working with it from tomorrow. Hopefully it does not fall short to amaze me :D</p>

<p><br />
As always, I welcome any questions or suggestions you may have. Don’t hesitate to reach out and continue the conversation.</p>]]></content><author><name>Pramesh Bajracharya</name><email>pe.messh@gmail.com</email></author><category term="ai" /><category term="tools" /><summary type="html"><![CDATA[Comparing AWS CodeWhisperer and Codeium as free AI autocomplete for everyday coding — accuracy, speed, and which one stuck.]]></summary><media:thumbnail xmlns:media="http://search.yahoo.com/mrss/" url="https://prameshbajra.com/static/assets/img/og/codewhisperer_vs_codium.png" /><media:content medium="image" url="https://prameshbajra.com/static/assets/img/og/codewhisperer_vs_codium.png" xmlns:media="http://search.yahoo.com/mrss/" /></entry><entry><title type="html">My must-have iOS apps</title><link href="https://prameshbajra.com/blog/my-top-ios-apps/" rel="alternate" type="text/html" title="My must-have iOS apps" /><published>2023-03-04T00:00:00+00:00</published><updated>2023-03-04T00:00:00+00:00</updated><id>https://prameshbajra.com/blog/my-top-ios-apps</id><content type="html" xml:base="https://prameshbajra.com/blog/my-top-ios-apps/"><![CDATA[<p>Just a note, these apps are not is order. Tap on the header to download the app ;)</p>

<p><strong><a href="https://apps.apple.com/us/app/google-calendar-get-organized/id909319292">Google Calendar</a></strong></p>

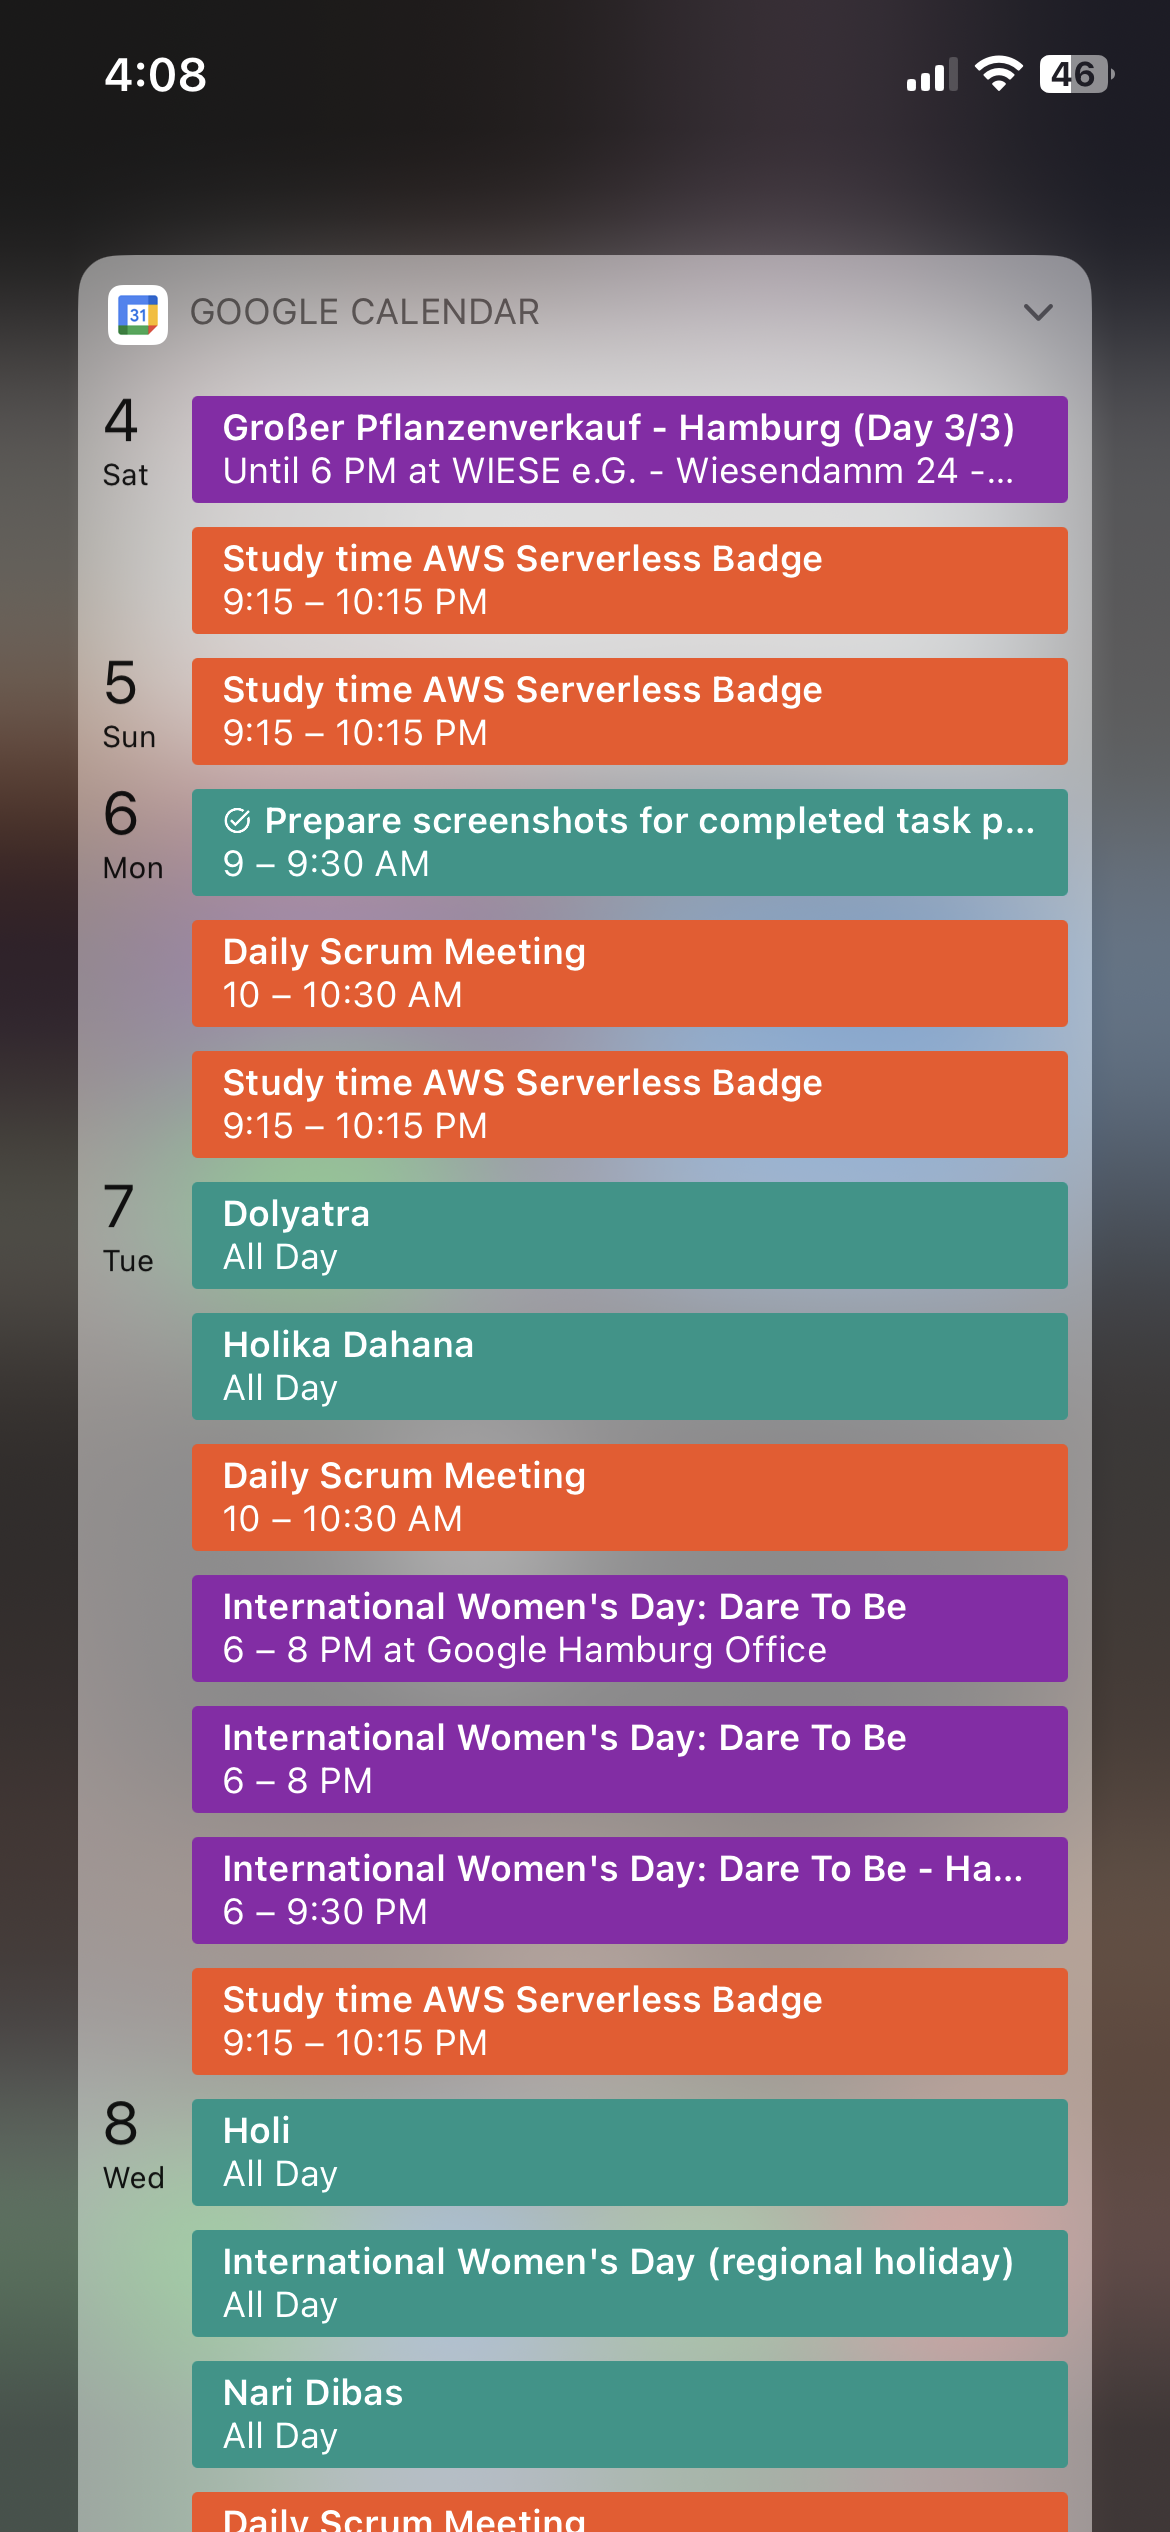
<p>I am pretty much sure that most of you might already have this app. For me, google calendar works like a reminder, todo app and a calendar app (obviously) all in one. I have tried apps like Fantastical, BusyCal, iCal, Todoist and many others but I always kept coming back to google calendar. For someone like me who keeps forgetting things, there is a widget that google calendar provides and it works wonders.</p>

<p><img src="/static/assets/img/blog/ios-apps/googlecalendar.png" alt="Google Calendar app screenshot on iOS" width="500" height="1082" style="width: 250px" loading="lazy" decoding="async" /></p>

<p><br /></p>

<p><strong><a href="https://apps.apple.com/us/app/bitwarden-password-manager/id1137397744">Bitwarden</a></strong></p>

<p>And again, for someone who forgets literally everything, remembering multiple passwords for different accounts is next to impossible. This is where bitwarden comes in handy. It helps users generate and store strong passwords securely, making it easier to manage and remember them.</p>

<p>Bitwarden is an open-source password manager in which data is encrypted locally before being synced with Bitwarden’s servers. Bitwarden uses two-factor authentication and alerts users of any suspicious login attempts, making it a highly secure option for password management. Great thing is, it’s cross-platform and especially in iOS the autocomplete works really well.</p>

<p><img src="/static/assets/img/blog/ios-apps/bitwarden.png" alt="Bitwarden password manager interface" width="932" height="748" style="width: 500px" loading="lazy" decoding="async" /></p>

<p><br /></p>

<p><strong><a href="https://apps.apple.com/us/app/apple-books/id364709193">Apple books</a></strong></p>

<p>I assume people are going to hate me for this but surprisingly Apple books has been working pretty great for me. I know that the app is pretty basic and has a long way to go when it comes to competing with other apps. But, there is this one feature it offers that I just can’t find anywhere which is importing any epub files from the internet.</p>

<p>I just download books from the internet in epub format and upload them to Apple books. The notetaking and highlighting feature is also good. Plus, it takes care of syncing, which means I can read it on my tablet, laptop and mobile pretty smoothly.</p>

<p><img src="/static/assets/img/blog/ios-apps/applebooks.png" alt="Apple Books library view on iPhone" width="500" height="1082" style="width: 250px" loading="lazy" decoding="async" /></p>

<p><br /></p>

<p><strong><a href="https://apps.apple.com/us/app/buffer-plan-schedule-posts/id490474324">Buffer</a></strong></p>

<p>I do not use this app a lot but I think this serves it’s value. This app allows you to schedule your post to certain social media sites. You can share to instagram , twitter, LinkedIn and many other platforms at once just by setting up a posting schedule. Want your post to be posted in different platforms at 6am tomorrow morning? It’s simple now.</p>

<p><img src="/static/assets/img/blog/ios-apps/buffer.jpeg" alt="Buffer scheduling app on mobile" width="500" height="1082" style="width: 250px" loading="lazy" decoding="async" /></p>

<p><br /></p>

<p><strong><a href="https://apps.apple.com/us/app/deepstash-smarter-every-day/id1445023295">Deepstash</a></strong></p>

<p>This is one of those apps that give you short and concise ideas. The UI is very intuitive and clean.</p>

<p><img src="/static/assets/img/blog/ios-apps/deepstash.jpeg" alt="Deepstash idea cards list" width="500" height="1082" style="width: 250px" loading="lazy" decoding="async" /></p>

<p><br /></p>

<p><strong><a href="https://apps.apple.com/us/app/hacker-feed/id1451386900">Hacker Feed</a></strong></p>

<p>This one would be perfect for those who are interest in tech. I personally use this to find amazing github repositories that are eye catching.</p>

<p><img src="/static/assets/img/blog/ios-apps/hackerfeed.jpeg" alt="Hacker Feed trending stories" width="500" height="1082" style="width: 250px" loading="lazy" decoding="async" /></p>

<p><br /></p>

<p><strong><a href="https://apps.apple.com/us/app/matter-a-better-reading-app/id1501592184">Matter</a></strong></p>

<p>This is one of the best apps the I found last year. It let’s you save things that you want to read for the future. The reader is clean and elegant. It has amazing highlighting features and this is one of those app which I think should be paid, but is not. There is a chrome extension also which lets you highlight and save pages to read in the future.</p>

<p><img src="/static/assets/img/blog/ios-apps/matter.jpeg" alt="Matter read-it-later queue" width="500" height="1082" style="width: 250px" loading="lazy" decoding="async" /></p>

<p><br /></p>

<p><strong><a href="https://apps.apple.com/us/app/notion-notes-docs-tasks/id1232780281">Notion</a></strong></p>

<p>I don’t think I need to say a word regarding this app. The app allows users to create different types of pages, including databases, notes, calendars, to-do lists, and more, all of which can be customized to fit their unique needs. It’s like having functionalities of various apps like Trello, Evernote, and Google Docs into one. I love the widget too.</p>

<p><img src="/static/assets/img/blog/ios-apps/notion.jpeg" alt="Notion workspace dashboard" width="500" height="496" style="width: 250px" loading="lazy" decoding="async" /></p>

<p><br /></p>

<p><strong><a href="https://apps.apple.com/us/app/raindrop-io/id1021913807">Raindrop.io</a></strong></p>

<p>This is one of those apps that I found after lots and lots of searching around. I was looking for an app that would save my links in an orderly fashion. This app does exactly that and so much more. This app also has a browser extension that has been super helpful for me in recent days. Definitely worth trying.</p>

<p><img src="/static/assets/img/blog/ios-apps/raindrop.jpeg" alt="Raindrop.io bookmarks collection" width="500" height="1082" style="width: 250px" loading="lazy" decoding="async" /></p>

<p><br /></p>

<p><strong><a href="https://apps.apple.com/de/app/reddit/id1064216828">Reddit</a></strong></p>

<p>Sorry, we can’t be friends if you do not use reddit. There is something for everyone. Select a field you are interested in and get posts about the latest and greatest topics. No wonder it is called “The Front Page of The Internet”. Go install !! RIGHT NOW !!</p>

<p><img src="/static/assets/img/blog/ios-apps/reddit.jpeg" alt="Reddit feed on mobile" width="500" height="1082" style="width: 250px" loading="lazy" decoding="async" /></p>

<p><br /></p>

<p><strong><a href="https://apps.apple.com/us/app/splitwise/id458023433">Splitwise</a></strong></p>

<p>This app is a must-have if you have friends like mine. Yeah, you know who you are guys :D Splitwise allows you to keep track of shared expenses with friends, family, or roommates. It simplifies the process of splitting bills and helps to avoid awkward situations by keeping a record of who owes what.</p>

<p><img src="/static/assets/img/blog/ios-apps/splitwise.webp" alt="Splitwise expense list" width="500" height="496" style="width: 250px" loading="lazy" decoding="async" /></p>

<p><br /></p>

<!-- Download links haru hallney ... -->]]></content><author><name>Pramesh Bajracharya</name><email>pe.messh@gmail.com</email></author><category term="life" /><category term="tools" /><summary type="html"><![CDATA[The iOS apps I actually keep on my home screen — password managers, read-it-later queues, note-taking, and expense splitting.]]></summary><media:thumbnail xmlns:media="http://search.yahoo.com/mrss/" url="https://prameshbajra.com/static/assets/img/og/my-top-ios-apps.png" /><media:content medium="image" url="https://prameshbajra.com/static/assets/img/og/my-top-ios-apps.png" xmlns:media="http://search.yahoo.com/mrss/" /></entry><entry><title type="html">The Anmeldung in Germany</title><link href="https://prameshbajra.com/blog/theanmeldung/" rel="alternate" type="text/html" title="The Anmeldung in Germany" /><published>2023-02-12T00:00:00+00:00</published><updated>2023-02-12T00:00:00+00:00</updated><id>https://prameshbajra.com/blog/theanmeldung</id><content type="html" xml:base="https://prameshbajra.com/blog/theanmeldung/"><![CDATA[<p>This is one of the most important things you should do after you land in Germany. The official website says that you have two weeks to get this done but some of my friends have done this after 3 months so I am not very sure about the time frame you need to get this done. I did it in a week just to be on the safer side.</p>

<p><strong>Why is this necessary?</strong></p>

<ul>
  <li>
    <p><strong>Get a bank account easily.</strong> <br /> However, there are workarounds which I have mentioned in my other blog.</p>
  </li>
  <li>
    <p><strong>Get a resident card/blue card.</strong> <br /> Depending on where you come from you would most probably have a temporary D-type visa for 3 months to 6 months. For living in Germany for a longer duration you will need to convert that to a resident permit.</p>
  </li>
  <li>
    <p><strong>Get a Sim card easily.</strong> <br /> Again, there is a  simple workaround for this as well which I have mentioned in my blog as well.</p>
  </li>
  <li>
    <p><strong>Get tax ID.</strong> <br /> This one is automatically done on your behalf from the city office/registration office. You will get your tax ID in your mailbox which you should be providing to your employer in order to pay taxes. As far as I know, there is nothing to be done from your end here.</p>
  </li>
</ul>

<p><strong>Before you get to this step you will need the following things:</strong></p>

<ul>
  <li>
    <p>You can only get to this step after you find yourself an apartment/living place where the landlord can provide you with an apartment confirmation document called <code class="language-plaintext highlighter-rouge">Wohnungsbestätigung</code>. <br /> Please note that hotels, Airbnb and some landlords do not provide this. You will need to keep this in mind when getting an apartment.</p>
  </li>
  <li>
    <p>Obviously, you will need a valid passport and the temporary visa (the D-type visa) that got you to Germany in the first place.</p>
  </li>
</ul>

<blockquote>
  <p>A small note here. There is an anmeldung form available online too but I did not need to fill that up. The lady in the city office filled it up for me during the appointment time. Depending on where you book your appointment you will have an English speaking on the other end.</p>
</blockquote>

<blockquote>
  <p>Here’s a PRO TIP: If it is possible, take someone who can speak German with you. I did the same and things got way wayyy easier because of him.</p>
</blockquote>

<p>Here is what I did and how it went.</p>

<ul>
  <li>
    <p>Book an appointment online from <a href="https://welcome.hamburg.de/allgemeines/8428388/anmeldung/">this link.</a> <br /> After you book it you will get an email with a number. For me, it was: T390.</p>
  </li>
  <li>
    <p>Go there on time and wait for your number to be called on the screens. Then head to the section you are called to and you should have your anmeldung/registration done in the next 10 mins.</p>
  </li>
</ul>

<p>My overall experience was super nice. The process was very fast. Way faster that I expected it to be. The lady in the office was also super nice and super kind. She spoke to me very politely and in english. There was no hesitation from her side when providing me the final anmeldung document.</p>]]></content><author><name>Pramesh Bajracharya</name><email>pe.messh@gmail.com</email></author><category term="life" /><summary type="html"><![CDATA[One of the most important things to do after you land in Germany.]]></summary><media:thumbnail xmlns:media="http://search.yahoo.com/mrss/" url="https://prameshbajra.com/static/assets/img/og/theanmeldung.png" /><media:content medium="image" url="https://prameshbajra.com/static/assets/img/og/theanmeldung.png" xmlns:media="http://search.yahoo.com/mrss/" /></entry><entry><title type="html">Friendly talk with Jagathyoti G Tuladhar | Senior Software Engineer @ FuseMachines</title><link href="https://prameshbajra.com/blog/friendlytalkwithjagat/" rel="alternate" type="text/html" title="Friendly talk with Jagathyoti G Tuladhar | Senior Software Engineer @ FuseMachines" /><published>2021-12-14T00:00:00+00:00</published><updated>2021-12-14T00:00:00+00:00</updated><id>https://prameshbajra.com/blog/friendlytalkwithjagat</id><content type="html" xml:base="https://prameshbajra.com/blog/friendlytalkwithjagat/"><![CDATA[<p>If you follow me on <a href="https://www.linkedin.com/in/prameshbajra/">LinkedIn</a>, you probably would have seen my post about connecting with Jagatjyoti, who is a <em>Senior Software Engineer</em> at <em>Fusemachines</em> (One of the leading IT companies in Nepal). This blog is a general summary of the things we talked about. To sum it up, we talked about technology (obviously), a little comparison between the IT sector in India and Nepal, our interests, and a few other things.</p>

<p>First, please let me introduce him.</p>

<p><strong>Jagatjyoti</strong> is a very humble person and a keen tech enthusiast. Like me, he believes in networking and is open to connecting with people who share common interests. He started his journey with <em>Designco Nepal</em> and is currently working on <em>Fusemachines</em> as a Senior Software Engineer for 4.5 years. Also, we both graduated in Computer Science and Engineering from India. He has expertise in Full stack development JavaScript / Typescript and is interested in keen blockchain, data science, and mobile development.</p>

<p><a href="https://www.linkedin.com/in/jagatjyotig/">Here</a> is his LinkedIn profile if you want to connect with him: <a href="">https://www.linkedin.com/in/jagatjyotig/</a></p>

<hr />

<p>I asked him many questions, but I will try to include only relevant ones that make sense to keep this blog short.
<br /><br />
<strong>Fusemachines is one of the leading IT companies here in Nepal. How did you get in? Do you feel proud of that?</strong></p>

<p>“<em>Indeed, I do feel proud. Taking ownership of projects and optimally delivering them is what thrives and inspires me. I find that very interesting, and I am learning a lot too. I was asked by a friend who suggested I drop my CV here. My interviews were extensively technical, and I was honestly very nervous. I remember I started with Node and Ember JS projects.</em>”
<br /><br /></p>

<p><strong>I heard from a close friend that Fusemachines conducts a Knowledge Sharing session every week to learn and research new things. Is that true?</strong></p>

<p>“<em>Yes, it is. Fusemachines as a company is extensively research-driven so having Knowledge sharing sessions enhances everyone’s ability to research and learn new things. Plus, we are an AI-based company, and R&amp;D is the heart here.</em>”
<br /><br /></p>

<p><strong>Do you think data Structures and algorithms are important for full-stack developers?</strong></p>

<p>“<em>I think it is an absolute requirement because, behind the scene, everything is based on it. These days, frameworks have made life easier, but you should know the internal workings of the framework as a software engineer. This also is true for machine learning engineers because even though there are packages readily available, what separates you the most is your understanding of how things work in the background. In general, it helps you make robust decisions. People usually ignore it, but I would say this is very, very important.</em>”
<br /><br /></p>

<p><strong>How do you handle the project’s code when there are more than a dozen people working?</strong></p>

<p>“<em>We try to maintain coding standards as much as we can. We help each other to lean towards better practices. On personal levels we use linters and each pull request goes through two other developers which only gets accepted if that section makes sense. Test cases much exist and there are few other practices that one should abide by. I personally feel this is very important because this indeed will help future contributors to be comfortable with the codebase faster. But, this is also one of the trickiest things to get right. Maintaining constraints for 70-80 engineers is a very difficult job to do. Efficiency and best practices are two vital components for us.</em>”</p>

<p><br /></p>

<blockquote>
  <p>What India has for college students? <br /><br /> I would like to introduce something out of the blue here which is very prevalent in India. India has a lot of companies and a lot of engineers. To fill the demand and supply gaps, the companies there have kind of a partnership with the colleges. These are also called “College Placements”. This means you will have a job in your hands right when you graduate. This was the case for me too. In fact, I joined Codemantra 2 days after my final exams. These days placements of some companies are very lucrative to be honest. Given the right skillset, some were placed at 25+ Lakhs per annum this year from several tier A colleges.</p>
</blockquote>

<p><br /></p>

<p><strong>How is the salary here in Nepal, especially for Software Engineers?</strong></p>

<p>“<em>I have a non-disclosure agreement that forbids me to talk about my salary, but in recent years the IT field has shown good growth, and the salary levels have also seen substantial increments. However, the fluctuation is huge and can widely vary.</em>”
<br /><br /></p>

<blockquote>
  <p>Similar is the case in India too. The IT field has seen enormous growth, and the salary ranges also vary from place to place. I have seen people getting 40+ lakhs per annum with ~4 years of experience and I personally have worked with people with ~10 lakhs per annum with the same experience. So, yes, the margin varies widely. There is a trend going in India these days. Startups that have secured some funding are paying really well to the developers compared to India’s tech giant. For example, Cred and Swiggy pay way more than TCS, Wipro, etc.</p>
</blockquote>

<blockquote>
  <p>Since we are talking about salary, with that comes tax too. I have worked in India, and I understand what tax deductions you can avail of, but unfortunately, I have no clue about the structure and beliefs here. Please let me know if you can help. I hear that the tax deduction system in Nepal is messed up, and nobody really provides a clear answer. For example, in India, we can claim tax deductions by investing in mutual funds. Can we do that here too?</p>
</blockquote>

<blockquote>
  <p><strong>Please let me know if you want to know about the salary ranges for different places. I will try to write another blog and refer to sites with all this information.</strong></p>
</blockquote>

<p><br /></p>

<p><strong>What are your views on cryptocurrencies?</strong></p>

<p>“<em>I believe in the concept of cryptocurrencies and the underlying tech that it runs on. In fact, in my free time, I research it and try to learn new stuff. I think that the power should be in the general public’s hands. With that said, there are scams like pump and dump happening worldwide, and some coins are just trolls. I assume that the future is bright for this, but the road is bumpy.</em>”
 <br /><br /></p>

<p><strong>What would you suggest to a beginner who is just starting out or is a fresh college graduate?</strong></p>

<p>“<em>My main tip would be - Do not just copy and paste code from GitHub or StackOverflow but try to understand what that code does as well. Be aware of what happens behind the scene. A developer needs to know what the code does. Do not just run after results but make sure you understand what you did to get the result (The final thing that works). Also, another thing you should do is, get your basics cleared in your college days and have something to show. Do not run after companies and think that you will learn whatever is needed when you get in. Companies these days are looking for interns who have done something by themselves before. If you have something to show, then that really makes you stand out from the crowd.</em>”</p>

<p><br /></p>

<blockquote>
  <p>I couldn’t agree more on this. Taking my example here, before graduating, I had a bunch of projects to show off to companies that really made a good impression on me. I had projects in blockchain, PHP, react, and a few other things, including my portfolio. This, till today, gives me a head start when reaching out to companies or impressing someone in the community.</p>
</blockquote>

<p><br /></p>

<p>I would like to bring this blog to an abrupt stop as it is getting lengthy. It is quite hard to summarize a 2-hour long call, honestly.</p>

<p>As usual, please reach out if you want to talk tech. I love to network and connect with people.</p>]]></content><author><name>Pramesh Bajracharya</name><email>pe.messh@gmail.com</email></author><category term="career" /><category term="money" /><summary type="html"><![CDATA[A conversation with Jagathyoti G Tuladhar about engineering, salaries across Nepal and India, and building a career in software.]]></summary><media:thumbnail xmlns:media="http://search.yahoo.com/mrss/" url="https://prameshbajra.com/static/assets/img/og/friendlytalkwithjagat.png" /><media:content medium="image" url="https://prameshbajra.com/static/assets/img/og/friendlytalkwithjagat.png" xmlns:media="http://search.yahoo.com/mrss/" /></entry><entry><title type="html">Make your shell pretty.</title><link href="https://prameshbajra.com/blog/pretty-powershell/" rel="alternate" type="text/html" title="Make your shell pretty." /><published>2021-06-21T00:00:00+00:00</published><updated>2021-06-21T00:00:00+00:00</updated><id>https://prameshbajra.com/blog/pretty-powershell</id><content type="html" xml:base="https://prameshbajra.com/blog/pretty-powershell/"><![CDATA[<p>Hey, I hope you are doing well. Before starting to blabber about the customization that we are going to make today, let me give you a sneak peek on what we are going to achieve at the end of this article.</p>

<p><img src="/static/assets/img/blog/powershell/prettypowershell.png" alt="Customized PowerShell console theme" width="1919" height="1035" style="width: 95%" loading="lazy" decoding="async" /></p>

<p>It is a clean and nice looking terminal, isn’t it? As a guy who works with code nearly all the time, this place should be very familiar to you.</p>

<p><br /></p>

<h2 id="why-would-you-want-this">Why would you want this?</h2>

<p>Trust me, you do. It looks aesthetically pleasing and clean. If you are like me, then terminal shells like this will make you want to use it more, making you more productive.</p>

<p><br /></p>

<h2 id="shut-up-and-get-to-the-point-how-do-i-get-this-installed">Shut up and get to the point. How do I get this installed?</h2>

<p>Ok. Before we start I would strongly recommend you to download some of these fonts because windows default fonts sucks and, these are the ones that support the icons and ligratures really well.</p>

<p><a href="https://www.nerdfonts.com/font-downloads" target="_blank"> DOWNLOAD NERD FONTS</a></p>

<blockquote>
  <p>Note: You do not need to download all these fonts. Just download the one you want and install it. All you will need to do is extract the <code class="language-plaintext highlighter-rouge">.zip</code> and double click on the font files to install it.</p>
</blockquote>

<p><br /></p>

<h2 id="done-good-now">Done? Good. Now,</h2>

<p>The page that I am referring is <a href="https://ohmyposh.dev/docs/windows" target="_blank">here (oh-my-posh)</a>. Feel free to jump there if you are confident to install it. I will walk you through the installation steps anyways. I highly suggest you to use <code class="language-plaintext highlighter-rouge">Windows Terminal</code> as it is amazing and any further customization is a piece of cake.
You will need either <code class="language-plaintext highlighter-rouge">winget</code> (is an awesome package manager for windows, try it out if you have not yet!) or <code class="language-plaintext highlighter-rouge">scoop</code> (similar to winget, but older?).
I will be using <code class="language-plaintext highlighter-rouge">winget</code>, but the process is exactly the same for <code class="language-plaintext highlighter-rouge">scoop</code> too. For the future readers, you might want to see if your windows already has <code class="language-plaintext highlighter-rouge">winget</code> installed, as Microsoft will be shipping <code class="language-plaintext highlighter-rouge">winget</code> by default in all Windows machines soon.</p>

<p>Install <code class="language-plaintext highlighter-rouge">oh-my-posh</code>:</p>

<div class="language-plaintext highlighter-rouge"><div class="highlight"><pre class="highlight"><code>winget install JanDeDobbeleer.OhMyPosh
</code></pre></div></div>

<p>Then, open your <code class="language-plaintext highlighter-rouge">Powershell</code> and follow the steps below (Remember, it has to be powershell or else it will not work).You will need to add a single line to a file here.</p>

<div class="language-plaintext highlighter-rouge"><div class="highlight"><pre class="highlight"><code>notepad $PROFILE
</code></pre></div></div>

<p>and add the below line to the file. If you already have some text in that file then add this line to the bottom of the text. Also, remember to replace <code class="language-plaintext highlighter-rouge">[PATH]</code> with the path to that <code class="language-plaintext highlighter-rouge">json</code> file. It should be under <code class="language-plaintext highlighter-rouge">~\AppData\Local\Programs\oh-my-posh\themes\</code> for almost everyone.</p>

<div class="language-plaintext highlighter-rouge"><div class="highlight"><pre class="highlight"><code>oh-my-posh --init --shell pwsh --config [PATH]/jandedobbeleer.omp.json | Invoke-Expression
</code></pre></div></div>

<p>now the final step is to reload the shell:</p>

<div class="language-plaintext highlighter-rouge"><div class="highlight"><pre class="highlight"><code>. $PROFILE
</code></pre></div></div>

<p>and you’re done.</p>

<p>By default there are a bunch of themes that this tool provides but I prefer to customize it further and make my own adjustments.
You can download my custom theme from <a href="https://gist.githubusercontent.com/prameshbajra/42dff56bbd229bad9ca8f5571d70c8cc/raw/dc145db13e2c86e57523290d71e0ee53d239b1be/pramesh.omp.json" target="_blank">here (prameshbajra github)</a>. Simply download this <code class="language-plaintext highlighter-rouge">json</code> and place it along with with <code class="language-plaintext highlighter-rouge">jsons</code> inside folder : <code class="language-plaintext highlighter-rouge">~\AppData\Local\Programs\oh-my-posh\themes\</code>.</p>

<p>You must also edit this line to:</p>

<div class="language-plaintext highlighter-rouge"><div class="highlight"><pre class="highlight"><code>oh-my-posh --init --shell pwsh --config [PATH]/pramesh.omp.json | Invoke-Expression 
</code></pre></div></div>

<p>and do:</p>

<div class="language-plaintext highlighter-rouge"><div class="highlight"><pre class="highlight"><code>. $PROFILE
</code></pre></div></div>

<p>You can have a look at the whole list of themes <a href="" target="_blank"> here</a>.</p>

<p>Enjoy your new theme.</p>

<p><br /></p>

<h2 id="oh-wait-one-more-thing">Oh wait, one more thing,</h2>

<p>The customizations you make here will also be applied in VSCode integrated terminal. So it is definitely a win-win.</p>

<p><img src="/static/assets/img/blog/powershell/vscodepowershell.png" alt="PowerShell extension running inside VS Code" width="1453" height="575" style="width: 95%" loading="lazy" decoding="async" /></p>

<p><br /></p>

<p>As always feel free to reach out if you have any queries. I love talking tech anytime.</p>]]></content><author><name>Pramesh Bajracharya</name><email>pe.messh@gmail.com</email></author><category term="tools" /><summary type="html"><![CDATA[Your development environment should be clean and cool.]]></summary><media:thumbnail xmlns:media="http://search.yahoo.com/mrss/" url="https://prameshbajra.com/static/assets/img/og/pretty-powershell.png" /><media:content medium="image" url="https://prameshbajra.com/static/assets/img/og/pretty-powershell.png" xmlns:media="http://search.yahoo.com/mrss/" /></entry><entry><title type="html">Youtube Downloader - Serverless</title><link href="https://prameshbajra.com/blog/serverless-youtube-downloader/" rel="alternate" type="text/html" title="Youtube Downloader - Serverless" /><published>2020-12-14T00:00:00+00:00</published><updated>2020-12-14T00:00:00+00:00</updated><id>https://prameshbajra.com/blog/serverless-youtube-downloader</id><content type="html" xml:base="https://prameshbajra.com/blog/serverless-youtube-downloader/"><![CDATA[<p>Before blabbering about the application that I made recently, I would like to shine some light on what serverless really is. <strong>Serverless</strong> is a cloud computing execution model in which the cloud provider (like google cloud/azure/amazon web services) runs the server, and dynamically manages the allocation of machine resources. In layman’s term, it means that there are no servers running untill and unless there is a necessity for it to run.
<br /><br /></p>
<h2>Serverless, I choose you.... But, why?</h2>

<p>I did it simply because I wanted to learn. Learning exiciting new stuffs and writing about them has become my niche these days. My motive aside, there are several good things that serverless brings to the table. The most important being the cost saving features. If you are a company that caters thousands, if not millions of users, then this might be a ground breaking thing but for me, this was not the main reason.</p>

<p>I went with serverless because it auto-scales without additional work. While, it is fun to come up with system architecture where everything is implemented in house, it sometimes becomes tedious if you just want you go live and make things work. Some other points that I love about serverless are:</p>

<ul>
  <li>
    <p>it scales with demand automatically</p>
  </li>
  <li>
    <p>it significantly reduces server cost (70-90%), because you don’t pay for idle</p>
  </li>
  <li>
    <p>it eliminates server maintenance</p>
  </li>
  <li>
    <p>it frees up developer resources to take on projects that directly drive business value (versus spending that time on maintenance)</p>
  </li>
</ul>

<p><br /></p>
<h2>Let's talk about the application - How to use it?</h2>

<p>You can simply head over to <a href="http://d2ty6b2yjm83if.cloudfront.net/">Youtube Download - Bazra</a> to have a look for it yourself. The site is very simple (My 12 year old brother was able to figure out how to download the videos without guidance).</p>

<p>So, first thing first, right after you visit the site you will see a place to enter a link for the video you want to download from <strong>YouTube</strong>. If you are from a laptop/computer, you can simply copy the link from the top address bar and paste it in the site and hit enter (or click download). If you are from a mobile you can share the video and copy the link (either way, it works) and paste it into the site and download it.</p>

<p>Done! Your video will be downloaded. Simple, isn’t it?</p>

<blockquote>
  <p><em>This is the first version release. After you click download the video will be downloaded in the highest resolution available.</em></p>
</blockquote>

<p><br /></p>
<h2>Technicalities - How it was build</h2>

<p>I have used the following:</p>

<ul>
  <li>
    <p><a href="https://aws.amazon.com">AWS (Amazon web services)</a></p>

    <p>I use AWS to host all my backend code. The core services I use are: Cloudfront (fast content delivery network (CDN)), S3 (to save videos and host this site), Lambda (backend code), Cloudwatch (for logs). <em>Let me know if you want to get started with AWS too. I can set up an account for you. I have couple hundred dollars lying passive here.</em></p>
  </li>
  <li>
    <p><a href="http://serverless.com/">Serverless Framework</a></p>

    <p>This is an awesome framework to which I should provide a <code class="language-plaintext highlighter-rouge">.yml</code> configuration file and it will setup all the infrastructure in any cloud provider (in my case AWS). There are plugins involved as well.</p>
  </li>
  <li>
    <p><a href="https://angular.io/">Angular 10</a></p>

    <p>It is another amazing platform for building mobile and desktop web applications.</p>
  </li>
  <li>
    <p><a href="https://www.python.org/">Python 3</a></p>

    <p>Programming language of my choice. I use packages like boto3, pytube etc.</p>
  </li>
  <li>
    <p><a href="https://www.docker.com/">Docker</a></p>

    <p>This deserves a whole long blog post on itself. But, just for this application it is needed to bundle python dependencies to deploy it as lambda functions on aws.</p>
  </li>
</ul>

<p>If you are already familiar with these then you can hop to my github repository where all the code is present. If you are interested, I would love to have contributions.</p>

<blockquote>
  <p><em>Please text me, or get in touch through any medium if you would like to discuss more on it. I love tech gossips.</em></p>
</blockquote>

<p><a href="https://github.com/prameshbajra/serverless-works/tree/master/yt-bazra-download">GITHUB: <strong>Youtube Downloader - Bazra</strong></a></p>

<p><br /></p>
<h2>Future Plans</h2>

<ol>
  <li>
    <p>I will be updating this site next weekend with more features like video download based on resolution you select. Good news! The backend is already done.</p>
  </li>
  <li>
    <p>Then, I will also be adding an audio download feature where you can just give the youtube URL and audio file will be downloaded instead of video.</p>
  </li>
  <li>
    <p>I will be adding a contributors page and a documentation page as well.</p>
  </li>
  <li>
    <p>I have lot of interest in creating a browser extension as well, but let’s see where this goes.</p>
  </li>
  <li>
    <p>There might be ads later. Maybe after some user traffic? Also, I will be using the money to donate to some good cause. The infrastructure will be handled by me as long as it is under my budget.</p>
  </li>
  <li>
    <p>This is not yet decided but, I will be publishing the APIs for free and will provide a concise documentation.</p>
  </li>
</ol>

<p><br /><br /></p>
<blockquote>
  <p><strong>As always, I would love to hear back. Feel free to drop suggestions and also let me know what I should add?</strong>
<strong>My emails and messages are always open. And, there is a comment box below if in case you did not notice. :P</strong></p>
</blockquote>]]></content><author><name>Pramesh Bajracharya</name><email>pe.messh@gmail.com</email></author><category term="cloud" /><category term="python" /><summary type="html"><![CDATA[I believe in serverless and I think this is the future.]]></summary><media:thumbnail xmlns:media="http://search.yahoo.com/mrss/" url="https://prameshbajra.com/static/assets/img/og/serverless-youtube-downloader.png" /><media:content medium="image" url="https://prameshbajra.com/static/assets/img/og/serverless-youtube-downloader.png" xmlns:media="http://search.yahoo.com/mrss/" /></entry><entry><title type="html">Python 3.9 - Latest Features</title><link href="https://prameshbajra.com/blog/python39-latest-features/" rel="alternate" type="text/html" title="Python 3.9 - Latest Features" /><published>2020-10-03T00:00:00+00:00</published><updated>2020-10-03T00:00:00+00:00</updated><id>https://prameshbajra.com/blog/python39-latest-features</id><content type="html" xml:base="https://prameshbajra.com/blog/python39-latest-features/"><![CDATA[<p>Please allow me to start with a disclaimer: I am a big <strong>JavaScipt</strong> fan and I only keep track of the latest features for <strong>JavaScript</strong>. The language (<em>JS</em>) has added very handy features in recent years and I can’t stop fan girling about them.</p>

<p>Ok then, with that out of the way. Let’s talk <strong>python</strong> today. This is my first time looking and using the latest features provided by any programming language other than <strong>JavaScript</strong> and honestly, I am very impressed.
<br /><br /></p>
<h2>Let's jump right in</h2>
<p><br />
To make things easier I will be ignoring all the other additions that I did not find very interesting. I mean, I will only mention those latest features which I think will be worth mentioning and will be of some use to us developers.</p>

<ol>
  <li>
    <p><b>The union operator for dictionaries (| and |=)</b></p>

    <p>In earlier versions, to merge 2 dictionaries you would do something like:</p>

    <div class="language-python highlighter-rouge"><div class="highlight"><pre class="highlight"><code> <span class="n">python</span> <span class="o">=</span> <span class="p">{</span><span class="mi">2000</span><span class="p">:</span> <span class="s">"2.0.1"</span><span class="p">,</span> <span class="mi">2008</span><span class="p">:</span> <span class="s">"2.6.9"</span><span class="p">,</span> <span class="mi">2010</span><span class="p">:</span> <span class="s">"2.7.18"</span><span class="p">}</span>
 <span class="n">python3</span> <span class="o">=</span> <span class="p">{</span><span class="mi">2008</span><span class="p">:</span> <span class="s">"3.0.1"</span><span class="p">,</span> <span class="mi">2009</span><span class="p">:</span> <span class="s">"3.1.5"</span><span class="p">,</span> <span class="mi">2016</span><span class="p">:</span> <span class="s">"3.6.12"</span><span class="p">,</span> <span class="mi">2020</span><span class="p">:</span> <span class="s">"3.9.0"</span><span class="p">}</span>

 <span class="c1">##merging two dictionaries
</span> <span class="p">{</span><span class="o">**</span><span class="n">python</span><span class="p">,</span> <span class="o">**</span><span class="n">python3</span><span class="p">}</span>

 <span class="c1"># or
</span> <span class="n">python</span><span class="p">.</span><span class="n">update</span><span class="p">(</span><span class="n">python3</span><span class="p">)</span>
</code></pre></div>    </div>

    <p>But, now you can simply do</p>

    <div class="language-python highlighter-rouge"><div class="highlight"><pre class="highlight"><code> <span class="c1">##merging two dictionaries
</span> <span class="n">python</span> <span class="o">|</span> <span class="n">python3</span>

 <span class="c1"># and update dictionary
</span> <span class="n">python</span> <span class="o">|=</span> <span class="n">python3</span>
</code></pre></div>    </div>

    <p>both of the above code will update <em>python</em> dictionary to</p>

    <div class="language-json highlighter-rouge"><div class="highlight"><pre class="highlight"><code><span class="w"> </span><span class="p">{</span><span class="w">
     </span><span class="mi">2000</span><span class="err">:</span><span class="w"> </span><span class="s2">"2.0.1"</span><span class="p">,</span><span class="w">
     </span><span class="mi">2008</span><span class="err">:</span><span class="w"> </span><span class="s2">"3.0.1"</span><span class="p">,</span><span class="w">
     </span><span class="mi">2010</span><span class="err">:</span><span class="w"> </span><span class="s2">"2.7.18"</span><span class="p">,</span><span class="w">
     </span><span class="mi">2009</span><span class="err">:</span><span class="w"> </span><span class="s2">"3.1.5"</span><span class="p">,</span><span class="w">
     </span><span class="mi">2016</span><span class="err">:</span><span class="w"> </span><span class="s2">"3.6.12"</span><span class="p">,</span><span class="w"> 
     </span><span class="mi">2020</span><span class="err">:</span><span class="w"> </span><span class="s2">"3.9.0"</span><span class="w">
 </span><span class="p">}</span><span class="w">
</span></code></pre></div>    </div>

    <p>Pretty sleek, don’t you think?</p>
  </li>
  <li>
    <p><b>removeprefix() and removesuffix() FINALLY !!!</b></p>

    <p>I do not know about you, but this is a must have for me. I personally, have to work with many file operations where saving a file with new name is a common job.</p>

    <p>In Python 3.9, there are two new string methods that solve this exact use case. You can use .removeprefix() and .removesuffix() to remove the beginning or end of a string, respectively:</p>

    <div class="language-python highlighter-rouge"><div class="highlight"><pre class="highlight"><code><span class="c1"># In older python code:
</span><span class="n">document_file_name</span> <span class="o">=</span> <span class="s">"pramesh.pdf"</span>
<span class="n">json_file_name</span> <span class="o">=</span> <span class="sa">f</span><span class="s">"</span><span class="si">{</span><span class="n">document_file_name</span><span class="p">.</span><span class="n">split</span><span class="p">(</span><span class="s">"."</span><span class="p">)[</span><span class="mi">0</span><span class="p">]</span><span class="si">}</span><span class="s">.json"</span>

<span class="c1"># In python 3.9, I can just do:
</span><span class="n">document_file_name</span> <span class="o">=</span> <span class="s">"pramesh.pdf"</span>
<span class="n">json_file_name</span> <span class="o">=</span> <span class="sa">f</span><span class="s">"</span><span class="si">{</span><span class="n">document_file_name</span><span class="p">.</span><span class="n">removesuffix</span><span class="p">(</span><span class="s">".pdf"</span><span class="p">)</span><span class="si">}</span><span class="s">.json"</span>
</code></pre></div>    </div>

    <p>Much clear, isn’t it?</p>
  </li>
  <li>
    <p><b>math.gcd() and math.lcm() now works with list of numbers.</b></p>

    <p>Earlier, you could do this</p>

    <div class="language-python highlighter-rouge"><div class="highlight"><pre class="highlight"><code> <span class="kn">import</span> <span class="nn">math</span>
 <span class="c1"># This worked ...
</span> <span class="k">print</span><span class="p">(</span><span class="n">math</span><span class="p">.</span><span class="n">gcd</span><span class="p">(</span><span class="mi">49</span><span class="p">,</span> <span class="mi">14</span><span class="p">))</span> <span class="c1"># 7
</span>
 <span class="c1"># But this did not ...
</span> <span class="k">print</span><span class="p">(</span><span class="n">math</span><span class="p">.</span><span class="n">gcd</span><span class="p">(</span><span class="mi">273</span><span class="p">,</span> <span class="mi">1729</span><span class="p">,</span> <span class="mi">6048</span><span class="p">))</span> <span class="c1"># 7
</span></code></pre></div>    </div>

    <p>Now, wahh laaa!! The second one works too. And, same thing applies to LCM as well. You will now be able to use these functions as</p>

    <div class="language-python highlighter-rouge"><div class="highlight"><pre class="highlight"><code> <span class="k">print</span><span class="p">(</span><span class="n">math</span><span class="p">.</span><span class="n">gcd</span><span class="p">(</span><span class="mi">273</span><span class="p">,</span> <span class="mi">1729</span><span class="p">,</span> <span class="mi">6048</span><span class="p">))</span> <span class="c1"># 7
</span></code></pre></div>    </div>
  </li>
  <li>
    <p><b>zoneinfo</b></p>

    <p>The zoneinfo module brings support for the IANA time zone database to the standard library. It adds zoneinfo.ZoneInfo, a concrete datetime.tzinfo implementation backed by the system’s time zone data.</p>

    <div class="language-python highlighter-rouge"><div class="highlight"><pre class="highlight"><code> <span class="o">&gt;&gt;&gt;</span> <span class="kn">from</span> <span class="nn">zoneinfo</span> <span class="kn">import</span> <span class="n">ZoneInfo</span>
 <span class="o">&gt;&gt;&gt;</span> <span class="kn">from</span> <span class="nn">datetime</span> <span class="kn">import</span> <span class="n">datetime</span><span class="p">,</span> <span class="n">timedelta</span>

 <span class="o">&gt;&gt;&gt;</span> <span class="c1"># Daylight saving time
</span> <span class="o">&gt;&gt;&gt;</span> <span class="n">dt</span> <span class="o">=</span> <span class="n">datetime</span><span class="p">(</span><span class="mi">2020</span><span class="p">,</span> <span class="mi">10</span><span class="p">,</span> <span class="mi">31</span><span class="p">,</span> <span class="mi">12</span><span class="p">,</span> <span class="n">tzinfo</span><span class="o">=</span><span class="n">ZoneInfo</span><span class="p">(</span><span class="s">"America/Los_Angeles"</span><span class="p">))</span>
 <span class="o">&gt;&gt;&gt;</span> <span class="k">print</span><span class="p">(</span><span class="n">dt</span><span class="p">)</span>
 <span class="mi">2020</span><span class="o">-</span><span class="mi">10</span><span class="o">-</span><span class="mi">31</span> <span class="mi">12</span><span class="p">:</span><span class="mi">00</span><span class="p">:</span><span class="mi">00</span><span class="o">-</span><span class="mi">07</span><span class="p">:</span><span class="mi">00</span>
 <span class="o">&gt;&gt;&gt;</span> <span class="n">dt</span><span class="p">.</span><span class="n">tzname</span><span class="p">()</span>
 <span class="s">'PDT'</span>

 <span class="o">&gt;&gt;&gt;</span> <span class="c1"># Standard time
</span> <span class="o">&gt;&gt;&gt;</span> <span class="n">dt</span> <span class="o">+=</span> <span class="n">timedelta</span><span class="p">(</span><span class="n">days</span><span class="o">=</span><span class="mi">7</span><span class="p">)</span>
 <span class="o">&gt;&gt;&gt;</span> <span class="k">print</span><span class="p">(</span><span class="n">dt</span><span class="p">)</span>
 <span class="mi">2020</span><span class="o">-</span><span class="mi">11</span><span class="o">-</span><span class="mi">07</span> <span class="mi">12</span><span class="p">:</span><span class="mi">00</span><span class="p">:</span><span class="mi">00</span><span class="o">-</span><span class="mi">08</span><span class="p">:</span><span class="mi">00</span>
 <span class="o">&gt;&gt;&gt;</span> <span class="k">print</span><span class="p">(</span><span class="n">dt</span><span class="p">.</span><span class="n">tzname</span><span class="p">())</span>
 <span class="n">PST</span>
</code></pre></div>    </div>
    <p><br /></p>
  </li>
</ol>

<p>These were some of the cool features that I liked in this new version of <strong>Python</strong>. There are many others too. Please refer to <a href="https://docs.python.org/3/whatsnew/3.9.html">RELEASE NOTES</a> if you want to dig deeper and have a look for yourself.
<br /><br /></p>
<h2>What's next?</h2>
<p><br />
I just wanted to point out some minor things here that needs to be kept in mind when working with <strong>Python</strong>.</p>

<p><strong>Python 2</strong> has been unsupported from the Python Community for a while now. <strong>Python 3.9</strong> is the last version providing those Python 2 backward compatibility layers, to give more time to Python projects maintainers to organize the removal of the Python 2 support and add support for Python 3.9. So, from next version onwards buckle up for some breaking things.</p>

<p><strong>Python 3.9</strong> uses a new parser, based on PEG instead of LL(1). The new parser’s performance is roughly comparable to that of the old parser, but the PEG formalism is more flexible than LL(1) when it comes to designing new language features. We’ll start using this flexibility in Python 3.10 and later. The ast module uses the new parser and produces the same AST as the old parser. In <strong>Python 3.10</strong>, the old parser will be deleted and so will all functionality that depends on it (primarily the parser module, which has long been deprecated). In Python 3.9 only, you can switch back to the LL(1) parser using a command line switch (-X oldparser) or an environment variable (PYTHONOLDPARSER=1).</p>

<p>Fingers crossed for Python 3.10 now.</p>
<hr />

<p><br />
<strong>As usual, feel free to drop a message if you want to get in touch. I am always ready to talk tech.</strong></p>]]></content><author><name>Pramesh Bajracharya</name><email>pe.messh@gmail.com</email></author><category term="python" /><summary type="html"><![CDATA[Python is coming up with some cool nifty features. Let's check out some of them here.]]></summary><media:thumbnail xmlns:media="http://search.yahoo.com/mrss/" url="https://prameshbajra.com/static/assets/img/og/python39-latest-features.png" /><media:content medium="image" url="https://prameshbajra.com/static/assets/img/og/python39-latest-features.png" xmlns:media="http://search.yahoo.com/mrss/" /></entry><entry><title type="html">Ag-Grid Angular 2+ - Create Extra Ordinary Tables/Grids</title><link href="https://prameshbajra.com/blog/ag-grid-angular/" rel="alternate" type="text/html" title="Ag-Grid Angular 2+ - Create Extra Ordinary Tables/Grids" /><published>2020-09-05T00:00:00+00:00</published><updated>2020-09-05T00:00:00+00:00</updated><id>https://prameshbajra.com/blog/ag-grid-angular</id><content type="html" xml:base="https://prameshbajra.com/blog/ag-grid-angular/"><![CDATA[<h2 id="to-start-">To start …</h2>
<p><br /></p>

<p>with any Angular related work you will need to have Node and the Angular CLI in place. If you do not then head over to the below links to install them.</p>

<ol>
  <li>
    <p><a href="https://nodejs.org/en/">Node</a> (will come with npm - node package manager)</p>
  </li>
  <li>
    <p><a href="https://cli.angular.io/">Angular CLI</a></p>
  </li>
</ol>

<p><br />
I’m guessing that you already have an Angular project in place. This method should work with all versions of Angular that came after 2.</p>

<p><br />
In case if you do not have an Angular project, then you can create it using:</p>

<div class="language-bash highlighter-rouge"><div class="highlight"><pre class="highlight"><code>ng new &lt;project_name&gt;
</code></pre></div></div>

<p><br />
You will be prompted with a bunch of necessary questions where you can select necessary configuration for the project to be created.</p>

<p><br />
For the demo purpose, I created a new Angular project named: <strong><em>aggrid-angular</em></strong> 
You can find the code at my github:</p>

<p><br />
<a href="https://github.com/prameshbajra/aggrid-angular">prameshbajra/aggrid-angular</a></p>

<p><br /></p>
<h2 id="starting-with-ag-grid">Starting with ag-grid</h2>
<p><br />
Before diving into the code, I would like to give a brief introduction on ag-grid and why I like it so much.</p>

<p>The “ag” part of ag-Grid stands for “agnostic”. People claim that this package is the best JavaScript Grid in the world. It is packed with lots of features and is a child’s play to use, that too without any compromise in the performace. They provide highly performant, scalable tables with almost unlimited features. And guess what? …. It is totally FREE !!!</p>

<p><br /></p>
<h2 id="on-to-the-code">On to the code</h2>

<p><br />
Start by installing the library itself.</p>

<div class="language-bash highlighter-rouge"><div class="highlight"><pre class="highlight"><code>npm <span class="nb">install</span> <span class="nt">--save</span> ag-grid-community ag-grid-angular
npm <span class="nb">install</span> 
</code></pre></div></div>

<p><br />
Let’s get to the actual coding! As a first step, let’s add the ag-Grid Angular module to our app module (<em>src/app/app.module.ts</em>):</p>

<div class="language-tsx highlighter-rouge"><div class="highlight"><pre class="highlight"><code><span class="k">import</span> <span class="p">{</span> <span class="nx">BrowserModule</span> <span class="p">}</span> <span class="k">from</span> <span class="dl">'</span><span class="s1">@angular/platform-browser</span><span class="dl">'</span><span class="p">;</span>
<span class="k">import</span> <span class="p">{</span> <span class="nx">NgModule</span> <span class="p">}</span> <span class="k">from</span> <span class="dl">'</span><span class="s1">@angular/core</span><span class="dl">'</span><span class="p">;</span>

<span class="k">import</span> <span class="p">{</span> <span class="nx">AppComponent</span> <span class="p">}</span> <span class="k">from</span> <span class="dl">'</span><span class="s1">./app.component</span><span class="dl">'</span><span class="p">;</span>
<span class="k">import</span> <span class="p">{</span> <span class="nx">AgGridModule</span> <span class="p">}</span> <span class="k">from</span> <span class="dl">'</span><span class="s1">ag-grid-angular</span><span class="dl">'</span><span class="p">;</span>

<span class="p">@</span><span class="nd">NgModule</span><span class="p">({</span>
  <span class="na">declarations</span><span class="p">:</span> <span class="p">[</span><span class="nx">AppComponent</span><span class="p">],</span>
  <span class="na">imports</span><span class="p">:</span> <span class="p">[</span>
    <span class="nx">BrowserModule</span><span class="p">,</span>
    <span class="nx">AgGridModule</span><span class="p">.</span><span class="nx">withComponents</span><span class="p">([])</span>
  <span class="p">],</span>
  <span class="na">providers</span><span class="p">:</span> <span class="p">[],</span>
  <span class="na">bootstrap</span><span class="p">:</span> <span class="p">[</span><span class="nx">AppComponent</span><span class="p">]</span>
<span class="p">})</span>
<span class="k">export</span> <span class="kd">class</span> <span class="nx">AppModule</span> <span class="p">{}</span>
</code></pre></div></div>

<p><br />
The next step is to add the ag-Grid styles - replace the content of <em>styles.scss</em> with the following code:</p>

<p>Note: If you are under an existing Angular project then consider adding these.</p>

<div class="language-scss highlighter-rouge"><div class="highlight"><pre class="highlight"><code><span class="k">@import</span> <span class="s2">"../node_modules/ag-grid-community/src/styles/ag-grid.scss"</span><span class="p">;</span>
<span class="k">@import</span> <span class="s2">"../node_modules/ag-grid-community/src/styles/ag-theme-alpine/sass/ag-theme-alpine-mixin.scss"</span><span class="p">;</span>

<span class="nc">.ag-theme-alpine</span> <span class="p">{</span>
    <span class="k">@include</span> <span class="nd">ag-theme-alpine</span><span class="p">();</span>
<span class="p">}</span>
</code></pre></div></div>

<p>The code above imports the grid “structure” stylesheet (<em>ag-grid.css</em>), and one of the available grid themes: (<em>ag-theme-alpine.css</em>). The grid ships several different themes; pick one that matches your project design. You can customise it further with Sass variables too.</p>

<p><br />
Next, let’s declare the basic grid configuration. Edit <em>src/app.component.ts:</em></p>

<div class="language-tsx highlighter-rouge"><div class="highlight"><pre class="highlight"><code><span class="k">import</span> <span class="p">{</span> <span class="nx">Component</span><span class="p">,</span> <span class="nx">OnInit</span> <span class="p">}</span> <span class="k">from</span> <span class="dl">'</span><span class="s1">@angular/core</span><span class="dl">'</span><span class="p">;</span>
<span class="k">import</span> <span class="p">{</span> <span class="nx">HttpClient</span> <span class="p">}</span> <span class="k">from</span> <span class="dl">'</span><span class="s1">@angular/common/http</span><span class="dl">'</span><span class="p">;</span>

<span class="p">@</span><span class="nd">Component</span><span class="p">({</span>
    <span class="na">selector</span><span class="p">:</span> <span class="dl">'</span><span class="s1">app-root</span><span class="dl">'</span><span class="p">,</span>
    <span class="na">templateUrl</span><span class="p">:</span> <span class="dl">'</span><span class="s1">./app.component.html</span><span class="dl">'</span><span class="p">,</span>
    <span class="na">styleUrls</span><span class="p">:</span> <span class="p">[</span><span class="dl">'</span><span class="s1">./app.component.scss</span><span class="dl">'</span><span class="p">]</span>
<span class="p">})</span>

<span class="k">export</span> <span class="kd">class</span> <span class="nx">AppComponent</span> <span class="k">implements</span> <span class="nx">OnInit</span> <span class="p">{</span>
    <span class="nx">title</span> <span class="o">=</span> <span class="dl">'</span><span class="s1">app</span><span class="dl">'</span><span class="p">;</span>

    <span class="nx">columnDefs</span> <span class="o">=</span> <span class="p">[</span>
        <span class="p">{</span><span class="na">headerName</span><span class="p">:</span> <span class="dl">'</span><span class="s1">Make</span><span class="dl">'</span><span class="p">,</span> <span class="na">field</span><span class="p">:</span> <span class="dl">'</span><span class="s1">make</span><span class="dl">'</span><span class="p">,</span> <span class="na">sortable</span><span class="p">:</span> <span class="kc">true</span><span class="p">,</span> <span class="na">filter</span><span class="p">:</span> <span class="kc">true</span><span class="p">},</span>
        <span class="p">{</span><span class="na">headerName</span><span class="p">:</span> <span class="dl">'</span><span class="s1">Model</span><span class="dl">'</span><span class="p">,</span> <span class="na">field</span><span class="p">:</span> <span class="dl">'</span><span class="s1">model</span><span class="dl">'</span><span class="p">,</span> <span class="na">sortable</span><span class="p">:</span> <span class="kc">true</span><span class="p">,</span> <span class="na">filter</span><span class="p">:</span> <span class="kc">true</span><span class="p">},</span>
        <span class="p">{</span><span class="na">headerName</span><span class="p">:</span> <span class="dl">'</span><span class="s1">Price</span><span class="dl">'</span><span class="p">,</span> <span class="na">field</span><span class="p">:</span> <span class="dl">'</span><span class="s1">price</span><span class="dl">'</span><span class="p">,</span> <span class="na">sortable</span><span class="p">:</span> <span class="kc">true</span><span class="p">,</span> <span class="na">filter</span><span class="p">:</span> <span class="kc">true</span><span class="p">}</span>
    <span class="p">];</span>

    <span class="nl">rowData</span><span class="p">:</span> <span class="kr">any</span><span class="p">;</span>

    <span class="kd">constructor</span><span class="p">(</span><span class="k">private</span> <span class="nx">http</span><span class="p">:</span> <span class="nx">HttpClient</span><span class="p">)</span> <span class="p">{</span>

    <span class="p">}</span>

    <span class="nx">ngOnInit</span><span class="p">()</span> <span class="p">{</span>
        <span class="k">this</span><span class="p">.</span><span class="nx">rowData</span> <span class="o">=</span> <span class="k">this</span><span class="p">.</span><span class="nx">http</span><span class="p">.</span><span class="kd">get</span><span class="p">(</span><span class="dl">'</span><span class="s1">https://raw.githubusercontent.com/ag-grid/ag-grid/master/grid-packages/ag-grid-docs/src/sample-data/smallRowData.json</span><span class="dl">'</span><span class="p">);</span>
    <span class="p">}</span>
<span class="p">}</span>
</code></pre></div></div>

<p><br />
The above code turns the rowData from a hard-coded array to an Observable. For the grid to work with it, we need to add an async pipe to the property:</p>

<div class="language-html highlighter-rouge"><div class="highlight"><pre class="highlight"><code><span class="nt">&lt;ag-grid-angular</span>
    <span class="na">style=</span><span class="s">"width: 500px; height: 500px;"</span>
		<span class="na">class=</span><span class="s">"ag-theme-alpine"</span>
		<span class="na">[rowData]=</span><span class="s">"rowData | async"</span>
		<span class="na">[columnDefs]=</span><span class="s">"columnDefs"</span><span class="nt">&gt;</span>
<span class="nt">&lt;/ag-grid-angular&gt;</span>
</code></pre></div></div>

<p>Just with these simple steps you can now see the table rendered in the UI. Try dragging the columns around. Nice, right? These are all the features that ag-grid provide out of the box.</p>

<p><br /></p>
<h2 id="why-stop-here-lets-keep-adding-some-more-stuffs">Why stop here? Let’s keep adding some more stuffs</h2>

<p><br />
<strong>Enable Sorting And Filtering</strong></p>

<p>Well, enabling sorting in ag-Grid is actually quite simple - all you need to do is set the sortable property to each column you want to be able to sort by. Easy isn’t it?</p>

<p>Click on the column heads to sort accordingly.</p>

<div class="language-tsx highlighter-rouge"><div class="highlight"><pre class="highlight"><code><span class="nx">columnDefs</span> <span class="o">=</span> <span class="p">[</span>
    <span class="p">{</span><span class="na">headerName</span><span class="p">:</span> <span class="dl">'</span><span class="s1">Make</span><span class="dl">'</span><span class="p">,</span> <span class="na">field</span><span class="p">:</span> <span class="dl">'</span><span class="s1">make</span><span class="dl">'</span><span class="p">,</span> <span class="na">sortable</span><span class="p">:</span> <span class="kc">true</span><span class="p">},</span>
    <span class="p">{</span><span class="na">headerName</span><span class="p">:</span> <span class="dl">'</span><span class="s1">Model</span><span class="dl">'</span><span class="p">,</span> <span class="na">field</span><span class="p">:</span> <span class="dl">'</span><span class="s1">model</span><span class="dl">'</span><span class="p">,</span> <span class="na">sortable</span><span class="p">:</span> <span class="kc">true</span><span class="p">},</span>
    <span class="p">{</span><span class="na">headerName</span><span class="p">:</span> <span class="dl">'</span><span class="s1">Price</span><span class="dl">'</span><span class="p">,</span> <span class="na">field</span><span class="p">:</span> <span class="dl">'</span><span class="s1">price</span><span class="dl">'</span><span class="p">,</span> <span class="na">sortable</span><span class="p">:</span> <span class="kc">true</span><span class="p">}</span>
<span class="p">];</span>
</code></pre></div></div>

<p><br />
As with sorting, enabling filtering is as easy as setting the filter property:</p>

<div class="language-tsx highlighter-rouge"><div class="highlight"><pre class="highlight"><code><span class="nx">columnDefs</span> <span class="o">=</span> <span class="p">[</span>
    <span class="p">{</span><span class="na">headerName</span><span class="p">:</span> <span class="dl">'</span><span class="s1">Make</span><span class="dl">'</span><span class="p">,</span> <span class="na">field</span><span class="p">:</span> <span class="dl">'</span><span class="s1">make</span><span class="dl">'</span><span class="p">,</span> <span class="na">sortable</span><span class="p">:</span> <span class="kc">true</span><span class="p">,</span> <span class="na">filter</span><span class="p">:</span> <span class="kc">true</span><span class="p">},</span>
    <span class="p">{</span><span class="na">headerName</span><span class="p">:</span> <span class="dl">'</span><span class="s1">Model</span><span class="dl">'</span><span class="p">,</span> <span class="na">field</span><span class="p">:</span> <span class="dl">'</span><span class="s1">model</span><span class="dl">'</span><span class="p">,</span> <span class="na">sortable</span><span class="p">:</span> <span class="kc">true</span><span class="p">,</span> <span class="na">filter</span><span class="p">:</span> <span class="kc">true</span><span class="p">},</span>
    <span class="p">{</span><span class="na">headerName</span><span class="p">:</span> <span class="dl">'</span><span class="s1">Price</span><span class="dl">'</span><span class="p">,</span> <span class="na">field</span><span class="p">:</span> <span class="dl">'</span><span class="s1">price</span><span class="dl">'</span><span class="p">,</span> <span class="na">sortable</span><span class="p">:</span> <span class="kc">true</span><span class="p">,</span> <span class="na">filter</span><span class="p">:</span> <span class="kc">true</span><span class="p">}</span>
<span class="p">];</span>
</code></pre></div></div>

<p><br />
<strong>Multi Level Header Table</strong></p>

<p>This was honestly the most tedious part of making tables in angular using libraries. No other library (including angular-material) provides an easy way of implementing multi header functionality. All thanks to Ag-grid, you can now do this with very minute change.</p>

<p>I will be creating a new component for this. It can be done by:</p>

<div class="language-plaintext highlighter-rouge"><div class="highlight"><pre class="highlight"><code>ng g c app/multi-header
</code></pre></div></div>

<p><br />
Inside the new component you can have the below html.</p>

<div class="language-html highlighter-rouge"><div class="highlight"><pre class="highlight"><code><span class="nt">&lt;ag-grid-angular</span> <span class="na">#agGrid</span> <span class="na">style=</span><span class="s">"width: 1200px; height: 600px;"</span> <span class="na">id=</span><span class="s">"myGrid"</span> <span class="na">class=</span><span class="s">"ag-theme-alpine"</span>
    <span class="na">[columnDefs]=</span><span class="s">"columnDefs"</span> <span class="na">[defaultColDef]=</span><span class="s">"defaultColDef"</span> <span class="na">[debug]=</span><span class="s">"true"</span> <span class="na">[rowData]=</span><span class="s">"rowData"</span>
    <span class="na">(gridReady)=</span><span class="s">"onGridReady($event)"</span><span class="nt">&gt;&lt;/ag-grid-angular&gt;</span>
</code></pre></div></div>

<p>and in the respective typescript component file you can have this:</p>

<div class="language-tsx highlighter-rouge"><div class="highlight"><pre class="highlight"><code><span class="k">import</span> <span class="p">{</span> <span class="nx">HttpClient</span> <span class="p">}</span> <span class="k">from</span> <span class="dl">'</span><span class="s1">@angular/common/http</span><span class="dl">'</span><span class="p">;</span>
<span class="k">import</span> <span class="p">{</span> <span class="nx">Component</span> <span class="p">}</span> <span class="k">from</span> <span class="dl">'</span><span class="s1">@angular/core</span><span class="dl">'</span><span class="p">;</span>

<span class="p">@</span><span class="nd">Component</span><span class="p">({</span>
    <span class="na">selector</span><span class="p">:</span> <span class="dl">'</span><span class="s1">app-multi-header</span><span class="dl">'</span><span class="p">,</span>
    <span class="na">templateUrl</span><span class="p">:</span> <span class="dl">'</span><span class="s1">./multi-header.component.html</span><span class="dl">'</span><span class="p">,</span>
    <span class="na">styleUrls</span><span class="p">:</span> <span class="p">[</span><span class="dl">'</span><span class="s1">./multi-header.component.scss</span><span class="dl">'</span><span class="p">]</span>
<span class="p">})</span>

<span class="k">export</span> <span class="kd">class</span> <span class="nx">MultiHeaderComponent</span> <span class="p">{</span>
    <span class="k">private</span> <span class="nx">gridApi</span><span class="p">;</span>
    <span class="k">private</span> <span class="nx">gridColumnApi</span><span class="p">;</span>

    <span class="k">private</span> <span class="nx">columnDefs</span><span class="p">;</span>
    <span class="k">private</span> <span class="nx">defaultColDef</span><span class="p">;</span>
    <span class="k">private</span> <span class="nx">rowData</span><span class="p">:</span> <span class="p">[];</span>

    <span class="kd">constructor</span><span class="p">(</span><span class="k">private</span> <span class="nx">http</span><span class="p">:</span> <span class="nx">HttpClient</span><span class="p">)</span> <span class="p">{</span>
        <span class="k">this</span><span class="p">.</span><span class="nx">columnDefs</span> <span class="o">=</span> <span class="p">[</span>
            <span class="p">{</span>
                <span class="na">headerName</span><span class="p">:</span> <span class="dl">'</span><span class="s1">Athlete Details</span><span class="dl">'</span><span class="p">,</span>
                <span class="na">children</span><span class="p">:</span> <span class="p">[</span>
                    <span class="p">{</span>
                        <span class="na">headerName</span><span class="p">:</span> <span class="dl">'</span><span class="s1">Athlete</span><span class="dl">'</span><span class="p">,</span>
                        <span class="na">field</span><span class="p">:</span> <span class="dl">'</span><span class="s1">athlete</span><span class="dl">'</span><span class="p">,</span>
                        <span class="na">width</span><span class="p">:</span> <span class="mi">180</span><span class="p">,</span>
                        <span class="na">filter</span><span class="p">:</span> <span class="dl">'</span><span class="s1">agTextColumnFilter</span><span class="dl">'</span><span class="p">,</span>
                    <span class="p">},</span>
                    <span class="p">{</span>
                        <span class="na">headerName</span><span class="p">:</span> <span class="dl">'</span><span class="s1">Age</span><span class="dl">'</span><span class="p">,</span>
                        <span class="na">field</span><span class="p">:</span> <span class="dl">'</span><span class="s1">age</span><span class="dl">'</span><span class="p">,</span>
                        <span class="na">width</span><span class="p">:</span> <span class="mi">90</span><span class="p">,</span>
                        <span class="na">filter</span><span class="p">:</span> <span class="dl">'</span><span class="s1">agNumberColumnFilter</span><span class="dl">'</span><span class="p">,</span>
                    <span class="p">},</span>
                    <span class="p">{</span>
                        <span class="na">headerName</span><span class="p">:</span> <span class="dl">'</span><span class="s1">Country</span><span class="dl">'</span><span class="p">,</span>
                        <span class="na">field</span><span class="p">:</span> <span class="dl">'</span><span class="s1">country</span><span class="dl">'</span><span class="p">,</span>
                        <span class="na">width</span><span class="p">:</span> <span class="mi">140</span><span class="p">,</span>
                    <span class="p">},</span>
                <span class="p">],</span>
            <span class="p">},</span>
            <span class="p">{</span>
                <span class="na">headerName</span><span class="p">:</span> <span class="dl">'</span><span class="s1">Sports Results</span><span class="dl">'</span><span class="p">,</span>
                <span class="na">children</span><span class="p">:</span> <span class="p">[</span>
                    <span class="p">{</span>
                        <span class="na">headerName</span><span class="p">:</span> <span class="dl">'</span><span class="s1">Sport</span><span class="dl">'</span><span class="p">,</span>
                        <span class="na">field</span><span class="p">:</span> <span class="dl">'</span><span class="s1">sport</span><span class="dl">'</span><span class="p">,</span>
                        <span class="na">width</span><span class="p">:</span> <span class="mi">140</span><span class="p">,</span>
                    <span class="p">},</span>
                    <span class="p">{</span>
                        <span class="na">headerName</span><span class="p">:</span> <span class="dl">'</span><span class="s1">Total</span><span class="dl">'</span><span class="p">,</span>
                        <span class="na">columnGroupShow</span><span class="p">:</span> <span class="dl">'</span><span class="s1">closed</span><span class="dl">'</span><span class="p">,</span>
                        <span class="na">field</span><span class="p">:</span> <span class="dl">'</span><span class="s1">total</span><span class="dl">'</span><span class="p">,</span>
                        <span class="na">width</span><span class="p">:</span> <span class="mi">100</span><span class="p">,</span>
                        <span class="na">filter</span><span class="p">:</span> <span class="dl">'</span><span class="s1">agNumberColumnFilter</span><span class="dl">'</span><span class="p">,</span>
                    <span class="p">},</span>
                    <span class="p">{</span>
                        <span class="na">headerName</span><span class="p">:</span> <span class="dl">'</span><span class="s1">Gold</span><span class="dl">'</span><span class="p">,</span>
                        <span class="na">columnGroupShow</span><span class="p">:</span> <span class="dl">'</span><span class="s1">open</span><span class="dl">'</span><span class="p">,</span>
                        <span class="na">field</span><span class="p">:</span> <span class="dl">'</span><span class="s1">gold</span><span class="dl">'</span><span class="p">,</span>
                        <span class="na">width</span><span class="p">:</span> <span class="mi">100</span><span class="p">,</span>
                        <span class="na">filter</span><span class="p">:</span> <span class="dl">'</span><span class="s1">agNumberColumnFilter</span><span class="dl">'</span><span class="p">,</span>
                    <span class="p">},</span>
                    <span class="p">{</span>
                        <span class="na">headerName</span><span class="p">:</span> <span class="dl">'</span><span class="s1">Silver</span><span class="dl">'</span><span class="p">,</span>
                        <span class="na">columnGroupShow</span><span class="p">:</span> <span class="dl">'</span><span class="s1">open</span><span class="dl">'</span><span class="p">,</span>
                        <span class="na">field</span><span class="p">:</span> <span class="dl">'</span><span class="s1">silver</span><span class="dl">'</span><span class="p">,</span>
                        <span class="na">width</span><span class="p">:</span> <span class="mi">100</span><span class="p">,</span>
                        <span class="na">filter</span><span class="p">:</span> <span class="dl">'</span><span class="s1">agNumberColumnFilter</span><span class="dl">'</span><span class="p">,</span>
                    <span class="p">},</span>
                    <span class="p">{</span>
                        <span class="na">headerName</span><span class="p">:</span> <span class="dl">'</span><span class="s1">Bronze</span><span class="dl">'</span><span class="p">,</span>
                        <span class="na">columnGroupShow</span><span class="p">:</span> <span class="dl">'</span><span class="s1">open</span><span class="dl">'</span><span class="p">,</span>
                        <span class="na">field</span><span class="p">:</span> <span class="dl">'</span><span class="s1">bronze</span><span class="dl">'</span><span class="p">,</span>
                        <span class="na">width</span><span class="p">:</span> <span class="mi">100</span><span class="p">,</span>
                        <span class="na">filter</span><span class="p">:</span> <span class="dl">'</span><span class="s1">agNumberColumnFilter</span><span class="dl">'</span><span class="p">,</span>
                    <span class="p">},</span>
                <span class="p">],</span>
            <span class="p">},</span>
        <span class="p">];</span>
        <span class="k">this</span><span class="p">.</span><span class="nx">defaultColDef</span> <span class="o">=</span> <span class="p">{</span>
            <span class="na">sortable</span><span class="p">:</span> <span class="kc">true</span><span class="p">,</span>
            <span class="na">resizable</span><span class="p">:</span> <span class="kc">true</span><span class="p">,</span>
            <span class="na">filter</span><span class="p">:</span> <span class="kc">true</span><span class="p">,</span>
        <span class="p">};</span>
    <span class="p">}</span>


    <span class="nx">onGridReady</span><span class="p">(</span><span class="nx">params</span><span class="p">)</span> <span class="p">{</span>
        <span class="k">this</span><span class="p">.</span><span class="nx">gridApi</span> <span class="o">=</span> <span class="nx">params</span><span class="p">.</span><span class="nx">api</span><span class="p">;</span>
        <span class="k">this</span><span class="p">.</span><span class="nx">gridColumnApi</span> <span class="o">=</span> <span class="nx">params</span><span class="p">.</span><span class="nx">columnApi</span><span class="p">;</span>

        <span class="k">this</span><span class="p">.</span><span class="nx">http</span>
            <span class="p">.</span><span class="kd">get</span><span class="p">(</span>
                <span class="dl">'</span><span class="s1">https://raw.githubusercontent.com/ag-grid/ag-grid/master/grid-packages/ag-grid-docs/src/olympicWinnersSmall.json</span><span class="dl">'</span>
            <span class="p">)</span>
            <span class="p">.</span><span class="nx">subscribe</span><span class="p">(</span><span class="nx">data</span> <span class="o">=&gt;</span> <span class="p">{</span>
                <span class="k">this</span><span class="p">.</span><span class="nx">rowData</span> <span class="o">=</span> <span class="nx">data</span><span class="p">;</span>
            <span class="p">});</span>
    <span class="p">}</span>
<span class="p">}</span>
</code></pre></div></div>

<p>and we’re done. Notice how flexible the headers are. You can expand them, drag and drop them.</p>

<p><br />
I do not think there is any other library that provides these many exhaustive set of features.</p>

<p><br /></p>
<blockquote>
  <p>As always, feel free to reach out if you need help with something. I’ll be honored to help.</p>
</blockquote>]]></content><author><name>Pramesh Bajracharya</name><email>pe.messh@gmail.com</email></author><category term="web" /><summary type="html"><![CDATA[Use AG-Grid for awesome tables.]]></summary><media:thumbnail xmlns:media="http://search.yahoo.com/mrss/" url="https://prameshbajra.com/static/assets/img/og/ag-grid-angular.png" /><media:content medium="image" url="https://prameshbajra.com/static/assets/img/og/ag-grid-angular.png" xmlns:media="http://search.yahoo.com/mrss/" /></entry><entry><title type="html">I wrote a SERVER that might be of use to YOU!!</title><link href="https://prameshbajra.com/blog/see-my-files/" rel="alternate" type="text/html" title="I wrote a SERVER that might be of use to YOU!!" /><published>2020-08-16T00:00:00+00:00</published><updated>2020-08-16T00:00:00+00:00</updated><id>https://prameshbajra.com/blog/see-my-files</id><content type="html" xml:base="https://prameshbajra.com/blog/see-my-files/"><![CDATA[<h2 id="what-is-it">What is it?</h2>

<p>It is like any other <code class="language-plaintext highlighter-rouge">http file server</code> but on <strong>steroids</strong>. Why?</p>

<p>Because it not only provides you the file sharing capabilities but also tags along other great features like <em>download as zip</em> and <em>upload to the server</em>.
<br /><br /></p>

<h2 id="is-it-a-complete-thing">Is it a complete thing?</h2>

<p>No, not really. In fact, this is nowhere close to done. I will be adding a vast array of features down the line. Please stay tuned.
<br /><br /></p>

<h2 id="why-did-i-make-this">Why did I make this?</h2>

<p>Duhhhh! Because I can.</p>

<p>Kidding aside. In my daily office works, I need to move files back and forth between multiple computers/laptops connected under a same network. So, this makes my (and my collegues) life much simpler and easier.
<br /><br /></p>

<h2 id="how-to-use-it">How to use it?</h2>

<p>Ok, enough blabbering. Let’s get started. You will need <strong>Node</strong> installed on your laptop/computer and both the system you want to transfer files to and from should be under the same network. Basically, it needs to be connected to the same wifi network. In case, you have not installed <strong>Node</strong>, you can do so from <a href="https://nodejs.org/en/">this link</a>.</p>

<p>Node will automatically install <strong>npm (Node Package Manager)</strong> for you from where you can install many other packages. It is like a market for node applications where you can pick stuffs and use it.</p>

<p>So,</p>

<ol>
  <li>
    <p>Open a terminal/cmd/shell on your host machine (the machine from which you want to transfer the files to), and type:</p>

    <div class="language-plaintext highlighter-rouge"><div class="highlight"><pre class="highlight"><code> npm install -g see-my-files
</code></pre></div>    </div>

    <p>This will install the required things that you will need to run the application.</p>
  </li>
  <li>
    <p>Then right after it you can simply do:</p>

    <div class="language-plaintext highlighter-rouge"><div class="highlight"><pre class="highlight"><code> see-my-files
</code></pre></div>    </div>

    <p>This will open up a server and give you a link.</p>
  </li>
</ol>

<p>The link that just got printed after running the above command can be used in any other computer to open a file system. The link should look something like: <code class="language-plaintext highlighter-rouge">http://192.168.1.11:3300</code>. Note this link and on the other computer simply open a browser and navigate to this very link.</p>

<p>You will see something link this:</p>

<p><img src="/static/assets/img/blog/see-my-files/see-my-files.png" alt="See My Files web interface" width="1919" height="985" style="width: 70%" loading="lazy" decoding="async" /></p>

<p>To <strong>downlaod a file</strong> simply <strong>click</strong> on the file. It will automatically be downloaded. To <strong>download a folder</strong> you can right click on it and press <strong>download as zip</strong>. To <strong>upload something</strong> to the source machine you can simply <strong>drag the file to the folder icon</strong>. The upload will be done automatically.</p>

<p>Well. That’s it for this article. I really hope you find this useful.
<br /><br />
As always, feel free to reach out to me if you need help.
<br /><br /></p>
<h2 id="are-you-a-developer-as-well">Are you a developer as well?</h2>

<p>Feel free to contribute: <a href="https://github.com/prameshbajra/see-my-files">https://github.com/prameshbajra/see-my-files</a></p>]]></content><author><name>Pramesh Bajracharya</name><email>pe.messh@gmail.com</email></author><category term="web" /><summary type="html"><![CDATA[Share files with a powerful http server.]]></summary><media:thumbnail xmlns:media="http://search.yahoo.com/mrss/" url="https://prameshbajra.com/static/assets/img/og/see-my-files.png" /><media:content medium="image" url="https://prameshbajra.com/static/assets/img/og/see-my-files.png" xmlns:media="http://search.yahoo.com/mrss/" /></entry><entry><title type="html">Stop sending plain/boring e-mails</title><link href="https://prameshbajra.com/blog/stop-boring-emails/" rel="alternate" type="text/html" title="Stop sending plain/boring e-mails" /><published>2020-07-26T00:00:00+00:00</published><updated>2020-07-26T00:00:00+00:00</updated><id>https://prameshbajra.com/blog/stop-boring-emails</id><content type="html" xml:base="https://prameshbajra.com/blog/stop-boring-emails/"><![CDATA[<p>I can pretty much guarantee that we all have been sending plain emails for a long long time. I’m here to help you change that.</p>

<p>Imagine the impression you will be making on a job application with the help of an unique email? You will be rocking your emails and 
people will notice it for sure.</p>

<p>Before we start. You might want to view this on your laptop because you cannot get this done from a mobile phone.</p>

<p><br /><br /></p>
<h2>What will I guide you with?</h2>
<p><br /></p>
<h3>From this:</h3>
<p><br />
<img src="/static/assets/img/blog/emails/old-email.png" alt="Example of default email template" width="1106" height="670" style="width: 65%" loading="lazy" decoding="async" />  <br />
<br /><br /></p>
<h3>To this:</h3>
<p><br />
<img src="/static/assets/img/blog/emails/new-email.png" alt="Customized email template preview" width="1491" height="494" style="width: 65%" loading="lazy" decoding="async" />  <br />
<br /></p>

<p>There are some things you will need early hand. It might get a bit tedious but trust me, it’s worth it.</p>

<p>The steps are fairly simple and will require little to no skills.
<br /><br /></p>
<h2>Follow along</h2>
<p><br /></p>

<ol>
  <li>
    <p>First thing first, head over to <strong><a href="https://mail.google.com/">GMail</a></strong>.</p>
  </li>
  <li>
    <p>You will have to enable a setting to proceed further. This can be enabled through couple of clicks.</p>
  </li>
  <li>
    <p>Go to all setting and enable the options for templates (Follow the image below for better clarification). Click <strong>Save changes</strong> at the buttom of the page to save your changes.
<br /><br />
<img src="/static/assets/img/blog/emails/step1.png" alt="Gmail settings step showing gear icon" width="564" height="502" style="width: 40%" loading="lazy" decoding="async" />  <br />
<br /><br />
<img src="/static/assets/img/blog/emails/step2.png" alt="Import theme dialog in Gmail" width="1512" height="812" style="width: 65%" loading="lazy" decoding="async" />  <br />
<br /><br /></p>
  </li>
  <li>
    <p>Time to get a little technical now. Head to <strong><a href="https://gist.githubusercontent.com/prameshbajra/1b0bcfbfb22c6fc7dfb8102873cd4408/raw/ad0899e5ec12ce89b24504ec99171378083c0b5c/GmailTemplateFooter.html">this URL</a></strong> and copy the entire HTML code.</p>
  </li>
  <li>
    <p>Paste this into the editor you prefer (something like notepad) and make necessary edits.</p>

    <ul>
      <li>
        <p>Change <strong>https://prameshbajra.github.io</strong> to <strong>#</strong> if in case you do not have your own website. If you do, then replace this with your website link.</p>
      </li>
      <li>
        <p>Replace all other social media links to your profile. Currently, the link refers to my profiles. Eg: Change <strong>https://www.facebook.com/prameshbajra/</strong> to <strong>https://www.facebook.com/YOUR_USERNAME_HERE/</strong>.</p>
      </li>
      <li>
        <p>After you’re done with all the edits select all and copy the entire HTML code. You will be needing this now.</p>
      </li>
    </ul>
  </li>
  <li>
    <p>After you’re done making the necessary changes, follow the below steps in the video. (Please do let me know if a youtube video would help. I would consider making one if need be.)
<br /><br />
<img src="/static/assets/img/blog/emails/steps.gif" alt="Animated steps to apply email theme" width="744" height="391" style="width: 65%" loading="lazy" decoding="async" />  <br />
<br /><br /></p>

    <p>In case you are wondering on what I just did there. Here are the steps to help process it.</p>

    <ul>
      <li>
        <p>I copied the HTML code that is to be sent in email. This is just the basic code to show the blue area and your name inside it.</p>
      </li>
      <li>
        <p>Then I typed <strong>Anything</strong> in the message area and did a right click to open a menu on which I clicked <strong>Inspect Element</strong>.</p>
      </li>
      <li>
        <p>After this I went ahead to the console area (the code part), selected the <strong>div</strong> element, right clicked and selected <strong>Edit As HTML</strong>.</p>
      </li>
      <li>
        <p>I then removed the text (<strong>Anything</strong>) and replaced it with the HTML code that I have copied.</p>
      </li>
      <li>
        <p>The content looks ugly at first but do not worry. We can go ahead and save it as a template. You need to provide a template name here. It can be anything you wish to name it.</p>
      </li>
      <li>
        <p>The setup is done. Your template is now ready to be used.</p>
      </li>
      <li>
        <p>Inorder to test it I clicked on <strong>Compose</strong> again and selected the saved template. The message area then changes automatically.</p>
      </li>
      <li>
        <p>Now just type your email and send it.</p>
      </li>
    </ul>
  </li>
  <li>
    <p>Done. Congratulations! Now you have a professional email template.</p>
  </li>
</ol>

<p><br /></p>
<h2>Somethings I can help you out with:</h2>

<ul>
  <li>
    <p>Feel free to contact me in any social media platforms (@prameshbajra) if you get stuck somewhere.</p>
  </li>
  <li>
    <p>If you are too lazy, not sure or too busy. Feel free to reach out to me. I can do this for you.</p>
  </li>
  <li>
    <p>If you want to see how the email looks. Drop a DM with your email ID. I will send you a sample email with this template.</p>
  </li>
  <li>
    <p>If in case you want some other design, something more pretty or more complex then contact me. I’d be happy to make one for you.</p>
  </li>
</ul>

<p><br />
<strong>Hope this helps.</strong></p>]]></content><author><name>Pramesh Bajracharya</name><email>pe.messh@gmail.com</email></author><category term="web" /><summary type="html"><![CDATA[A concise tutorial on adding beautiful custom templates to your personal email in Gmail.]]></summary><media:thumbnail xmlns:media="http://search.yahoo.com/mrss/" url="https://prameshbajra.com/static/assets/img/og/stop-boring-emails.png" /><media:content medium="image" url="https://prameshbajra.com/static/assets/img/og/stop-boring-emails.png" xmlns:media="http://search.yahoo.com/mrss/" /></entry><entry><title type="html">Use ChartsJS in your Angular2+ Project</title><link href="https://prameshbajra.com/blog/angular-ng2charts/" rel="alternate" type="text/html" title="Use ChartsJS in your Angular2+ Project" /><published>2020-03-14T00:00:00+00:00</published><updated>2020-03-14T00:00:00+00:00</updated><id>https://prameshbajra.com/blog/angular-ng2charts</id><content type="html" xml:base="https://prameshbajra.com/blog/angular-ng2charts/"><![CDATA[<p>How about displaying your data on a beautiful chart? They are very much favoured by almost all users and makes your website very appealing.
<br /><br /></p>

<h2 id="lets-jump-to-the-coding-section">Let’s jump to the coding section.</h2>
<p>We will be creating the application from scratch but, if in case, you need this in your existing application then feel free to jump ahead. I
will be listing down the steps and you should be good to go just by simple copy and paste. But, before that there are some prerequisites in order to continue.</p>

<h3 id="prerequisites">Prerequisites:</h3>

<ol>
  <li>
    <p><a href="https://nodejs.org/en/">NodeJS</a> installed.</p>
  </li>
  <li>
    <p><a href="https://cli.angular.io/">Angular CLI</a> installed.</p>
  </li>
</ol>

<h3 id="steps">Steps:</h3>

<ol>
  <li>
    <p>Create a new angular project. I will be using angular 8 here but this should work for any angular application above verison 2.</p>

    <div class="language-plaintext highlighter-rouge"><div class="highlight"><pre class="highlight"><code> ng new chartjs-demo
</code></pre></div>    </div>

    <p>If you are prompted with a configuration selection screen then you can select accordingly. However, I will be keeping everything as default.</p>
  </li>
  <li>
    <p>Open the newly created project (<strong>chartsjs-demo</strong> in my case) in your favorite code editor.</p>
  </li>
  <li>
    <p>For Angular2+ the equivalence library for <a href="https://www.chartjs.org/">ChartsJS</a> is <a href="https://valor-software.com/ng2-charts/">Ng2Charts</a> and here we will be using the same. I will also be referring the <strong>Ng2Charts</strong> documentation for installing and setting up the charts.</p>
  </li>
  <li>
    <p>Open a terminal in your current project folder and execute the following command.</p>

    <div class="language-plaintext highlighter-rouge"><div class="highlight"><pre class="highlight"><code> npm install --save ng2-charts
 npm install --save chart.js
</code></pre></div>    </div>
  </li>
  <li>
    <p>The above step will install ChartJS library into your angular application. We need to import it as a module now. We do what we always do to import modules in angular. Import it in <code class="language-plaintext highlighter-rouge">app.module.ts</code> file.</p>

    <div class="language-javascript highlighter-rouge"><div class="highlight"><pre class="highlight"><code> <span class="k">import</span> <span class="p">{</span> <span class="nx">ChartsModule</span> <span class="p">}</span> <span class="k">from</span> <span class="dl">'</span><span class="s1">ng2-charts</span><span class="dl">'</span><span class="p">;</span>

 <span class="c1">// In your App's module:</span>
 <span class="nl">imports</span><span class="p">:</span> <span class="p">[</span>
   <span class="nx">ChartsModule</span>
 <span class="p">]</span>
</code></pre></div>    </div>

    <p>Just to be sure we are not bombarded with errors we can check our application in the browser by running <code class="language-plaintext highlighter-rouge">ng serve -o</code>.</p>
  </li>
  <li>
    <p>A starter screen should automatically open and you should be able to see angular screen.</p>
  </li>
  <li>
    <p>Now, moving on to the charts part. I will be creating the charts right at the <code class="language-plaintext highlighter-rouge">App Component</code>. So, to do this we can remove all existing code in <code class="language-plaintext highlighter-rouge">app.component.html</code> and add this snippet for rendering charts.</p>

    <div class="language-html highlighter-rouge"><div class="highlight"><pre class="highlight"><code> <span class="nt">&lt;div&gt;</span>
     <span class="nt">&lt;div&gt;</span>
         <span class="nt">&lt;div</span> <span class="na">class=</span><span class="s">"chart"</span><span class="nt">&gt;</span>
         <span class="nt">&lt;canvas</span> <span class="na">baseChart</span> <span class="na">[data]=</span><span class="s">"pieChartData"</span> <span class="na">[labels]=</span><span class="s">"pieChartLabels"</span>
             <span class="na">[chartType]=</span><span class="s">"pieChartType"</span> <span class="na">[options]=</span><span class="s">"pieChartOptions"</span> <span class="na">[colors]=</span><span class="s">"pieChartColors"</span> <span class="na">[legend]=</span><span class="s">"pieChartLegend"</span><span class="nt">&gt;</span>
         <span class="nt">&lt;/canvas&gt;</span>
         <span class="nt">&lt;/div&gt;</span>
     <span class="nt">&lt;/div&gt;</span>
 <span class="nt">&lt;/div&gt;</span>
</code></pre></div>    </div>

    <p>Similarly, in <code class="language-plaintext highlighter-rouge">app.component.ts</code> file you can replace the existing code with:</p>

    <div class="language-typescript highlighter-rouge"><div class="highlight"><pre class="highlight"><code> <span class="k">import</span> <span class="p">{</span> <span class="nx">Component</span> <span class="p">}</span> <span class="k">from</span> <span class="dl">'</span><span class="s1">@angular/core</span><span class="dl">'</span><span class="p">;</span>
 <span class="k">import</span> <span class="p">{</span> <span class="nx">ChartType</span><span class="p">,</span> <span class="nx">ChartOptions</span> <span class="p">}</span> <span class="k">from</span> <span class="dl">'</span><span class="s1">chart.js</span><span class="dl">'</span><span class="p">;</span>
 <span class="k">import</span> <span class="p">{</span> <span class="nx">Label</span> <span class="p">}</span> <span class="k">from</span> <span class="dl">'</span><span class="s1">ng2-charts</span><span class="dl">'</span><span class="p">;</span>

 <span class="p">@</span><span class="nd">Component</span><span class="p">({</span>
     <span class="na">selector</span><span class="p">:</span> <span class="dl">'</span><span class="s1">app-root</span><span class="dl">'</span><span class="p">,</span>
     <span class="na">templateUrl</span><span class="p">:</span> <span class="dl">'</span><span class="s1">./app.component.html</span><span class="dl">'</span><span class="p">,</span>
     <span class="na">styleUrls</span><span class="p">:</span> <span class="p">[</span><span class="dl">'</span><span class="s1">./app.component.scss</span><span class="dl">'</span><span class="p">]</span>
 <span class="p">})</span>
 <span class="k">export</span> <span class="kd">class</span> <span class="nx">AppComponent</span> <span class="p">{</span>
     <span class="nx">title</span> <span class="o">=</span> <span class="dl">'</span><span class="s1">chartjs</span><span class="dl">'</span><span class="p">;</span>

     <span class="k">public</span> <span class="nx">pieChartOptions</span><span class="p">:</span> <span class="nx">ChartOptions</span> <span class="o">=</span> <span class="p">{</span>
         <span class="na">responsive</span><span class="p">:</span> <span class="kc">true</span><span class="p">,</span>
         <span class="na">legend</span><span class="p">:</span> <span class="p">{</span>
             <span class="na">position</span><span class="p">:</span> <span class="dl">'</span><span class="s1">top</span><span class="dl">'</span><span class="p">,</span>
         <span class="p">},</span>
         <span class="na">plugins</span><span class="p">:</span> <span class="p">{</span>
             <span class="na">datalabels</span><span class="p">:</span> <span class="p">{</span>
                 <span class="na">formatter</span><span class="p">:</span> <span class="p">(</span><span class="nx">value</span><span class="p">,</span> <span class="nx">ctx</span><span class="p">)</span> <span class="o">=&gt;</span> <span class="p">{</span>
                     <span class="kd">const</span> <span class="nx">label</span> <span class="o">=</span> <span class="nx">ctx</span><span class="p">.</span><span class="nx">chart</span><span class="p">.</span><span class="nx">data</span><span class="p">.</span><span class="nx">labels</span><span class="p">[</span><span class="nx">ctx</span><span class="p">.</span><span class="nx">dataIndex</span><span class="p">];</span>
                     <span class="k">return</span> <span class="nx">label</span><span class="p">;</span>
                 <span class="p">},</span>
             <span class="p">},</span>
         <span class="p">}</span>
     <span class="p">};</span>
     <span class="k">public</span> <span class="nx">pieChartLabels</span><span class="p">:</span> <span class="nx">Label</span><span class="p">[]</span> <span class="o">=</span> <span class="p">[[</span><span class="dl">'</span><span class="s1">PUBG</span><span class="dl">'</span><span class="p">],</span> <span class="p">[</span><span class="dl">'</span><span class="s1">Fortnite</span><span class="dl">'</span><span class="p">],</span> <span class="p">[</span><span class="dl">'</span><span class="s1">Call of Duty</span><span class="dl">'</span><span class="p">]];</span>
     <span class="k">public</span> <span class="nx">pieChartData</span><span class="p">:</span> <span class="kr">number</span><span class="p">[]</span> <span class="o">=</span> <span class="p">[</span><span class="mi">300</span><span class="p">,</span> <span class="mi">500</span><span class="p">,</span> <span class="mi">100</span><span class="p">];</span>
     <span class="k">public</span> <span class="nx">pieChartType</span><span class="p">:</span> <span class="nx">ChartType</span> <span class="o">=</span> <span class="dl">'</span><span class="s1">pie</span><span class="dl">'</span><span class="p">;</span>
     <span class="k">public</span> <span class="nx">pieChartLegend</span> <span class="o">=</span> <span class="kc">true</span><span class="p">;</span>
     <span class="k">public</span> <span class="nx">pieChartColors</span> <span class="o">=</span> <span class="p">[</span>
         <span class="p">{</span>
             <span class="na">backgroundColor</span><span class="p">:</span> <span class="p">[</span><span class="dl">'</span><span class="s1">rgba(255,0,0,0.3)</span><span class="dl">'</span><span class="p">,</span> <span class="dl">'</span><span class="s1">rgba(0,255,0,0.3)</span><span class="dl">'</span><span class="p">,</span> <span class="dl">'</span><span class="s1">rgba(0,0,255,0.3)</span><span class="dl">'</span><span class="p">],</span>
         <span class="p">},</span>
     <span class="p">];</span>

 <span class="p">}</span>
</code></pre></div>    </div>
  </li>
  <li>
    <p>Switch back to your browser and you should see something like this.</p>

    <p><img src="https://www.freakyjolly.com/wp-content/uploads/2020/05/Pasted-into-Angular-98-Chart-Js-Tutorial-using-ng2-charts-with-Examples-4.png" alt="Chart JS chart" loading="lazy" decoding="async" /></p>
  </li>
  <li>
    <p>Congratutions, we are done. The charts are at your disposal.
<br /><br /></p>
  </li>
</ol>

<p>It was easy isn’t it? But it is very rare that your requirements will be this limited and abstract.
<br /><br />
The chart we did here is just the tip of an iceberg. There are lots of other charts like line charts, bar charts, doughnut charts and scatter plots which you could make use of. All the available charts are present in <a href="https://valor-software.com/ng2-charts/#/GeneralInfo">this documentation</a>. These charts are very customizable and configurable but unfortunately not all options are available in the documentation above. For more options regarding the configurations, you might want to have a look at <a href="https://www.chartjs.org/docs/latest/">CHARTJS Docs</a>. Other entities might be different but the <strong>ChartOptions</strong> are exactly the same.
<br /><br />
The entire code for this can be found here: <a href="https://github.com/prameshbajra/chartsjs-demo">https://github.com/prameshbajra/chartsjs-demo</a></p>

<p>Hope this helps! Happy Coding!
<br /><br /></p>

<blockquote>
  <p>As always, feel free to get in touch if you need any help.</p>
</blockquote>]]></content><author><name>Pramesh Bajracharya</name><email>pe.messh@gmail.com</email></author><category term="web" /><summary type="html"><![CDATA[Display beautiful charts in your angular web application.]]></summary><media:thumbnail xmlns:media="http://search.yahoo.com/mrss/" url="https://prameshbajra.com/static/assets/img/og/angular-ng2charts.png" /><media:content medium="image" url="https://prameshbajra.com/static/assets/img/og/angular-ng2charts.png" xmlns:media="http://search.yahoo.com/mrss/" /></entry><entry><title type="html">12 ways to make your code suck less</title><link href="https://prameshbajra.com/blog/12_ways_to_make_code_suck_less/" rel="alternate" type="text/html" title="12 ways to make your code suck less" /><published>2020-02-16T00:00:00+00:00</published><updated>2020-02-16T00:00:00+00:00</updated><id>https://prameshbajra.com/blog/12_ways_to_make_code_suck_less</id><content type="html" xml:base="https://prameshbajra.com/blog/12_ways_to_make_code_suck_less/"><![CDATA[<p>Personally, I think that code is more read than write. Take an example of any textbook, we read textbooks a lot more than we write. So putting it straight I say that reading code is equally important as writing code. Also, the code you write will be read by many fellow developers or many other contributors so as to make the product/project better.</p>

<p>Here are 12 tips for you to write code that will help you and others as well.</p>

<p><strong>1. Use linters.</strong></p>

<p>Linters maintain code consistency. It helps in making code structure similar across all development teams such that there exist no confusion between developers. Linters also covers <em>code indentation, use of proper variables, best modern practices</em> etc. I, being a JavaScript developer use linters like <em>ESLINT, JSLINT, JSHINT</em> etc. Similar types of linters are available for python, java and pretty much all popular programming languages. These linters easily couples with you current code editors like <em>VSCode, Atom, Sublime text and other full featured IDEs like Intellij , PHPStorm, WebStrom</em> etc.</p>

<p><strong>2. Favor high cohesion and low coupling.</strong></p>

<p>Simply, <em>cohesion</em> just means <em>a piece of code that does only one thing</em>. This helps in reducing frequency of change in the software and it also gives low cyclomatic complexity which is very favorable. Changing or updating the code is also very easy if we do this. <em>Coupling</em> refers to <em>a piece of code that depends or has some kind of relation with another part of code</em>. We should keep our code as independent as it could be. Favoring low coupling is best for development and it also make testing very easy.</p>

<p><strong>3. Schedule time to lower technical debt.</strong></p>

<p>This is a non-technical criteria to keep in mind when writing code. Writing poor quality code is not technical debt. If you are working on a solo project or a project that doesn’t have a deadline then you may skip this point but, if you are working for someone or some company then schedule your time and work on your part. Schedule time to plan, write code, test and reviews accordingly. If you do not do this then your project will definitely lack in some part.</p>

<p><strong>4. Program with intention.</strong></p>

<p>Always have a goal on what you are trying to accomplish by writing a program. Never follow “Heat and trial” approach. One of the best way to program with intention is to <em>write tests first</em> and then write program that makes the test pass. This will be difficult at first but trust me, it’s worth it. What this approach does is that it forces you to move towards your goal. It will be like moving to a certain fixed destination that you are aware of.</p>

<p><strong>5. Avoid primitive obsession.</strong></p>

<p>“<code class="language-plaintext highlighter-rouge">It is better to reuse than to rewrite</code>” – always keep this in mind. Try not to rewrite the functions, classes or any snippets that is already available in the codebase. Those methods are highly efficient and also written by one of the best developers. If you think that your method can surpass those predefined methods then a rewrite would be considerable, but remember this is very unlikely.</p>

<p>For example -</p>

<p>to sort an array in java you do not have to write a sorting algorithms everytime, you can just use <code class="language-plaintext highlighter-rouge">Arrays.sort(ArrayName)</code>.</p>

<p>This is concise, self explanatory, short and efficient. We should avoid writing code at lowest level possible.  Also, prefer to code in functional style rather than imperative style.</p>

<p><em>Note: Functional Programming &gt; Imperative Programming.</em></p>

<p><strong>6. Always prefer clean code, not clever code.</strong></p>

<p>Writing clever code makes you feel good, and you are not alone. It gives you a moment of joy and confidence. There is a quote that goes by – “<code class="language-plaintext highlighter-rouge">Programs must be written for people to read and only incidentally for machine to execute</code>”. I want you to remember this quote next time you write any clever code. I want to focus on one main drawback by writing clever code. Well it’s clear that you won’t remember every line of code that you wrote. May be after couple of months you won’t even remember working on the project. So, by case if you have to change a piece of code or you perhaps want to add a feature then you have to go back and read the same clever code that you wrote months back. This code will definitely confuse you and take up a good portion of your time. To avoid these kind of scenarios we should avoid writing clever code.</p>

<p><strong>7. Apply Zinsser’s principle.</strong></p>

<p><em>“Hard writing makes easy reading and easy writing makes hard reading”</em> – <code class="language-plaintext highlighter-rouge">Zinsser’s Principle</code>. So to make this clear, take your time to code. Think about the clean and easy way to code such that it will be easier for others and future you to read it without getting stuck and wasting too much time.  I also would like to suggest everyone to leave a blank line after each function declaration, class definition or any transition relevance act. This makes reading code very easy and transitions and breaks are understood by everyone.</p>

<p><strong>8. Comment why, not what.</strong></p>

<p><code class="language-plaintext highlighter-rouge">A good code is like a good joke, it’s not worth it if you have to explain it</code>. Always only comment the logic behind the code. Try to write expressive self-documenting code. Comment why the code is there not what that code does.</p>

<p>For example:</p>

<p><code class="language-plaintext highlighter-rouge">i++;                //   post increment i value by one</code></p>

<p>these types of comments are stupid so please avoid these. 
Rather explain why is the increment done.</p>

<p><strong>9. Avoid long methods.</strong></p>

<p>When writing methods apply <strong>SLAP</strong> (<em>Single level of abstraction principle</em>). You might have a slight guess why developers do not prefer long methods. I personally do not like long methods because they are hard to maintain, hard to debug, difficult to test and even harder to refactor. Long methods have high coupling and low cohesion, they are not suitable to reuse and long methods leads to duplication of code. They violate good coding principles. So, separate a method when you think it’s level of abstraction is complete.</p>

<p><strong>10. Follow naming conventions.</strong></p>

<p>This is a must follow rule for everyone (Especially in our college). Always name your methods, classes and variables meaningfully. Avoid naming variables as single letters.</p>

<p>For example –</p>

<p><code class="language-plaintext highlighter-rouge">int a , b, c;</code></p>

<p>Never do this. These variables do not explain what they do. They enhance the complexity of the program and creates more confusion. For classes, remember to name their initials in capital letters. For method and variable you can either follow <em>snake_casing</em> or <em>CamelCasing</em>.</p>

<p><strong>11. Use tactical code reviews.</strong></p>

<p>Code review is generally done in groups, like in a meeting. I call this a bad idea. Not everybody has similar views on the code you write. Some might like your code and some won’t. Reviewing this in groups will create diverse results making it harder to decide. What can be a better alternative is to invite a colleague or another developers from the same company and cross review the code. I mean you reviewing your colleague code and your colleague reviewing your code. This will save time and resource, as well as maintain a friendly environment.</p>

<p><strong>12. Reduce state and state mutations.</strong></p>

<p>Simple trick is to start writing functions before declaring variables. They somehow force you to know the nature of the variables and use them properly. Messing with the state is the root of man problems both in software and in politics.</p>]]></content><author><name>Pramesh Bajracharya</name><email>pe.messh@gmail.com</email></author><category term="career" /><summary type="html"><![CDATA[Reading code is as important as writing it.]]></summary><media:thumbnail xmlns:media="http://search.yahoo.com/mrss/" url="https://prameshbajra.com/static/assets/img/og/12_ways_to_make_code_suck_less.png" /><media:content medium="image" url="https://prameshbajra.com/static/assets/img/og/12_ways_to_make_code_suck_less.png" xmlns:media="http://search.yahoo.com/mrss/" /></entry><entry><title type="html">Artificial Intelligence</title><link href="https://prameshbajra.com/blog/AI/" rel="alternate" type="text/html" title="Artificial Intelligence" /><published>2020-01-14T00:00:00+00:00</published><updated>2020-01-14T00:00:00+00:00</updated><id>https://prameshbajra.com/blog/AI</id><content type="html" xml:base="https://prameshbajra.com/blog/AI/"><![CDATA[<p><strong>Artificial intelligence (AI)</strong> is an area of computer science that emphasizes the creation of intelligent machines that work and react like humans. Some of the activities computers with artificial intelligence are designed for include:</p>

<ol>
  <li>
    <p>Speech recognition</p>
  </li>
  <li>
    <p>Learning</p>
  </li>
  <li>
    <p>Planning</p>
  </li>
  <li>
    <p>Problem solving</p>
  </li>
</ol>

<p><strong>Artificial intelligence</strong> is a branch of computer science that aims to create intelligent machines. It has become an essential part of the technology industry.</p>

<p>Research associated with artificial intelligence is highly technical and specialized. The core problems of artificial intelligence include programming computers for certain traits such as:</p>

<ol>
  <li>
    <p>Knowledge</p>
  </li>
  <li>
    <p>Reasoning</p>
  </li>
  <li>
    <p>Problem solving</p>
  </li>
  <li>
    <p>Perception</p>
  </li>
  <li>
    <p>Learning</p>
  </li>
  <li>
    <p>Planning</p>
  </li>
  <li>
    <p>Ability to manipulate and move objects</p>
  </li>
</ol>

<p><strong>Knowledge engineering</strong> is a core part of AI research. Machines can often act and react like humans only if they have abundant information relating to the world. Artificial intelligence must have access to objects, categories, properties and relations between all of them to implement knowledge engineering. Initiating common sense, reasoning and problem-solving power in machines is a difficult and tedious approach.</p>

<p><strong>Machine learning</strong> is another core part of AI. Learning without any kind of supervision requires an ability to identify patterns in streams of inputs, whereas learning with adequate supervision involves classification and numerical regressions. Classification determines the category an object belongs to and regression deals with obtaining a set of numerical input or output examples, thereby discovering functions enabling the generation of suitable outputs from respective inputs. Mathematical analysis of machine learning algorithms and their performance is a well-defined branch of theoretical computer science often referred to as computational learning theory.</p>

<p><strong>Machine perception</strong> deals with the capability to use sensory inputs to deduce the different aspects of the world, while computer vision is the power to analyze visual inputs with a few sub-problems such as facial, object and gesture recognition.</p>

<p><strong>Robotics</strong> is also a major field related to AI. Robots require intelligence to handle tasks such as object manipulation and navigation, along with sub-problems of localization, motion planning and mapping.
<br />
<br /></p>
<h2 id="ai-and-quantum-computing"><strong>A.I. And Quantum Computing</strong></h2>

<p>The truth is that, whether or not true A.I. is out there or is actually a threat to our existence, there’s no stopping its evolution and its rise. Humans have always fixated themselves on improving life across every spectrum, and the use of technology has become the vehicle for doing just that. And although the past 100 years have seen the most dramatic technological upheavals to life than in all of human history, the next 100 years is set to pave the way for a multi-generational leap forward.</p>

<p>This will be at the hands of artificial intelligence. A.I. will also become smarter, faster, more fluid and human-like thanks to the inevitable rise of quantum computing. Quantum computers will not only solve all of life’s most complex problems and mysteries regarding the environment, aging, disease, war, poverty, famine, the origins of the universe and deep-space exploration, just to name a few, it’ll soon power all of our A.I. systems, acting as the brains of these super-human machines.</p>

<p>However, quantum computers hold their own inherent risks. What happens after the first quantum computer goes online, making the rest of the world’s computing obsolete? How will existing architecture be protected from the threat that these quantum computers pose? Considering that the world lacks any formidable quantum resistant cryptography (QRC), how will a country like the United States or Russia protect its assets from rogue nations or bad actors that are hellbent on using quantum computers to hack the world’s most secretive and lucrative information?</p>

<p>Applications of Artificial Intelligence In Use Today</p>

<p>Beyond our quantum-computing conundrum, today’s so-called A.I. systems are merely advanced machine learning software with extensive behavioral algorithms that adapt themselves to our likes and dislikes. While extremely useful, these machines aren’t getting smarter in the existential sense, but they are improving their skill and usefulness based on a large dataset. These are some of the most popular examples of artificial intelligence that’s being used today.
<br />
<br /></p>
<h2 id="1-siri"><strong>1. Siri</strong></h2>

<p>Everyone is familiar with Apple’s personal assistant, Siri. She’s the friendly voice-activated computer that we interact with on a daily basis. She helps us find information, gives us directions, add events to our calendars, helps us send messages and so on. Siri is a pseudo-intelligent digital personal assistant. She uses machine-learning technology to get smarter and better able to predict and understand our natural-language questions and requests.
<br />
<br /></p>
<h2 id="2-alexa"><strong>2. Alexa</strong></h2>

<p>Alexa’s rise to become the smart home’s hub, has been somewhat meteoric. When Amazon first introduced Alexa, it took much of the world by storm. However, it’s usefulness and its uncanny ability to decipher speech from anywhere in the room has made it a revolutionary product that can help us scour the web for information, shop, schedule appointments, set alarms and a million other things, but also help power our smart homes and be a conduit for those that might have limited mobility.
<br />
<br /></p>
<h2 id="3-tesla"><strong>3. Tesla</strong></h2>

<p>If you don’t own a Tesla, you have no idea what you’re missing. This is quite possibly one of the best cars ever made. Not only for the fact that it’s received so many accolades, but because of its predictive capabilities, self-driving features and sheer technological “coolness.” Anyone that’s into technology and cars needs to own a Tesla, and these vehicles are only getting smarter and smarter thanks to their over-the-air updates.
<br />
<br /></p>
<h2 id="4-cogito"><strong>4. Cogito</strong></h2>

<p>Originally co-founded by CEO, Joshua Feast and, Dr. Sandy Pentland, Cogito is quite possibly one of the most powerful examples of behavioral adaptation to improve the emotional intelligence of customer support representatives that exists on the market today. The company is a fusion of machine learning and behavioral science to improve the customer interaction for phone professionals. This applies to millions upon millions of voice calls that are occurring on a daily basis.
<br />
<br /></p>
<h2 id="5-boxever"><strong>5. Boxever</strong></h2>

<p>Boxever, co-founded by CEO, Dave O’Flanagan, is a company that leans heavily on machine learning to improve the customer’s experience in the travel industry and deliver ‘micro-moments,’ or experiences that delight the customers along the way. It’s through machine learning and the usage of A.I. that the company has dominated the playing field, helping its customers to find new ways to engage their clients in their travel journeys.
<br />
<br /></p>
<h2 id="6-john-paul"><strong>6. John Paul</strong></h2>

<p>John Paul, a highly-esteemed luxury travel concierge company helmed by its astute founder, David Amsellem, is another powerful example of potent A.I. in the predictive algorithms for existing-client interactions, able to understand and know their desires and needs on an acute level. The company powers the concierge services for millions of customers through the world’s largest companies such as VISA, Orange and Air France, and was recently acquired by Accor Hotels.
<br />
<br /></p>
<h2 id="7-amazoncom"><strong>7. Amazon.com</strong></h2>

<p>Amazon’s transactional A.I. is something that’s been in existence for quite some time, allowing it to make astronomical amounts of money online. With its algorithms refined more and more with each passing year, the company has gotten acutely smart at predicting just what we’re interested in purchasing based on our online behavior. While Amazon plans to ship products to us before we even know we need them, it hasn’t quite gotten there yet. But it’s most certainly on its horizons.
<br />
<br /></p>
<h2 id="8-netflix"><strong>8. Netflix</strong></h2>

<p>Netflix provides highly accurate predictive technology based on customer’s reactions to films. It analyzes billions of records to suggest films that you might like based on your previous reactions and choices of films. This tech is getting smarter and smarter by the year as the dataset grows. However, the tech’s only drawback is that most small-labeled movies go unnoticed while big-named movies grow and balloon on the platform.
<br />
<br /></p>
<h2 id="9-pandora"><strong>9. Pandora</strong></h2>

<p>Pandora’s A.I. is quite possibly one of the most revolutionary techs that exists out there today. They call it their musical DNA. Based on 400 musical characteristics, each song is first manually analyzed by a team of professional musicians based on this criteria, and the system has an incredible track record for recommending songs that would otherwise go unnoticed but that people inherently love.
<br />
<br /></p>
<h2 id="10-nest"><strong>10. Nest</strong></h2>

<p>Most everyone is familiar with Nest, the learning thermostat that was acquired by Google in January of 2014 for $3.2 billion. The Nest learning thermostat, which, by the way, can now be voice-controlled by Alexa, uses behavioral algorithms to predictively learn from your heating and cooling needs, thus anticipating and adjusting the temperature in your home or office based on your own personal needs, and also now includes a suite of other products such as the Nest cameras.
<br />
<br /></p>
<blockquote>
  <p>PS : The shout out for this article post goes to a sophomore computer science engineer “<strong>Shovit Raj Paudel</strong>”. <br />
Be sure to follow him on instagram : <strong>shovitrajpaudel</strong></p>
</blockquote>]]></content><author><name>Pramesh Bajracharya</name><email>pe.messh@gmail.com</email></author><category term="ai" /><summary type="html"><![CDATA[Artificial intelligence is a branch of computer science that aims to create intelligent machines.]]></summary><media:thumbnail xmlns:media="http://search.yahoo.com/mrss/" url="https://prameshbajra.com/static/assets/img/og/AI.png" /><media:content medium="image" url="https://prameshbajra.com/static/assets/img/og/AI.png" xmlns:media="http://search.yahoo.com/mrss/" /></entry><entry><title type="html">Bitcoin – The Internet of Money</title><link href="https://prameshbajra.com/blog/bitcoin_money/" rel="alternate" type="text/html" title="Bitcoin – The Internet of Money" /><published>2019-12-07T00:00:00+00:00</published><updated>2019-12-07T00:00:00+00:00</updated><id>https://prameshbajra.com/blog/bitcoin_money</id><content type="html" xml:base="https://prameshbajra.com/blog/bitcoin_money/"><![CDATA[<p>Unless you have been living under a rock I can guarantee that you have heard the word ‘<strong>Bitcoin</strong>’!!</p>

<p>So, What is <strong>Bitcoin</strong>?</p>

<p>“<strong>Bitcoin is considered to be the beginning of something great: a currency without a government, something necessary and imperative.</strong>”</p>

<p><strong>Bitcoin</strong> is a crypto money/ currency and worldwide payment system. It is the first <strong>decentralized digital currency</strong> as the system works without a central bank. The difference between real money and the bitcoin is that <strong>Bitcoin</strong> is just a bit of data whereas the money we use is a piece of paper. They are stored in digital wallets.</p>

<p><br />
<strong>How to get bitcoin and how the bitcoin network works?</strong></p>

<p>For getting bitcoin you must mine, it’s like searching for gold, but, in digital way because it’s not a physical money, it’s a digital currency. Mining is important and integral part of bitcoin that ensures fairness while keeping the bitcoin network safe, stable and secure. Actually, in case of bitcoin: mining means solving the mathematical problems.</p>

<p>Someone is mining bitcoin, means that he/she is solving mathematical problems using a machine. When the mathematical problem is solved the miner is rewarded by bitcoin. When you send and receive bitcoin, your transactions are recorded in a ‘<strong>Block Chain</strong>’.</p>

<p><strong>Block Chain</strong> is network where you are known by a <em>cryptographic hash (Alphanumeric string)</em>, which means that you do not have to show your identity in order to do something with bitcoin.</p>

<p>As the process looks simple, it’s way harder to get it because it’s getting rarer. The more the bitcoin is found, number of bitcoin users are increased and the problems to be solved will get harder and harder. It requires very powerful computer to mine a single bitcoin. Though it needs powerful system, <em>bitcoin was mined first time by using 55 years old IBM pc</em>.</p>

<p>Then people started using the latest CPU’s. Later they started using GPU’s which were made for gaming.</p>

<p>Now In 2018, People use special computer which uses <strong>ASIC (Application Specific Integrated Circuit)</strong> chips in order to mine bitcoin for getting more profit. Since mining uses more power, it will reduce the life of the chips if you are using low end chips. The more powerful the cards, more will be the profit.</p>

<p>You might think of mining bitcoins in your laptop, please forget it. I tried it once the results were not at all worth it and all you will do is wear out your CPU/ GPU.</p>

<p>Nowadays, people also practice pool mining. <em>In pool mining, a group of people work together for solving the mathematical problem and when it is solved the members are rewarded with proportionate amount of bitcoin according to their work.</em></p>

<p><br />
<strong>Where can you use bitcoin?</strong></p>

<p>Since bitcoin is a cypto currency, you can exchange it for real money. It’s way more expensive than real money.
According to 2017 data one bitcoin equals to 9385.92 US$ and rapidly increasing. It’s price keeps on changing.</p>

<p>Bitcoin doesn’t reveal the identity of the user, so many people use this currency for buying and selling illegal things like drugs, military grade items and confidential information. This is also one of the main reason that Bitcoin is banned is many contries like Nepal, SriLanka etc.</p>

<p><br />
<strong>Future of bitcoin:</strong> It is stated that there are around 21 million bitcoins in the world, out of which 12 million have already been mined. I think it’s value will increase more and more due to it’s privacy and craze of people on bitcoins. Everybody wants to have their hands-on bitcoin.</p>

<p>You might also be the one to get it. If so, you might also be one of the lucky one.</p>

<p><strong>As, writing of the post the value of bitcoin is 8400$ + which fell down from 19000$.</strong></p>

<blockquote>
  <p>PS : Unlike other posts, I didn’t write this one. The complete credit goes to a Computer Engineer and a very enthusiastic programmer - “<strong>Subodh Ghimire</strong>”. <br />
Be sure to follow him on instagram : <strong>subodhghimire99</strong></p>
</blockquote>]]></content><author><name>Pramesh Bajracharya</name><email>pe.messh@gmail.com</email></author><category term="money" /><summary type="html"><![CDATA[Bitcoin is an innovative payment network and a new kind of money.]]></summary><media:thumbnail xmlns:media="http://search.yahoo.com/mrss/" url="https://prameshbajra.com/static/assets/img/og/bitcoin_money.png" /><media:content medium="image" url="https://prameshbajra.com/static/assets/img/og/bitcoin_money.png" xmlns:media="http://search.yahoo.com/mrss/" /></entry><entry><title type="html">Pimp Your Command Prompt/Cmd in Windows</title><link href="https://prameshbajra.com/blog/command_prompt/" rel="alternate" type="text/html" title="Pimp Your Command Prompt/Cmd in Windows" /><published>2019-11-10T00:00:00+00:00</published><updated>2019-11-10T00:00:00+00:00</updated><id>https://prameshbajra.com/blog/command_prompt</id><content type="html" xml:base="https://prameshbajra.com/blog/command_prompt/"><![CDATA[<p>Bored with plain old command prompt? You’re in the right place then. Welcome.</p>

<p>Let’s start by changing the format of your current CMD. Follow along and please do ask if you get stuck somewhere.<br /><br /></p>

<ol>
  <li>
    <p>Open your <strong>CMD / Command Prompt</strong> , copy this &gt; <code class="language-plaintext highlighter-rouge">setx prompt $$ $C$P $L--$G $D$F$_$C$$$F -$G </code> and paste it. Then press enter. (You might have to restart your <strong>CMD / Command Prompt</strong>)</p>
  </li>
  <li>
    <p>Your <strong>CMD</strong> should now look something like</p>

    <blockquote>
      <p><code class="language-plaintext highlighter-rouge">$ (C:\Windows\Temp &lt;--&gt; 2017-08-03)</code></p>

      <p><code class="language-plaintext highlighter-rouge">($) -&gt; █</code></p>
    </blockquote>

    <p><br />
 If you do not like this format then you can customize it yourself. Enter <code class="language-plaintext highlighter-rouge">prompt /?</code> and see the formatting options.
 For your convienence they are mention below:
 <br />
 Start with <code class="language-plaintext highlighter-rouge">setx prompt </code> then make your own format as above.
 <br /></p>
    <pre>
 - $A       &amp;           (Ampersand) 
 - $B       |           (pipe) 
 - $C       (           (Left parenthesis) 
 - $D                    Current date 
 - $E                    Escape code  (ASCII code 27) 
 - $F       )           (Right parenthesis) 
 - $G       &gt;           (greater-than sign) 
 - $H       Backspace   (erases previous character) 
 - $L       &lt;           (less-than sign) 
 - $M       Display the remote name for Network drives
 - $N       Current drive 
 - $P       Current drive and path 
 - $Q       =           (equal sign) 
 - $S                    (space) 
 - $T       Current time 
 - $V       Windows NT version number 
 - $_       Carriage return and linefeed 
 - $$       $           (dollar sign)
 - $+       Will display plus signs (+) one for each level of the PUSHD directory stack
 </pre>
  </li>
  <li>
    <p>I’m guessing you haven’t changed the font and color yet. In case you have or you like the default one skip this step. Right click on the title bar and go to <strong>properties</strong> , select <strong>Font</strong> tab and choose any font of your liking. Then go to <strong>Colors</strong> and choose your preferable color for screen text and screen background. After you’re done press <strong>OK</strong>.
<br /></p>
  </li>
</ol>

<p>Very simple, Isn’t it? <br />
Now let’s add a feature that <strong>preserves history between sessions</strong> and <strong>tab on completion</strong>.
This is very simple just download <a href="http://mridgers.github.io/clink/">Clink</a> and install it. 
<br />
<br /></p>
<h3 id="annnnnd-youre-done-congratulations">Annnnnd!! You’re done. Congratulations!</h3>]]></content><author><name>Pramesh Bajracharya</name><email>pe.messh@gmail.com</email></author><category term="tools" /><summary type="html"><![CDATA[Make your CMD stand out and add some features to it to make life easier.]]></summary><media:thumbnail xmlns:media="http://search.yahoo.com/mrss/" url="https://prameshbajra.com/static/assets/img/og/command_prompt.png" /><media:content medium="image" url="https://prameshbajra.com/static/assets/img/og/command_prompt.png" xmlns:media="http://search.yahoo.com/mrss/" /></entry><entry><title type="html">Deploy your own custom trained object detection model in AWS Sagemaker</title><link href="https://prameshbajra.com/blog/deploy_in_sagemaker/" rel="alternate" type="text/html" title="Deploy your own custom trained object detection model in AWS Sagemaker" /><published>2019-10-13T00:00:00+00:00</published><updated>2019-10-13T00:00:00+00:00</updated><id>https://prameshbajra.com/blog/deploy_in_sagemaker</id><content type="html" xml:base="https://prameshbajra.com/blog/deploy_in_sagemaker/"><![CDATA[<p>The main motive of this blog is to help others deploy their custom models to <strong>Sagemaker</strong>. Honestly speaking, I had to play around with this for 100+ hours in order to get this to work. At the time of writing this blog the sagemaker documentation is not consistent anywhere and lacks many tiny details. This method is not specific to object detection models and can be used to deploy any kind of models, be it custom/pretrained or downloaded from somewhere else.</p>

<p>Let’s get started: <br /><br /></p>

<h2 id="prerequisites">Prerequisites</h2>

<p>Before reading this the reader is expected to have a general idea for generating model from tensorflow. You will need to that this part comes only after your model is successfully trained and the models are generated.</p>

<p>In order to deploy your models to <strong>Sagemaker</strong> you need to make sure of some things before you start. Firstly, make sure that the folder structure is something like this:</p>

<div class="language-plaintext highlighter-rouge"><div class="highlight"><pre class="highlight"><code>some_name 
    |__ Some positive number that represents version (For eg: 1) 
            |__ saved_model.pb 
            |__ variables 
                    |__ (Non empty)
</code></pre></div></div>

<p>Keep in mind that the <strong>variables</strong> folder should not be empty. The <strong>variables</strong> folder in most of the case are empty because the original tensorflow object detection tutorial exports a frozen graph instead of unfrozen one. Here, frozen means that all the variables are frozen (i.e. made constants). Because of this reason the <strong>variables</strong> folder is empty. We will have to export an unfrozen graph. Follow my <a href="/blog/export-unfrozen-graph-tensorflow-object-detection/">another blog</a> in order to export an unfrozen graph.</p>

<p>After you have the above folder structure you can compress it into a <code class="language-plaintext highlighter-rouge">some_name.tar.gz</code> format. Notice that we have a positive numbered folder inside <code class="language-plaintext highlighter-rouge">model</code> directory. Your <code class="language-plaintext highlighter-rouge">model</code> folder can have multiple positive numbered folders. These will be treated as versions and Sagemaker will choose the highest version (i.e. highest positive number inside model directory) to deploy. 
<br /><br /></p>
<h2 id="setup-model-for-sagemaker">Setup model for Sagemaker</h2>

<p>After the prerequisites are done, you can proceed by uploading your <code class="language-plaintext highlighter-rouge">some_name.tar.gz</code> into <strong>S3</strong>. You can do it manually too. Just in case you want to upload it by using code here is the way to do it.</p>

<div class="language-python highlighter-rouge"><div class="highlight"><pre class="highlight"><code><span class="kn">from</span> <span class="nn">sagemaker.session</span> <span class="kn">import</span> <span class="n">Session</span>

<span class="n">model_data</span> <span class="o">=</span> <span class="n">Session</span><span class="p">().</span><span class="n">upload_data</span><span class="p">(</span><span class="n">path</span><span class="o">=</span><span class="s">'&lt;PATH TO some_name.tar.gz&gt;'</span><span class="p">,</span> <span class="n">key_prefix</span><span class="o">=</span><span class="s">'model'</span><span class="p">)</span>
<span class="k">print</span><span class="p">(</span><span class="n">model_data</span><span class="p">)</span>
</code></pre></div></div>

<p>This will print the <strong>S3</strong> path to <strong>some_name.tar.gz</strong>. Make sure to copy it.
<br /><br /></p>
<h2 id="initialize-the-model">Initialize the model</h2>

<p>Sagemaker SDK is very powerful and amazing. You can use one line code to create a model, it’s respective endpoint configuration and endpoint. The model can be initialized by using the code below:</p>

<div class="language-python highlighter-rouge"><div class="highlight"><pre class="highlight"><code><span class="kn">from</span> <span class="nn">sagemaker.tensorflow.serving</span> <span class="kn">import</span> <span class="n">Model</span>

<span class="c1"># Use an env argument to set the name of the default model.
# This is optional, but recommended when you deploy multiple models
# so that requests that don't include a model name are sent to a
# predictable model.
</span><span class="n">env</span> <span class="o">=</span> <span class="p">{</span><span class="s">'SAGEMAKER_TFS_DEFAULT_MODEL_NAME'</span><span class="p">:</span> <span class="s">'some_name'</span><span class="p">}</span>
<span class="c1"># set specific role
</span><span class="n">sagemaker_role</span> <span class="o">=</span> <span class="s">"YOUR ROLE NAME FOR SAGEMAKER"</span>

<span class="n">model</span> <span class="o">=</span> <span class="n">Model</span><span class="p">(</span>
    <span class="n">model_data</span><span class="o">=</span>
    <span class="s">'&lt;Paste the S3 path to some_name.tar.gz&gt;'</span><span class="p">,</span>
    <span class="n">role</span><span class="o">=</span><span class="n">sagemaker_role</span><span class="p">,</span>
    <span class="n">framework_version</span><span class="o">=</span><span class="s">"1.14"</span><span class="p">,</span>
    <span class="n">env</span><span class="o">=</span><span class="n">env</span><span class="p">)</span>
</code></pre></div></div>

<p>Another thing to keep in mind here. The <strong>framework_version</strong> that you provide when initializing the model above must be same as the version of tensorflow that was used to train the model. So, make sure to do some saerching on the trained version before using any random version for deployment.
<br /><br /></p>
<h2 id="deploy-the-model">Deploy the model</h2>

<p>Use the code below to deploy the model. <strong>Sagemaker</strong> will do the heavy lifting for you from here on and create an endpoint that will be ready to take in inputs and return your predictions. <code class="language-plaintext highlighter-rouge">The model.deploy()</code> method will return a <strong>predict</strong> object that can take in inputs and give out predictions.</p>

<div class="language-python highlighter-rouge"><div class="highlight"><pre class="highlight"><code><span class="c1"># This will take some time ... Grab a coffee, take a break ...
</span><span class="n">predictor</span> <span class="o">=</span> <span class="n">model</span><span class="p">.</span><span class="n">deploy</span><span class="p">(</span><span class="n">initial_instance_count</span><span class="o">=</span><span class="mi">1</span><span class="p">,</span>
                         <span class="n">instance_type</span><span class="o">=</span><span class="s">'ml.t2.medium'</span><span class="p">)</span>
</code></pre></div></div>
<p>Based on you requirements you can increase the <code class="language-plaintext highlighter-rouge">initial_instance_count</code> and change the <code class="language-plaintext highlighter-rouge">instance_type</code> to a more powerful instance. You can even set a <code class="language-plaintext highlighter-rouge">accelarator_type</code> too by simply adding a parameter to <code class="language-plaintext highlighter-rouge">model.deploy()</code> function. Eg: <code class="language-plaintext highlighter-rouge">predictor = model.deploy(initial_instance_count=1, instance_type='ml.c5.xlarge', accelerator_type='ml.eia1.medium')</code> 
<br /><br /></p>
<h2 id="get-predict-from-endpoint">Get predict from endpoint</h2>

<p>From the predictor object you can get the <strong>endpoint_name</strong> that the model has been deployed to. This method is necessary because every time you will call <code class="language-plaintext highlighter-rouge">predict()</code> it is not feasible to deploy the model. What you can do is get the predictor object from the endpoint. You can do this by :</p>

<div class="language-python highlighter-rouge"><div class="highlight"><pre class="highlight"><code><span class="kn">from</span> <span class="nn">sagemaker.tensorflow.serving</span> <span class="kn">import</span> <span class="n">Predictor</span>

<span class="n">predictor</span> <span class="o">=</span> <span class="n">Predictor</span><span class="p">(</span><span class="n">endpoint_name</span> <span class="o">=</span> <span class="s">"&lt;Your endpoint name&gt;"</span><span class="p">)</span>
</code></pre></div></div>

<p>There are other ways to do this too. You can use <code class="language-plaintext highlighter-rouge">RealtimePredictor</code> that sagemaker provides. I won’t be including that here as that would make this a long post.
<br /><br /></p>
<h2 id="testing-is-must">Testing is must</h2>

<p>We are on the final stage now. We need to get the prediction done. But wait, sagemaker endpoint only accepts json/csv format (Not sure why). We have to pass image to this. We can do this by :</p>

<div class="language-python highlighter-rouge"><div class="highlight"><pre class="highlight"><code><span class="kn">import</span> <span class="nn">cv2</span>
<span class="kn">import</span> <span class="nn">numpy</span> <span class="k">as</span> <span class="n">np</span>

<span class="n">headers</span> <span class="o">=</span> <span class="p">{</span><span class="s">"content-type"</span><span class="p">:</span> <span class="s">"application/json"</span><span class="p">}</span>
<span class="n">image_content</span> <span class="o">=</span> <span class="n">cv2</span><span class="p">.</span><span class="n">imread</span><span class="p">(</span><span class="s">"&lt;Path to your image&gt;"</span><span class="p">,</span>
                           <span class="mi">1</span><span class="p">).</span><span class="n">astype</span><span class="p">(</span><span class="s">'uint8'</span><span class="p">).</span><span class="n">tolist</span><span class="p">()</span>
<span class="n">body</span> <span class="o">=</span> <span class="p">{</span><span class="s">"instances"</span><span class="p">:</span> <span class="p">[{</span><span class="s">"inputs"</span><span class="p">:</span> <span class="n">image_content</span><span class="p">}]}</span>

<span class="n">results</span> <span class="o">=</span> <span class="n">predictor</span><span class="p">.</span><span class="n">predict</span><span class="p">(</span><span class="n">body</span><span class="p">)</span>

<span class="k">print</span><span class="p">(</span><span class="n">results</span><span class="p">)</span>
</code></pre></div></div>

<p>This will get you some output in <strong>dict</strong> format having elements like <strong>detection_classes</strong>, <strong>detection_boxes</strong> etc. This output  that you get here is similar to the one you get when you run object detection in tensorflow. You will have to arrange or even write up some code in order to get the co-ordinates for detections done.</p>

<p>Feel free to ping me anywhere in social media if you get stuck somewhere or in case you have some questions.</p>]]></content><author><name>Pramesh Bajracharya</name><email>pe.messh@gmail.com</email></author><category term="cloud" /><category term="ai" /><category term="python" /><summary type="html"><![CDATA[Deployment of your own object detection model in sagemaker.]]></summary><media:thumbnail xmlns:media="http://search.yahoo.com/mrss/" url="https://prameshbajra.com/static/assets/img/og/deploy_in_sagemaker.png" /><media:content medium="image" url="https://prameshbajra.com/static/assets/img/og/deploy_in_sagemaker.png" xmlns:media="http://search.yahoo.com/mrss/" /></entry><entry><title type="html">Deploy Node - Express Application as NPM packages</title><link href="https://prameshbajra.com/blog/deployexpressasnpm/" rel="alternate" type="text/html" title="Deploy Node - Express Application as NPM packages" /><published>2019-09-16T00:00:00+00:00</published><updated>2019-09-16T00:00:00+00:00</updated><id>https://prameshbajra.com/blog/deployexpressasnpm</id><content type="html" xml:base="https://prameshbajra.com/blog/deployexpressasnpm/"><![CDATA[<p>I recently came around this problem where I needed to deploy an express application as a npm package, but to my suprise
there were no article explaining how it’s done. Weird right?</p>

<p>First of all, I am not sure why you would want to do this. For me this was just a play- around thing. Turns out, this is easy AF.</p>

<p>First, setup you express project. I did this like:</p>

<div class="language-plaintext highlighter-rouge"><div class="highlight"><pre class="highlight"><code>express --ejs myApplication
</code></pre></div></div>

<p>If you are not sure what this is then please check out <code class="language-plaintext highlighter-rouge">express-generator</code>, you can install it by:</p>

<div class="language-plaintext highlighter-rouge"><div class="highlight"><pre class="highlight"><code>npm i -g express-generator
</code></pre></div></div>

<p>Here’s a reference for convienence. <a href="https://expressjs.com/en/starter/generator.html">Express generator</a></p>

<p>Just to make things clear beforehand we won’t be changing anything in the application itself.
Most of the changes will be in the <code class="language-plaintext highlighter-rouge">package.json</code> file.</p>

<p>Your <code class="language-plaintext highlighter-rouge">package.json</code> file would look something like this at first:</p>

<div class="language-plaintext highlighter-rouge"><div class="highlight"><pre class="highlight"><code>{
    "name": "package-name",
    "version": "0.0.1",
    "private": true,
    "scripts": {
        "start": "node ./bin/www"
    },
    "dependencies": {
        "Your dependancies here"
    }
}
</code></pre></div></div>

<p>You should add some elements here such that your final <code class="language-plaintext highlighter-rouge">package.json</code> would look something like this:</p>

<div class="language-plaintext highlighter-rouge"><div class="highlight"><pre class="highlight"><code>{
    "name": "package-name",
    "version": "0.0.1",
    "private": false,
    "main": "./bin/www",
    "scripts": {
        "start": "node ./bin/www"
    },
    "bin": {
        "package-name": "./bin/www"
    },
    "dependencies": {
        "Your dependancies here"
    }
}
</code></pre></div></div>

<p>Watch out for the <code class="language-plaintext highlighter-rouge">"private": false</code> part if you are going to release you npm package as public.</p>

<p>We are pretty much done at this point.</p>

<p>Before publishing make sure that you have your account set up at : <a href="https://npmjs.com">NPM JS</a>
and login from terminal.</p>

<p>You can login to npm from your command line using :</p>

<div class="language-plaintext highlighter-rouge"><div class="highlight"><pre class="highlight"><code>npm login
</code></pre></div></div>

<p>After this you can simply:</p>

<div class="language-plaintext highlighter-rouge"><div class="highlight"><pre class="highlight"><code>npm publish
</code></pre></div></div>

<p>If everything is good and god is on your side then you should be able to publish your package successfully.
Give it a try and let me know which app you published. I’d be happy to use it.</p>

<p>If there is any doubt along the way, please feel free to drop a mail or contact me through any means.</p>]]></content><author><name>Pramesh Bajracharya</name><email>pe.messh@gmail.com</email></author><category term="web" /><summary type="html"><![CDATA[Deploy Express application as npm packages and publish it to npm registry.]]></summary><media:thumbnail xmlns:media="http://search.yahoo.com/mrss/" url="https://prameshbajra.com/static/assets/img/og/deployexpressasnpm.png" /><media:content medium="image" url="https://prameshbajra.com/static/assets/img/og/deployexpressasnpm.png" xmlns:media="http://search.yahoo.com/mrss/" /></entry><entry><title type="html">Export an unfrozen graph tensorflow - Object Detection</title><link href="https://prameshbajra.com/blog/export-unfrozen-graph-tensorflow-object-detection/" rel="alternate" type="text/html" title="Export an unfrozen graph tensorflow - Object Detection" /><published>2019-08-14T00:00:00+00:00</published><updated>2019-08-14T00:00:00+00:00</updated><id>https://prameshbajra.com/blog/export-unfrozen-graph-tensorflow-object-detection</id><content type="html" xml:base="https://prameshbajra.com/blog/export-unfrozen-graph-tensorflow-object-detection/"><![CDATA[<h2 id="why">Why?</h2>

<p>Because the <a href="https://github.com/tensorflow/models/blob/master/research/object_detection/g3doc/exporting_models.md">offical tutorial for tensorflow object detection</a> only exports a frozen graph. These frozen graphs are all good for testing the model and some small prediction works but for production they are a huge pain to work with. Again, the documentation is not clear on what needs to be done in order to make this model production ready.</p>

<p>Here are something we need to know before continuing:</p>

<ul>
  <li>
    <p>We should have a surfacial understanding on <a href="https://github.com/tensorflow/models/tree/master/research/object_detection">object detection using tensorflow</a> as this part comes only after our training is done and the checkpoint files are generated. More on this later.</p>
  </li>
  <li>
    <p>We need to know that <strong>tensorflow</strong> has a <a href="https://github.com/tensorflow/serving">tensorflow serving</a> that allows one to production ready models. But these servings only take in unfrozen graph and in the documentaion (when this blog was written) it is not mentioned how to export a unfrozen graph. This is the main reason this blog exists.</p>
  </li>
  <li>
    <p>Exporting checkpoints to a graph are no where to be found and many ways do not work.</p>
  </li>
</ul>

<p><br /></p>
<h2 id="diving-into-tensorflow-directories">Diving into Tensorflow directories:</h2>

<p>Just a second, before diving into tensorflow directories in order to export an unfrozen graph we will need to have checkpoint files that gets generated from the output from training the model. These checkpoint files look something like:</p>

<div class="language-plaintext highlighter-rouge"><div class="highlight"><pre class="highlight"><code>output_path
    |__ model.ckpt-&lt;checkpoint&gt;.data-00000-of-00001
    |__ model.ckpt-&lt;checkpoint&gt;.index
    |__ model.ckpt-&lt;checkpoint&gt;.meta
</code></pre></div></div>

<p>The <strong>checkpoint</strong> will be a number that means how much steps it has been trained on. We can have many files like this. Just make sure to remember the highest number among all.</p>

<p>With that out of the way we can start changing the code for exporting the unforzen graph.</p>

<p>Start by changing <code class="language-plaintext highlighter-rouge">exporter.py</code> file located in <code class="language-plaintext highlighter-rouge">models/research/object_detection/exporter.py</code>.
Replace the function <code class="language-plaintext highlighter-rouge">write_saved_model()</code> with this:</p>

<div class="language-python highlighter-rouge"><div class="highlight"><pre class="highlight"><code><span class="k">def</span> <span class="nf">write_saved_model</span><span class="p">(</span><span class="n">saved_model_path</span><span class="p">,</span> <span class="n">trained_checkpoint_prefix</span><span class="p">,</span> <span class="n">inputs</span><span class="p">,</span>
                      <span class="n">outputs</span><span class="p">):</span>
    <span class="s">"""Writes SavedModel to disk.
  Args:
    saved_model_path: Path to write SavedModel.
    trained_checkpoint_prefix: path to trained_checkpoint_prefix.
    inputs: The input image tensor to use for detection.
    outputs: A tensor dictionary containing the outputs of a DetectionModel.
  """</span>
    <span class="n">saver</span> <span class="o">=</span> <span class="n">tf</span><span class="p">.</span><span class="n">train</span><span class="p">.</span><span class="n">Saver</span><span class="p">()</span>
    <span class="k">with</span> <span class="n">session</span><span class="p">.</span><span class="n">Session</span><span class="p">()</span> <span class="k">as</span> <span class="n">sess</span><span class="p">:</span>
        <span class="n">saver</span><span class="p">.</span><span class="n">restore</span><span class="p">(</span><span class="n">sess</span><span class="p">,</span> <span class="n">trained_checkpoint_prefix</span><span class="p">)</span>
        <span class="n">builder</span> <span class="o">=</span> <span class="n">tf</span><span class="p">.</span><span class="n">saved_model</span><span class="p">.</span><span class="n">builder</span><span class="p">.</span><span class="n">SavedModelBuilder</span><span class="p">(</span><span class="n">saved_model_path</span><span class="p">)</span>

        <span class="n">tensor_info_inputs</span> <span class="o">=</span> <span class="p">{</span>
            <span class="s">'inputs'</span><span class="p">:</span> <span class="n">tf</span><span class="p">.</span><span class="n">saved_model</span><span class="p">.</span><span class="n">utils</span><span class="p">.</span><span class="n">build_tensor_info</span><span class="p">(</span><span class="n">inputs</span><span class="p">)</span>
        <span class="p">}</span>
        <span class="n">tensor_info_outputs</span> <span class="o">=</span> <span class="p">{}</span>
        <span class="k">for</span> <span class="n">k</span><span class="p">,</span> <span class="n">v</span> <span class="ow">in</span> <span class="n">outputs</span><span class="p">.</span><span class="n">items</span><span class="p">():</span>
            <span class="n">tensor_info_outputs</span><span class="p">[</span><span class="n">k</span><span class="p">]</span> <span class="o">=</span> <span class="n">tf</span><span class="p">.</span><span class="n">saved_model</span><span class="p">.</span><span class="n">utils</span><span class="p">.</span><span class="n">build_tensor_info</span><span class="p">(</span><span class="n">v</span><span class="p">)</span>

        <span class="n">detection_signature</span> <span class="o">=</span> <span class="p">(</span>
            <span class="n">tf</span><span class="p">.</span><span class="n">saved_model</span><span class="p">.</span><span class="n">signature_def_utils</span><span class="p">.</span><span class="n">build_signature_def</span><span class="p">(</span>
                <span class="n">inputs</span><span class="o">=</span><span class="n">tensor_info_inputs</span><span class="p">,</span>
                <span class="n">outputs</span><span class="o">=</span><span class="n">tensor_info_outputs</span><span class="p">,</span>
                <span class="n">method_name</span><span class="o">=</span><span class="n">signature_constants</span><span class="p">.</span><span class="n">PREDICT_METHOD_NAME</span><span class="p">))</span>

        <span class="n">builder</span><span class="p">.</span><span class="n">add_meta_graph_and_variables</span><span class="p">(</span>
            <span class="n">sess</span><span class="p">,</span>
            <span class="p">[</span><span class="n">tf</span><span class="p">.</span><span class="n">saved_model</span><span class="p">.</span><span class="n">tag_constants</span><span class="p">.</span><span class="n">SERVING</span><span class="p">],</span>
            <span class="n">signature_def_map</span><span class="o">=</span><span class="p">{</span>
                <span class="n">signature_constants</span><span class="p">.</span><span class="n">DEFAULT_SERVING_SIGNATURE_DEF_KEY</span><span class="p">:</span>
                <span class="n">detection_signature</span><span class="p">,</span>
            <span class="p">},</span>
        <span class="p">)</span>
        <span class="n">builder</span><span class="p">.</span><span class="n">save</span><span class="p">()</span>
</code></pre></div></div>

<p>Notice that there are some changes, the <code class="language-plaintext highlighter-rouge">frozen_graph_def</code> has been changed with <code class="language-plaintext highlighter-rouge">trained_checkpoint_prefix</code>.</p>

<p>After this we also need to change the caller of this function:</p>

<p>Replace</p>

<div class="language-python highlighter-rouge"><div class="highlight"><pre class="highlight"><code><span class="n">write_saved_model</span><span class="p">(</span><span class="n">saved_model_path</span><span class="p">,</span> <span class="n">frozen_graph_def</span><span class="p">,</span> <span class="n">placeholder_tensor</span><span class="p">,</span> <span class="n">outputs</span><span class="p">)</span>
</code></pre></div></div>

<p>with</p>

<div class="language-python highlighter-rouge"><div class="highlight"><pre class="highlight"><code><span class="n">write_saved_model</span><span class="p">(</span><span class="n">saved_model_path</span><span class="p">,</span> <span class="n">trained_checkpoint_prefix</span><span class="p">,</span> <span class="n">placeholder_tensor</span><span class="p">,</span> <span class="n">outputs</span><span class="p">)</span>
</code></pre></div></div>

<p><br /></p>
<h2 id="done">Done</h2>

<p>It was simple, wasn’t it? I still am not sure why tensorflow still doesn’t provide this code or include this in their official github documentation. This could help a lot of people. Anyways, we are done here. All we have to do is run the same command we run when we need to export a graph.</p>

<p>The command would be something like :</p>

<div class="language-plaintext highlighter-rouge"><div class="highlight"><pre class="highlight"><code># From directory tensorflow/models/research/

INPUT_TYPE=image_tensor
PIPELINE_CONFIG_PATH={path to pipeline config file}
TRAINED_CKPT_PREFIX={path to model.ckpt}
EXPORT_DIR={path to folder that will be used for export}
python object_detection/export_inference_graph.py \
    --input_type=${INPUT_TYPE} \
    --pipeline_config_path=${PIPELINE_CONFIG_PATH} \
    --trained_checkpoint_prefix=${TRAINED_CKPT_PREFIX} \
    --output_directory=${EXPORT_DIR}
</code></pre></div></div>

<p>It’s obvious we have to provide our own path to the necessary files like <strong>configs</strong> and <strong>directories</strong>. Also, this might be a bit confusing but the <strong>TRAINED_CKPT_PREFIX</strong> is the number that I asked you to remember in the beginning of the blog.</p>

<p><br /></p>
<h2 id="verify">Verify</h2>

<p>You can verify that the unfrozen graph has been exported by checking files under <strong>saved_model/variables</strong> directory. There should be files like :</p>

<div class="language-plaintext highlighter-rouge"><div class="highlight"><pre class="highlight"><code>saved_model
    |__ saved_model.pb
    |__ variables
            |__ variables.data-00000-of-00001
            |__ variables.index
</code></pre></div></div>

<p>Congratulations on getting the graph, but we did this for a reason. Making this model production ready.</p>

<p>I have another blog that deploys the model to sagemaker to makes predictions. Make sure to go through <a href="/blog/deploy_in_sagemaker/">this</a>.</p>

<p>Let me know if you get stuck somewhere or you have any confusion. Drop me a mail or message me at twitter - <a href="https://twitter.com/prameshbajra">@prameshbajra</a>. I will help as much as I can. Thank you.</p>]]></content><author><name>Pramesh Bajracharya</name><email>pe.messh@gmail.com</email></author><category term="ai" /><category term="python" /><summary type="html"><![CDATA[How to export an unfrozen TensorFlow graph from the Object Detection API so it can be served rather than only run locally.]]></summary><media:thumbnail xmlns:media="http://search.yahoo.com/mrss/" url="https://prameshbajra.com/static/assets/img/og/export-unfrozen-graph-tensorflow-object-detection.png" /><media:content medium="image" url="https://prameshbajra.com/static/assets/img/og/export-unfrozen-graph-tensorflow-object-detection.png" xmlns:media="http://search.yahoo.com/mrss/" /></entry><entry><title type="html">Github for every developer</title><link href="https://prameshbajra.com/blog/github/" rel="alternate" type="text/html" title="Github for every developer" /><published>2019-07-11T00:00:00+00:00</published><updated>2019-07-11T00:00:00+00:00</updated><id>https://prameshbajra.com/blog/github</id><content type="html" xml:base="https://prameshbajra.com/blog/github/"><![CDATA[<p><strong>GitHub</strong> and services like it, such as <strong>BitBucket, GitLab or Gitorious</strong> use git. <strong>Git</strong> is a distributed version control system written by the creator of <strong>Linux, Linus Torvalds</strong>, after he got frustrated with proprietary software. <strong>Git</strong> is similar to other version control systems such as subversion or CVS, but it’s distributed. What this means is that if you clone a git project, you have the entire project history. You can commit, branch and tag all on you local machine without interacting with a server at all. If you were working with subversion or another centralized VCS all of your interactions occur with the server.</p>

<p><strong>GitHub</strong> and similar services bring all of the benefits of a decentralized VCS to a centralized service. <strong>GitHub</strong> also stores a copy of your project’s repository just like any other developer. Then, you basically designate that as the project’s central repository and all the developers push and pull their changes to and from that repository. <strong>GitHub</strong> takes this a step further by encouraging developers to fork a project’s repository and then use that as their own centralized repository. From there they can send “pull requests” to the main project with their changes and then the project maintainers can review them before deciding whether to include them in their project or not.</p>

<p>So what are the three best reasons to use <strong>GitHub</strong>?</p>

<ol>
  <li>
    <p><strong>It makes it easy to contribute to your favorite open source projects.</strong> <br />
Today, nearly every open-source project uses GitHub to manage their project. GitHub is free if your project is open source and includes a wiki and issue tracker that make it easy to include more in-depth documentation and get feedback about your project. Symfony, Ruby on Rails, and Django all use GitHub (symfony, rails, django) to develop their project and accept contributions from the community. Even the GitLab source is available at GitHub! If you want to contribute, you just fork their project, make your changes and then send them a pull request using the GitHub web interface.</p>
  </li>
  <li>
    <p><strong>GitHub has some of the best documentation around.</strong> <br />
You won’t run out of content when you use GitHub, thanks to a well-padded guide and help section for articles that you can pull up for practically any topic on earth, for as long as it is related to a git. It’s got content for helping you learn about generating SSH keys. A guide for the best git workflow is available. Samples on gitignore (and more) are abound for your next planned project, among other things. You would not need to look elsewhere for all the information that you need.</p>
  </li>
  <li>
    <p><strong>GitHub has Gists and GitHub Pages, too.</strong> <br />
A while back, GitHub rolled out a feature called Gists, which lets you convert one or several files into a working git repository. This new feature converted sharing and tracking changes made to configuration files and even simple scripts into a whole new level of easy. While they aren’t as rich in features like a full-blown GitHub repository, they really work well even if you are without a paid account. GitHub pages, on the other hand, lets you host static websites by simple assigning HTML pages onto another, separate repository – the way you would any other type of git repository. With this, blogging can be done off the bat as well as updating with additional documentation or bumping up its web presence.</p>
  </li>
  <li>
    <p><strong>Become a better developer.</strong> <br />
Probably the most beneficial part is, it help you to become a better developer. You can go through different people code as well as create something new and show it to people around you. A great way to showcase your work and attract recruiters and bigger companies. Nowadays a lot of companies look into your github profile too and if you are not from some great university or college building a good github profile certainly going to help you.</p>
  </li>
</ol>

<p>I hope I have made some valid points regarding GitHub. If not,  there is always more.</p>

<ul>
  <li>
    <p>Version control your projects.</p>
  </li>
  <li>
    <p>Push your projects to GitHub and let the world know how nice and useful code you write.</p>
  </li>
  <li>
    <p>Explore other’s projects on GitHub, get inspired code more, or contribute to their project.</p>
  </li>
  <li>
    <p>Collaborate with others, by letting other people contribute to your projects or you contributing to other’s projects.</p>
  </li>
  <li>
    <p>Maintain useful lists. I didn’t find anything better then creating lists on GitHub using markdown. I like how clean it looks.</p>
  </li>
  <li>
    <p>Learn Git.</p>
  </li>
  <li>
    <p>Link your nice GitHub profile while applying for grants, jobs, in your resume. It makes things better and helps.</p>
  </li>
</ul>

<p>These reason suffice to make any developer use GitHub. So get started on it.</p>

<p>Also find me on github : <a href="http://www.github.com/Suzal3579">Suzal3579</a></p>]]></content><author><name>Pramesh Bajracharya</name><email>pe.messh@gmail.com</email></author><category term="tools" /><summary type="html"><![CDATA[If you are a developer Github is a must]]></summary><media:thumbnail xmlns:media="http://search.yahoo.com/mrss/" url="https://prameshbajra.com/static/assets/img/og/github.png" /><media:content medium="image" url="https://prameshbajra.com/static/assets/img/og/github.png" xmlns:media="http://search.yahoo.com/mrss/" /></entry><entry><title type="html">How I got into the Tech World</title><link href="https://prameshbajra.com/blog/How_i_got_into_software_world/" rel="alternate" type="text/html" title="How I got into the Tech World" /><published>2019-06-01T00:00:00+00:00</published><updated>2019-06-01T00:00:00+00:00</updated><id>https://prameshbajra.com/blog/How_i_got_into_software_world</id><content type="html" xml:base="https://prameshbajra.com/blog/How_i_got_into_software_world/"><![CDATA[<h2 id="babbling-history"><strong>Babbling History</strong></h2>

<p>2012, After school. The final exams were over and my school life eventually came to an end. I was quite confident that I would get good grades. My family had huge expectation from me. They promised me to get a new phone if I get 80+. Good thing, I did. This accompolishment got everyone happy, that my family brought me a new phone. Back then android was unheard of and touchscreen was just a new kid in the block. I still remember the shop (Merina Mobiles, New Road) where we went to buy my new phone. I chose Samsung Galaxy Young. That puny phone cost 12000rs, back then. I can’t imagine now how happy I was. This single purchase was my entry ticket to the world of technology.  <br /><br /></p>

<h2 id="after-school---starting-line-to-the-journey"><strong>After School - Starting line to the Journey</strong></h2>

<p>It was this time I got a great friend (<em>Prasanna Mishra</em>). We were in same school, but interacted once in a bluemoon. The bridge course classes we attended made us great buddies. This guy was curious AF. My new phone got both of us excited but it was Prasanna who tried out new stuffs like keeping launchers, making, breaking and hacking through several apps. This thing intrigued me. I wanted to play around too. Then after couple of months he got his first smartphone too. It was a cute HTC. We used to be in his place all the time as my place had no internet nor a laptop. Those time gave us great understanding about the android world.    <br /><br /></p>

<h2 id="college-time---all-about-smartphone"><strong>College Time - All About Smartphone</strong></h2>

<p>College was all about custom roms, cool applications and android launchers. We were flashing android firmwares and custom softwares like pros. Ok! I’ll be honest, It was Prasanna most of the time but yea, it was his home, his internet and his laptop after all. We were too much into smartphones that we got known for it. Our friends, relatives used to call us to fix their phones. We used to be updated with latest phone releases, android versions and so called specs chart. I believe it was around this time I was first introduced to code. I thought code was only written by highly intelligent individuals and is not for a no brainer like me. Top of that I did not have a laptop too. So, I never bothered. <br /><br /></p>

<h2 id="after-college---where-it-all-changed"><strong>After College - Where it all changed</strong></h2>

<p>So, what after college? Engineering? Perhaps, Civil? Everybody had plans for me to join civil engineering. (Echoing voices… Civil Engineers are paid high and has great scope) But, as you might have guessed, technology is what I was interested in and wanted to work on for all my life. I had “<em>the career talk</em>” with everybody. The one and the only talk that went in my head and stayed are my mom’s words “<strong>Are you even interested in civil? I do not think so. Everyone says you are good with smartphones. We are not educated like others and we don’t know what happens in either of the fields. So, this decision is completely up to you. I think you should choose what you feel like studying. Money can be earned from either of them right ?</strong>”. These were the exact words (Just translated in english) that came from her. I was baffled. These words from her, totally changed my life. I can’t express how thankful I am to you MOM <strong>&lt;3</strong>. This decision of joining <em>Computer Science Engineering was one of the best decision of my life</em>.</p>

<p>But remember? I still did not have a laptop. My mom and my elder mom were saving money for me to get a laptop as I was insisting on it for long. They saved nearly 30000rs but that was no where close to get a decent one. We were planning to get a second hand. Then, a miracle happened. One day me and my mom were out for some grocery shopping my mom stepped into something. She looked down, bowed and picked up a shiny thing. That shiny thing was a gold ring. There was no one around to ask if it was theres. We stood there for a while but no one came by. So… <em>we kept it, like every good citizen does :P</em> . After we got home my mom held me and told - “<em>Now you don’t have to wait long for a new laptop</em>”. We then went to a relatives jwellery store and asked him how much would we get for the ring? He examined and replied - “<em>I can give you 23000 for this ring</em>”. I literally felt like crying that moment. A laptop I was aiming to get was around 55000rs and the ring that came for 23000rs and 30000rs from savings just made my wish possible. We sold the ring and went to get a new laptop after couple of days. Matter of fact, this blog is writen using the very laptop I am talking about. Yeah, I’m stil using it to this day.</p>

<p><strong>Best thing comes with the worst ones, right?</strong> Yeah, that’s what happened next. I was not selected in one of the finest colleges in Nepal, obviously!!. I then got a chance to study in India. Now this, <em>was one of the worst decision of my life</em>. I regret it till date.
<br /><br /></p>

<h2 id="india---computer-science-engineering"><strong>India - Computer Science Engineering</strong></h2>

<p>I joined <strong>BVC Engineering College in Andra Pradesh, India</strong>. First year was a nightmare. No internet, No clean gym, No good food, No clean water and basically everything was crap. It was extermly difficult to learn something new. So, all I can do was play basketball and read text books. My family, as usual, had expectations from me to do well. Amazingly, I nearly topped the first year. My family members were happy, but they had no idea that I didn’t like it there at all. Moving on to the second year, the internet improved a bit and I started downloading youtube tutorial videos, smartphone reviews and some informative tech videos to learn in free time. I used to set an alarm at 1 am, 3 am and 5am just to check if I could queue up some other downloads or whether the internet is still working or not. 3 fourth of my hard drive was filled with youtube videos and more than half of it was tutorials. Like this, I starting watching coding videos. They made no sense at all at first.</p>

<p>I was about to quit but the feeling when you get when your code works is heavenly. Overcoming the difficulties and being able to code a simple app gave me drops of happiness. It was like a self-pat at the back. Say “<em>Well done! You’re the best :D.</em>” to yourself. Honestly, I did not love to code when I started. I was just learning to code as a time pass thing. But, you know as Carl Jung said - “<strong>You are what you repeatedly do</strong>”. I started getting kinda good in coding. Technical things and some cryptic words that was in my course pulled me into it. I started learning more and more and never stopped working on my learning. I topped my batch in my second year (<strong>NERD ALERT!!!!</strong>). Then the internet became more stable and a bit faster than before. The food became a habit. By this time I always had my hands full. Attending college, playing basketball, learning new stuffs and coding were my daily jam. I barely had time to talk to my friends at home.</p>

<p>Looking back, I am glad I never stopped learning and was off the radar for quite a long to learn and improve. If only I had quit or did not show any interest to learn I would be regretting it a lot today. My friends still say this to me - “You put in your work and got what you deserve”. Missing parties, staying hungry, saying no to long tours, I don’t regret it all. It was all for a reason - A reason to do something for my family and learn to the fullest.</p>

<p><br /></p>
<blockquote>
  <p>I hope when I read this after a couple of years, it will bring back some memories and a wide smile :)</p>
</blockquote>]]></content><author><name>Pramesh Bajracharya</name><email>pe.messh@gmail.com</email></author><category term="career" /><summary type="html"><![CDATA[How I got into technology and why I will be doing this for my life]]></summary><media:thumbnail xmlns:media="http://search.yahoo.com/mrss/" url="https://prameshbajra.com/static/assets/img/og/How_i_got_into_software_world.png" /><media:content medium="image" url="https://prameshbajra.com/static/assets/img/og/How_i_got_into_software_world.png" xmlns:media="http://search.yahoo.com/mrss/" /></entry><entry><title type="html">Theming Jupyter Notebooks</title><link href="https://prameshbajra.com/blog/jupyter-notebook/" rel="alternate" type="text/html" title="Theming Jupyter Notebooks" /><published>2019-05-10T00:00:00+00:00</published><updated>2019-05-10T00:00:00+00:00</updated><id>https://prameshbajra.com/blog/jupyter-notebook</id><content type="html" xml:base="https://prameshbajra.com/blog/jupyter-notebook/"><![CDATA[<p><strong>Machine learning</strong> is the new trend everywhere. Every developer I meet is into machine learning these days (including me).
You are for sure to stumble upon <strong>Jupyter Notebooks</strong> if you are into machine learning stuff. Basically, <strong>Jupyter Notebooks</strong> are
documents the contain both computer code (<em>e.g. python</em>) and rich text elements (<em>paragraph, equations, figures, links, etc…</em>). Notebook documents are both human-readable documents containing the analysis description and the results (<em>figures, tables, etc..</em>) as well as executable documents.</p>

<p><strong>Jupyter Notebooks</strong> has support for over 40 programming languages, including Python, R, Julia, and Scala.</p>

<p>If you are like me then you are never satisfied with out of the box experience on any development environment. I literally spend hours 
tweaking tools, changing fonts, colors and what not. Making the tools/ides look better than the code to be honest. I am writing this guide for Ubuntu/Linux users but this should pretty much help for all platforms. You just have to search for the respective folders. So, let’s begin.</p>

<p><br /></p>
<h2 id="we-will-start-by-tweaking-the-default-theme-thats-provided-by-jupyter">We will start by tweaking the default theme that’s provided by jupyter.</h2>

<ul>
  <li>
    <p>For this you will need to find <code class="language-plaintext highlighter-rouge">.jupyter</code> folder - Usually located in <code class="language-plaintext highlighter-rouge">home/.jupyter</code>. Try <code class="language-plaintext highlighter-rouge">ctrl + h</code> if your files are hidden.</p>
  </li>
  <li>
    <p>Then, you need to navigate inside the folder and go inside <code class="language-plaintext highlighter-rouge">custom</code> folder. Now, all you need to do is change <code class="language-plaintext highlighter-rouge">custom.css</code> file.</p>
  </li>
  <li>
    <p>If you do not like the width of your notebook then you can change it by adding the snippet below in <code class="language-plaintext highlighter-rouge">custom.css</code> file. Do not change anything else (I am not responsible for the things you break, or just take a back up of your <code class="language-plaintext highlighter-rouge">custom.css</code> before moving further.).</p>

    <div class="language-plaintext highlighter-rouge"><div class="highlight"><pre class="highlight"><code>  .container { 
      width:90% !important; 
  }
</code></pre></div>    </div>
  </li>
  <li>
    <p>You can also change the fonts. Just replace the font name in the same file and most of all remember to place the font under <code class="language-plaintext highlighter-rouge">fonts</code> folder
the you will find right beside <code class="language-plaintext highlighter-rouge">custom.css</code></p>
  </li>
  <li>
    <p>Also, I have no idea what <code class="language-plaintext highlighter-rouge">custom.js</code> does.</p>
  </li>
</ul>

<p><br />
If you are curious on what styles am I using then here is the full <code class="language-plaintext highlighter-rouge">custom.css</code> of mine:</p>

<div class="language-plaintext highlighter-rouge"><div class="highlight"><pre class="highlight"><code>@font-face {
    font-family: "Hasklig";
    font-weight: normal;
    font-style: italic;
    src: local('"Hasklig"'), url('fonts/hasklig.otf') format('opentype');
}
@font-face {
font-family: "Hasklig";
font-weight: normal;
font-style: italic;
src: local('"Hasklig"'), url('fonts/hasklig-italic.otf') format('opentype');
}

.container { 
    width:90% !important; 
}

div#notebook {
    font-size: 11px;
}

div.prompt {
    min-width: 10ex;
}

.timing_area {
    font-size: 60% !important;
}

.CodeMirror {
    line-height: 1.50em;
    font-size: 12px;
    height: auto;
    background: none;
}

.completions select {
    background: white;
    outline: none;
    border: none;
    padding: 0px;
    margin: 0px;
    overflow: auto;
    font-family: monospace;
    font-size: 90%;
    color: #000;
    width: auto;
}

&lt;script&gt;
    MathJax.Hub.Config({
        "HTML-CSS": {
            /*preferredFont: "TeX",*/
            /*availableFonts: ["TeX", "STIX"],*/
            styles: {
                scale: 80,
                ".MathJax_Display": {
                    "font-size": "80%",
                }
            }
        }
    });
&lt;/script&gt;
</code></pre></div></div>

<p>By, this time you might wonder on how I got the css selectors name (<em>Eg: css class names</em>). For this you need to start <strong>Jupyter Notebook</strong>
and open any <code class="language-plaintext highlighter-rouge">.ipynb</code> files that you have. <code class="language-plaintext highlighter-rouge">.ipynb</code> files are basically the iPython files (Interative Python). You can then inspect element
on the page and select the class name of the element that you would like to change. (<code class="language-plaintext highlighter-rouge">ctrl+shift+c</code> <em>In case you prefer shortcuts</em>)</p>

<p>Update 2020: By this time there is this advent of dark-mode everywhere, here is my CSS for dark mode. Only CSS is to be changed. Replace your custom CSS with this:</p>

<div class="language-plaintext highlighter-rouge"><div class="highlight"><pre class="highlight"><code>div#notebook {
    font-family: sans-serif;
    font-size: 9pt;
    line-height: 170%;
    color: #f8f8f0;
    -webkit-font-smoothing: antialiased !important;
    padding-top: 25px !important;
}

body,
div.body {
    font-family: sans-serif;
    font-size: 9pt;
    color: #f8f8f0;
    background-color: #1e1e1e;
    background: #1e1e1e;
    -webkit-font-smoothing: antialiased !important;
}

body.notebook_app {
    padding: 0;
    background-color: #1e1e1e;
    background: #1e1e1e;
    padding-right: 0px !important;
    overflow-y: hidden;
}

a {
    font-family: sans-serif;
    color: #f8f8f0;
    -webkit-font-smoothing: antialiased !important;
}

a:hover,
a:focus {
    color: #f8f8f0;
    -webkit-font-smoothing: antialiased !important;
}

div#maintoolbar {
    position: absolute;
    width: 90%;
    margin-left: -10%;
    padding-right: 8%;
    float: left;
    background: transparent !important;
}

#maintoolbar {
    margin-bottom: -3px;
    margin-top: 0px;
    border: 0px;
    min-height: 27px;
    padding-top: 2px;
    padding-bottom: 0px;
}

#maintoolbar .container {
    width: 100%;
    margin-right: auto;
    margin-left: auto;
    background-color: #282828;
    margin-top: -1px;
}

.list_header,
div#notebook_list_header.row.list_header {
    font-size: 9pt;
    color: #f8f8f0;
    background-color: transparent;
    height: 35px;
}

i.fa.fa-folder {
    display: inline-block;
    font: normal normal normal 14px "FontAwesome";
    font-family: "FontAwesome" !important;
    text-rendering: auto;
    -webkit-font-smoothing: antialiased;
    font-size: 18px;
    -moz-osx-font-smoothing: grayscale;
}

#running .panel-group .panel .panel-heading {
    font-size: 14pt;
    color: #f8f8f0;
    padding: 8px 8px;
    background: #2f2f2f;
    background-color: #2f2f2f;
}

#running .panel-group .panel .panel-heading a {
    font-size: 14pt;
    color: #f8f8f0;
}

#running .panel-group .panel .panel-heading a:focus,
#running .panel-group .panel .panel-heading a:hover {
    font-size: 14pt;
    color: #f8f8f0;
}

#running .panel-group .panel .panel-body .list_container .list_item {
    background: #232323;
    background-color: #232323;
    padding: 2px;
    border-bottom: 2px solid rgba(93, 92, 82, .25);
}

#running .panel-group .panel .panel-body .list_container .list_item:hover {
    background: #232323;
    background-color: #232323;
}

#running .panel-group .panel .panel-body {
    padding: 2px;
}

button#refresh_running_list {
    border: none !important;
}

button#refresh_cluster_list {
    border: none !important;
}

div.running_list_info.toolbar_info {
    font-size: 15px;
    padding: 4px 0 4px 0;
    margin-top: 5px;
    margin-bottom: 8px;
    height: 24px;
    line-height: 24px;
    text-shadow: none;
}

.list_placeholder {
    font-weight: normal;
}

#tree-selector {
    padding: 0px;
    border-color: transparent;
}

#project_name&gt;ul&gt;li&gt;a&gt;i.fa.fa-home {
    color: #a6e22e;
    font-size: 17pt;
    display: inline-block;
    position: static;
    padding: 0px 0px;
    font-weight: normal;
    text-align: center;
    vertical-align: text-top;
}

.fa-folder:before {
    color: #ae81ff;
}

.fa-arrow-up:before {
    font-size: 14px;
}

.fa-arrow-down:before {
    font-size: 14px;
}

span#last-modified.btn.btn-xs.btn-default.sort-action:hover .fa,
span#sort-name.btn.btn-xs.btn-default.sort-action:hover .fa {
    color: #a6e22e;
}

.folder_icon:before {
    display: inline-block;
    font: normal normal normal 14px/1 FontAwesome;
    font-size: inherit;
    text-rendering: auto;
    -webkit-font-smoothing: antialiased;
    -moz-osx-font-smoothing: grayscale;
    content: "\f07b";
    color: #ae81ff;
}

.notebook_icon:before {
    display: inline-block;
    font: normal normal normal 14px/1 FontAwesome;
    font-size: inherit;
    text-rendering: auto;
    -webkit-font-smoothing: antialiased;
    -moz-osx-font-smoothing: grayscale;
    content: "\f02d";
    position: relative;
    color: #a6e22e !important;
    top: 0px;
}

.file_icon:before {
    display: inline-block;
    font: normal normal normal 14px/1 FontAwesome;
    font-size: inherit;
    text-rendering: auto;
    -webkit-font-smoothing: antialiased;
    -moz-osx-font-smoothing: grayscale;
    content: "\f15b";
    position: relative;
    top: 0px;
    color: #888888 !important;
}

#project_name a {
    display: inline-flex;
    padding-left: 7px;
    margin-left: -2px;
    text-align: -webkit-auto;
    vertical-align: baseline;
    font-size: 18px;
}

div#notebook_toolbar div.dynamic-instructions {
    font-family: sans-serif;
    font-size: 17px;
    color: #75715e;
}

span#login_widget&gt;.button,
#logout {
    font-family: "Proxima Nova", sans-serif;
    color: #f8f8f0;
    background: transparent;
    background-color: transparent;
    border: 2px solid #2f2f2f;
    font-weight: normal;
    box-shadow: none;
    text-shadow: none;
    border-radius: 3px;
    margin-right: 10px;
    padding: 2px 7px;
}

span#login_widget&gt;.button:hover,
#logout:hover {
    color: #a6e22e;
    background-color: transparent;
    background: transparent;
    border: 2px solid #a6e22e;
    background-image: none;
    box-shadow: none !important;
    border-radius: 3px;
}

span#login_widget&gt;.button:focus,
#logout:focus,
span#login_widget&gt;.button.focus,
#logout.focus,
span#login_widget&gt;.button:active,
#logout:active,
span#login_widget&gt;.button.active,
#logout.active,
.open&gt;.dropdown-togglespan#login_widget&gt;.button,
.open&gt;.dropdown-toggle#logout {
    color: #f8f8f2;
    background-color: #f8f8f0;
    background: #f8f8f0;
    border-color: #f8f8f0;
    background-image: none;
    box-shadow: none !important;
    border-radius: 2px;
}

body&gt;#header #header-container {
    padding-bottom: 0px;
    padding-top: 4px;
    box-sizing: border-box;
    -moz-box-sizing: border-box;
    -webkit-box-sizing: border-box;
}

body&gt;#header {
    background: #1e1e1e;
    background-color: #1e1e1e;
    position: relative;
    z-index: 100;
}

.list_container {
    font-size: 9pt;
    color: #f8f8f0;
    border: none;
    text-shadow: none !important;
}

.list_container&gt;div {
    border-bottom: 1px solid rgba(93, 92, 82, .25);
    font-size: 9pt;
}

.list_header&gt;div,
.list_item&gt;div {
    padding-top: 6px;
    padding-bottom: 2px;
    padding-left: 0px;
}

.list_header&gt;div .item_link,
.list_item&gt;div .item_link {
    margin-left: -1px;
    vertical-align: middle;
    line-height: 22px;
    font-size: 9pt;
}

.item_icon {
    color: #ae81ff;
    font-size: 9pt;
    vertical-align: middle;
}

.list_item input:not([type="checkbox"]) {
    padding-right: 0px;
    height: 1.75em;
    width: 25%;
    margin: 0px 0 0;
    margin-top: 0px;
}

.list_header&gt;div .item_link,
.list_item&gt;div .item_link {
    margin-left: -1px;
    vertical-align: middle;
    line-height: 1.5em;
    font-size: 9pt;
    display: inline-table;
    position: static;
}

#button-select-all {
    height: 34px;
    min-width: 55px;
    z-index: 0;
    border: none !important;
    padding-top: 0px;
    padding-bottom: 0px;
    margin-bottom: 0px;
    margin-top: 0px;
    left: -3px;
    border-radius: 0px !important;
}

#button-select-all:focus,
#button-select-all:active:focus,
#button-select-all.active:focus,
#button-select-all.focus,
#button-select-all:active.focus,
#button-select-all.active.focus {
    background-color: #2f2f2f !important;
    background: #2f2f2f !important;
}

button#tree-selector-btn {
    height: 34px;
    font-size: 12.0pt;
    border: none;
    left: 0px;
    border-radius: 0px !important;
}

input#select-all.pull-left.tree-selector {
    margin-left: 7px;
    margin-right: 2px;
    margin-top: 2px;
    top: 4px;
}

input[type="radio"],
input[type="checkbox"] {
    margin-top: 1px;
    line-height: normal;
}

.delete-button {
    border: none !important;
}

i.fa.fa-trash {
    font-size: 13.5pt;
}

.list_container a {
    font-size: 16px;
    color: #f8f8f0;
    border: none;
    text-shadow: none !important;
    font-weight: normal;
    font-style: normal;
}

div.list_container a:hover {
    color: #f8f8f0;
}

.list_header&gt;div input,
.list_item&gt;div input {
    margin-right: 7px;
    margin-left: 12px;
    vertical-align: baseline;
    line-height: 22px;
    position: relative;
    top: -1px;
}

div.list_item:hover {
    background-color: rgba(93, 92, 82, .1);
}

.breadcrumb&gt;li {
    font-size: 12.0pt;
    color: #f8f8f0;
    border: none;
    text-shadow: none !important;
}

.breadcrumb&gt;li+li:before {
    content: "/\00a0";
    padding: 0px;
    color: #f8f8f0;
    font-size: 18px;
}

#project_name&gt;.breadcrumb {
    padding: 0px;
    margin-bottom: 0px;
    background-color: transparent;
    font-weight: normal;
    margin-top: -2px;
}

ul#tabs a {
    font-family: sans-serif;
    font-size: 9pt;
    font-weight: normal;
    font-style: normal;
    text-shadow: none !important;
}

.nav-tabs {
    font-family: sans-serif;
    font-size: 9pt;
    font-weight: normal;
    font-style: normal;
    background-color: transparent;
    border-color: transparent;
    text-shadow: none !important;
    border: 2px solid transparent;
}

.nav-tabs&gt;li&gt;a:active,
.nav-tabs&gt;li&gt;a:focus,
.nav-tabs&gt;li&gt;a:hover,
.nav-tabs&gt;li.active&gt;a,
.nav-tabs&gt;li.active&gt;a:focus,
.nav-tabs&gt;li.active&gt;a:hover,
.nav-tabs&gt;li.active&gt;a,
.nav-tabs&gt;li.active&gt;a:hover,
.nav-tabs&gt;li.active&gt;a:focus {
    color: #a6e22e;
    background-color: transparent;
    border-color: transparent;
    border-bottom: 2px solid transparent;
}

.nav&gt;li.disabled&gt;a,
.nav&gt;li.disabled&gt;a:hover {
    color: #75715e;
}

.nav-tabs&gt;li&gt;a:before {
    content: "";
    position: absolute;
    width: 100%;
    height: 2px;
    bottom: -2px;
    left: 0;
    background-color: #a6e22e;
    visibility: hidden;
    -webkit-transform: perspective(0)scaleX(0);
    transform: perspective(0)scaleX(0);
    -webkit-transition: ease 220ms;
    transition: ease 220ms;
    -webkit-font-smoothing: antialiased !important;
}

.nav-tabs&gt;li&gt;a:hover:before {
    visibility: visible;
    -webkit-transform: perspective(1)scaleX(1);
    transform: perspective(1)scaleX(1);
}

.nav-tabs&gt;li.active&gt;a:before {
    content: "";
    position: absolute;
    width: 100%;
    height: 2px;
    bottom: -2px;
    left: 0;
    background-color: #a6e22e;
    visibility: visible;
    -webkit-transform: perspective(1)scaleX(1);
    transform: perspective(1)scaleX(1);
    -webkit-font-smoothing: subpixel-antialiased !important;
}

div#notebook {
    font-family: sans-serif;
    font-size: 9pt;
    padding-top: 4px;
}

.notebook_app {
    background-color: #1e1e1e;
}

#notebook-container {
    padding: 13px 2px;
    background-color: #1e1e1e;
    min-height: 0px;
    box-shadow: none;
    width: 1260px;
    margin-right: auto;
    margin-left: auto;
}

div#ipython-main-app.container {
    width: 1260px;
    margin-right: auto;
    margin-left: auto;
    margin-right: auto;
    margin-left: auto;
}

.container {
    width: 1260px;
    margin-right: auto;
    margin-left: auto;
}

div#menubar-container {
    width: 100%;
    width: 980px;
}

div#header-container {
    width: 980px;
}

.notebook_app #header,
.edit_app #header {
    box-shadow: none !important;
    background-color: #1e1e1e;
    border-bottom: 2px solid rgba(93, 92, 82, .25);
}

#header,
.edit_app #header {
    font-family: sans-serif;
    font-size: 9pt;
    box-shadow: none;
    background-color: #1e1e1e;
}

#header .header-bar,
.edit_app #header .header-bar {
    background: #1e1e1e;
    background-color: #1e1e1e;
}

body&gt;#header .header-bar {
    width: 100%;
    background: #1e1e1e;
}

span.checkpoint_status,
span.autosave_status {
    font-size: small;
    display: none;
}

#menubar,
div#menubar {
    background-color: #1e1e1e;
    padding-top: 0px !important;
}

#menubar .navbar,
.navbar-default {
    background-color: #1e1e1e;
    margin-bottom: 0px;
    margin-top: 0px;
}

.navbar {
    border: none;
}

div.navbar-text,
.navbar-text,
.navbar-text.indicator_area,
p.navbar-text.indicator_area {
    margin-top: 8px !important;
    margin-bottom: 0px;
    color: #a6e22e;
}

.navbar-default {
    font-family: sans-serif;
    font-size: 9pt;
    background-color: #1e1e1e;
    border-color: rgba(93, 92, 82, .25);
    line-height: 1.5em;
    padding-bottom: 0px;
}

.navbar-default .navbar-nav&gt;li&gt;a {
    font-family: sans-serif;
    font-size: 9pt;
    color: #f8f8f0;
    display: block;
    line-height: 1.5em;
    padding-top: 14px;
    padding-bottom: 11px;
}

.navbar-default .navbar-nav&gt;li&gt;a:hover,
.navbar-default .navbar-nav&gt;li&gt;a:focus {
    color: #f8f8f0 !important;
    background-color: rgba(93, 92, 82, .25) !important;
    border-color: rgba(93, 92, 82, .25) !important;
    line-height: 1.5em;
    transition: 80ms ease;
}

.navbar-default .navbar-nav&gt;.open&gt;a,
.navbar-default .navbar-nav&gt;.open&gt;a:hover,
.navbar-default .navbar-nav&gt;.open&gt;a:focus {
    color: #f8f8f2;
    background-color: #383838;
    border-color: #383838;
    line-height: 1.5em;
}

.navbar-nav&gt;li&gt;.dropdown-menu {
    margin-top: 0px;
}

.navbar-nav {
    margin: 0;
}

div.notification_widget.info,
.notification_widget.info,
.notification_widget:active:hover,
.notification_widget.active:hover,
.open&gt;.dropdown-toggle.notification_widget:hover,
.notification_widget:active:focus,
.notification_widget.active:focus,
.open&gt;.dropdown-toggle.notification_widget:focus,
.notification_widget:active.focus,
.notification_widget.active.focus,
.open&gt;.dropdown-toggle.notification_widget.focus,
div#notification_notebook.notification_widget.btn.btn-xs.navbar-btn,
div#notification_notebook.notification_widget.btn.btn-xs.navbar-btn:hover,
div#notification_notebook.notification_widget.btn.btn-xs.navbar-btn:focus {
    color: #f8f8f0 !important;
    background-color: transparent !important;
    border-color: transparent !important;
    padding-bottom: 0px !important;
    margin-bottom: 0px !important;
    font-size: 9pt !important;
    z-index: 0;
}

div#notification_notebook.notification_widget.btn.btn-xs.navbar-btn {
    font-size: 9pt !important;
    z-index: 0;
}

.notification_widget {
    color: #ae81ff;
    z-index: -500;
    font-size: 9pt;
    background: transparent;
    background-color: transparent;
    margin-right: 3px;
    border: none;
}

.notification_widget,
div.notification_widget {
    margin-right: 0px;
    margin-left: 0px;
    padding-right: 0px;
    vertical-align: text-top !important;
    margin-top: 6px !important;
    background: transparent !important;
    background-color: transparent !important;
    font-size: 9pt !important;
    border: none;
}

.navbar-btn.btn-xs:hover {
    border: none !important;
    background: transparent !important;
    background-color: transparent !important;
    color: #f8f8f0 !important;
}

div.notification_widget.info,
.notification_widget.info {
    display: none !important;
}

.edit_mode .modal_indicator:before {
    display: none;
}

.command_mode .modal_indicator:before {
    display: none;
}

.item_icon {
    color: #ae81ff;
}

.item_buttons .kernel-name {
    font-size: 9pt;
    color: #ae81ff;
}

.running_notebook_icon:before {
    color: #a6e22e !important;
    font: normal normal normal 15px/1 FontAwesome;
    font-size: 15px;
    text-rendering: auto;
    -webkit-font-smoothing: antialiased;
    -moz-osx-font-smoothing: grayscale;
    content: "\f10c";
    vertical-align: middle;
    position: static;
    display: inherit;
}

.item_buttons .running-indicator {
    padding-top: 4px;
    color: #a6e22e;
    font-family: sans-serif;
    text-rendering: auto;
    -webkit-font-smoothing: antialiased;
}

#notification_trusted {
    font-family: sans-serif;
    border: none;
    background: transparent;
    background-color: transparent;
    margin-bottom: 0px !important;
    vertical-align: bottom !important;
    color: #75715e !important;
    cursor: default !important;
}

#notification_area,
div.notification_area {
    float: right !important;
    position: static;
    cursor: pointer;
    padding-top: 6px;
    padding-right: 4px;
}

div#notification_notebook.notification_widget.btn.btn-xs.navbar-btn {
    font-size: 9pt !important;
    z-index: 0;
    margin-top: -5px !important;
}

#modal_indicator {
    float: right !important;
    color: #4c8be2;
    background: #1e1e1e;
    background-color: #1e1e1e;
    margin-top: 8px !important;
    margin-left: 0px;
}

#kernel_indicator {
    float: right !important;
    color: #a6e22e;
    background: #1e1e1e;
    background-color: #1e1e1e;
    border-left: 2px solid #a6e22e;
    padding-top: 0px;
    padding-bottom: 4px;
    margin-top: 10px !important;
    margin-left: -2px;
    padding-left: 5px !important;
}

#kernel_indicator .kernel_indicator_name {
    font-size: 12px;
    color: #a6e22e;
    background: #1e1e1e;
    background-color: #1e1e1e;
    padding-left: 5px;
    padding-right: 5px;
    margin-top: 4px;
    vertical-align: text-top;
    padding-bottom: 0px;
}

.kernel_idle_icon:before {
    display: inline-block;
    font: normal normal normal 22px/1 FontAwesome;
    font-size: 22px;
    text-rendering: auto;
    -webkit-font-smoothing: antialiased;
    cursor: pointer;
    margin-left: 0px !important;
    opacity: 0.7;
    vertical-align: bottom;
    margin-top: 1px;
    content: "\f1db";
}

.kernel_busy_icon:before {
    display: inline-block;
    font: normal normal normal 22px/1 FontAwesome;
    font-size: 22px;
    -webkit-animation: pulsate 2s infinite ease-out;
    animation: pulsate 2s infinite ease-out;
    text-rendering: auto;
    -webkit-font-smoothing: antialiased;
    cursor: pointer;
    margin-left: 0px !important;
    vertical-align: bottom;
    margin-top: 1px;
    content: "\f111";
}

@-webkit-keyframes pulsate {
    0% {
        -webkit-transform: scale(1.0, 1.0);
        opacity: 0.8;
    }

    8% {
        -webkit-transform: scale(1.0, 1.0);
        opacity: 0.8;
    }

    50% {
        -webkit-transform: scale(0.75, 0.75);
        opacity: 0.3;
    }

    92% {
        -webkit-transform: scale(1.0, 1.0);
        opacity: 0.8;
    }

    100% {
        -webkit-transform: scale(1.0, 1.0);
        opacity: 0.8;
    }
}

div.notification_widget.info,
.notification_widget.info,
.notification_widget:active:hover,
.notification_widget.active:hover,
.open&gt;.dropdown-toggle.notification_widget:hover,
.notification_widget:active:focus,
.notification_widget.active:focus,
.open&gt;.dropdown-toggle.notification_widget:focus,
.notification_widget:active.focus,
.notification_widget.active.focus,
.open&gt;.dropdown-toggle.notification_widget.focus,
div#notification_notebook.notification_widget.btn.btn-xs.navbar-btn,
div#notification_notebook.notification_widget.btn.btn-xs.navbar-btn:hover,
div#notification_notebook.notification_widget.btn.btn-xs.navbar-btn:focus {
    color: #f8f8f0;
    background-color: #1e1e1e;
    border-color: #1e1e1e;
}

#notification_area,
div.notification_area {
    float: right !important;
    position: static;
}

.notification_widget,
div.notification_widget {
    margin-right: 0px;
    margin-left: 0px;
    padding-right: 0px;
    vertical-align: text-top !important;
    margin-top: 6px !important;
    z-index: 1000;
}

#kernel_logo_widget,
#kernel_logo_widget .current_kernel_logo {
    display: none;
}

div#ipython_notebook {
    display: none;
}

i.fa.fa-icon {
    -webkit-font-smoothing: antialiased;
    -moz-osx-font-smoothing: grayscale;
    text-rendering: auto;
}

.fa {
    display: inline-block;
    font: normal normal normal 10pt/1 "FontAwesome", sans-serif;
    text-rendering: auto;
    -webkit-font-smoothing: antialiased;
    -moz-osx-font-smoothing: grayscale;
}

.dropdown-menu {
    font-family: sans-serif;
    font-size: 9pt;
    box-shadow: none;
    padding: 0px;
    text-align: left;
    border: none;
    background-color: #383838;
    background: #383838;
    line-height: 1;
}

.dropdown-menu:hover {
    font-family: sans-serif;
    font-size: 9pt;
    box-shadow: none;
    padding: 0px;
    text-align: left;
    border: none;
    background-color: #383838;
    box-shadow: none;
    line-height: 1;
}

.dropdown-menu&gt;li&gt;a {
    font-family: sans-serif;
    font-size: 9.0pt;
    display: block;
    padding: 10px 20px 9px 10px;
    color: #f8f8f0;
    background-color: #383838;
    background: #383838;
}

.dropdown-menu&gt;li&gt;a:hover,
.dropdown-menu&gt;li&gt;a:focus {
    color: #f8f8f0;
    background-color: rgba(93, 92, 82, .25);
    background: rgba(93, 92, 82, .25);
    border-color: rgba(93, 92, 82, .25);
    transition: 200ms ease;
}

.dropdown-menu .divider {
    height: 1px;
    margin: 0px 0px;
    overflow: hidden;
    background-color: rgba(93, 92, 82, .5);
}

.dropdown-submenu&gt;.dropdown-menu {
    display: none;
    top: 2px !important;
    left: 100%;
    margin-top: -2px;
    margin-left: 0px;
    padding-top: 0px;
    transition: 200ms ease;
}

.dropdown-menu&gt;.disabled&gt;a,
.dropdown-menu&gt;.disabled&gt;a:hover,
.dropdown-menu&gt;.disabled&gt;a:focus {
    font-family: sans-serif;
    font-size: 12.0pt;
    font-weight: normal;
    color: #75715e;
    padding: none;
    display: block;
    clear: both;
    white-space: nowrap;
}

.dropdown-submenu&gt;a:after {
    color: #f8f8f0;
    margin-right: -16px;
    margin-top: 0px;
    display: inline-block;
}

.dropdown-submenu:hover&gt;a:after,
.dropdown-submenu:active&gt;a:after,
.dropdown-submenu:focus&gt;a:after,
.dropdown-submenu:visited&gt;a:after {
    color: #a6e22e;
    margin-right: -16px;
    display: inline-block !important;
}

div.kse-dropdown&gt;.dropdown-menu,
.kse-dropdown&gt;.dropdown-menu {
    min-width: 0;
    top: 94%;
}

.btn,
.btn-default {
    font-family: sans-serif;
    color: #f8f8f0;
    background: #2f2f2f;
    background-color: #2f2f2f;
    border: 2px solid #2f2f2f;
    font-weight: normal;
    box-shadow: none;
    text-shadow: none;
    border-radius: 3px;
    font-size: initial;
}

.btn:hover,
.btn:active:hover,
.btn.active:hover,
.btn-default:hover,
.open&gt;.dropdown-toggle.btn-default:hover,
.open&gt;.dropdown-toggle.btn:hover {
    color: #a6e22e;
    border: 2px solid #2a2a2a;
    background-color: #2a2a2a;
    background: #2a2a2a;
    background-image: none;
    box-shadow: none !important;
    border-radius: 3px;
}

.btn:active,
.btn.active,
.btn:active:focus,
.btn.active:focus,
.btn:active.focus,
.btn.active.focus,
.btn-default:focus,
.btn-default.focus,
.btn-default:active,
.btn-default.active,
.btn-default:active:hover,
.btn-default.active:hover,
.btn-default:active:focus,
.btn-default.active:focus,
.btn-default:active.focus,
.btn-default.active.focus,
.open&gt;.dropdown-toggle.btn:focus,
.open&gt;.dropdown-toggle.btn.focus,
.open&gt;.dropdown-toggle.btn-default:hover,
.open&gt;.dropdown-toggle.btn-default:focus,
.open&gt;.dropdown-toggle.btn-default.hover,
.open&gt;.dropdown-toggle.btn-default.focus {
    color: #a6e22e;
    border: 2px solid #2a2a2a;
    background-color: #2a2a2a !important;
    background: #2a2a2a !important;
    background-image: none;
    box-shadow: none !important;
    border-radius: 3px;
}

.btn-default:active:hover,
.btn-default.active:hover,
.btn-default:active:focus,
.btn-default.active:focus,
.btn-default:active.focus,
.btn-default.active.focus {
    color: #a6e22e !important;
    background-color: #2f2f2f;
    border-color: #546745 !important;
    transition: 2000ms ease;
}

.btn:focus,
.btn.focus,
.btn:active:focus,
.btn.active:focus,
.btn:active,
.btn.active,
.btn:active.focus,
.btn.active.focus {
    color: #a6e22e !important;
    outline: none !important;
    outline-width: 0px !important;
    background: #546745 !important;
    background-color: #546745 !important;
    border-color: #546745 !important;
    transition: 200ms ease !important;
}

.item_buttons&gt;.btn,
.item_buttons&gt;.btn-group,
.item_buttons&gt;.input-group {
    font-size: 9pt;
    background: transparent;
    background-color: transparent;
    border: 0px solid #2f2f2f;
    border-bottom: 2px solid transparent;
    margin-left: 5px;
    padding-top: 4px !important;
}

.item_buttons&gt;.btn:hover,
.item_buttons&gt;.btn-group:hover,
.item_buttons&gt;.input-group:hover,
.item_buttons&gt;.btn.active,
.item_buttons&gt;.btn-group.active,
.item_buttons&gt;.input-group.active,
.item_buttons&gt;.btn.focus {
    margin-left: 5px;
    background: #2a2a2a;
    padding-top: 4px !important;
    background-color: transparent;
    border: 0px solid transparent;
    border-bottom: 2px solid #a6e22e;
    border-radius: 0px;
    transition: none;
}

.item_buttons {
    line-height: 1.5em !important;
}

.item_buttons .btn {
    min-width: 11ex;
}

.btn-group&gt;.btn:first-child {
    margin-left: 3px;
}

.btn-group&gt;.btn-mini,
.btn-sm,
.btn-group-sm&gt;.btn,
.btn-xs,
.btn-group-xs&gt;.btn,
.alternate_upload .btn-upload,
.btn-group,
.btn-group-vertical {
    font-size: inherit;
    font-weight: normal;
    height: inherit;
    line-height: inherit;
}

.btn-xs,
.btn-group-xs&gt;.btn {
    font-size: initial !important;
    background-image: none;
    font-weight: normal;
    text-shadow: none;
    display: inline-table;
    padding: 2px 5px;
    line-height: 1.45;
}

.btn-group&gt;.btn:first-child {
    margin-left: 3px;
}

div#new-buttons&gt;button,
#new-buttons&gt;button,
div#refresh_notebook_list,
#refresh_notebook_list {
    background: transparent;
    background-color: transparent;
    border: none;
}

div#new-buttons&gt;button:hover,
#new-buttons&gt;button:hover,
div#refresh_notebook_list,
#refresh_notebook_list,
div.alternate_upload .btn-upload,
.alternate_upload .btn-upload,
div.dynamic-buttons&gt;button,
.dynamic-buttons&gt;button,
.dynamic-buttons&gt;button:focus,
.dynamic-buttons&gt;button:active:focus,
.dynamic-buttons&gt;button.active:focus,
.dynamic-buttons&gt;button.focus,
.dynamic-buttons&gt;button:active.focus,
.dynamic-buttons&gt;button.active.focus,
#new-buttons&gt;button:focus,
#new-buttons&gt;button:active:focus,
#new-buttons&gt;button.active:focus,
#new-buttons&gt;button.focus,
#new-buttons&gt;button:active.focus,
#new-buttons&gt;button.active.focus,
.alternate_upload .btn-upload:focus,
.alternate_upload .btn-upload:active:focus,
.alternate_upload .btn-upload.active:focus,
.alternate_upload .btn-upload.focus,
.alternate_upload .btn-upload:active.focus,
.alternate_upload .btn-upload.active.focus {
    background: transparent !important;
    background-color: transparent !important;
    border: none !important;
}

.alternate_upload input.fileinput {
    text-align: center;
    vertical-align: bottom;
    margin-left: -.5ex;
    display: inline-table;
    border: solid 0px #2f2f2f;
    margin-bottom: -1ex;
}

.alternate_upload .btn-upload {
    display: inline-table;
    background: transparent;
    border: none;
}

.btn-group .btn+.btn,
.btn-group .btn+.btn-group,
.btn-group .btn-group+.btn,
.btn-group .btn-group+.btn-group {
    margin-left: -2px;
}

.btn-group&gt;.btn:first-child:not(:last-child):not(.dropdown-toggle) {
    border-bottom-right-radius: 0;
    border-top-right-radius: 0;
    z-index: 2;
}

.dropdown-header {
    font-family: sans-serif !important;
    font-size: 9pt !important;
    color: #a6e22e !important;
    border-bottom: none !important;
    padding: 0px !important;
    margin: 6px 6px 0px !important;
}

span#last-modified.btn.btn-xs.btn-default.sort-action,
span#sort-name.btn.btn-xs.btn-default.sort-action,
span#file-size.btn.btn-xs.btn-default.sort-action {
    font-family: sans-serif;
    font-size: 16px;
    background-color: transparent;
    background: transparent;
    border: none;
    color: #f8f8f0;
    padding-bottom: 0px;
    margin-bottom: 0px;
    vertical-align: sub;
}

span#last-modified.btn.btn-xs.btn-default.sort-action {
    margin-left: 19px;
}

button.close {
    border: 0px none;
    font-family: sans-serif;
    font-size: 20pt;
    font-weight: normal;
}

.dynamic-buttons {
    padding-top: 0px;
    display: inline-block;
}

.close {
    color: #f92672;
    opacity: .5;
    text-shadow: none;
    font-weight: normal;
}

.close:hover {
    color: #f92672;
    opacity: 1;
    font-weight: normal;
}

div.nbext-enable-btns .btn[disabled],
div.nbext-enable-btns .btn[disabled]:hover,
.btn-default.disabled,
.btn-default[disabled],
.btn-default.disabled:hover,
.btn-default[disabled]:hover,
fieldset[disabled] .btn-default:hover,
.btn-default.disabled:focus,
.btn-default[disabled]:focus,
fieldset[disabled] .btn-default:focus,
.btn-default.disabled.focus,
.btn-default[disabled].focus,
fieldset[disabled] .btn-default.focus {
    color: #888888;
    background: #2c2c2c;
    background-color: #2c2c2c;
    border-color: #2c2c2c;
    transition: 200ms ease;
}

.input-group-addon {
    padding: 2px 5px;
    font-size: 9pt;
    font-weight: normal;
    height: auto;
    color: #f8f8f0;
    text-align: center;
    background-color: transparent;
    border: 2px solid transparent !important;
    text-transform: capitalize;
}

a.btn.btn-default.input-group-addon:hover {
    background: transparent !important;
    background-color: transparent !important;
}

.btn-group&gt;.btn+.dropdown-toggle {
    padding-left: 8px;
    padding-right: 8px;
    height: 100%;
}

.btn-group&gt;.btn+.dropdown-toggle:hover {
    background: #2a2a2a !important;
}

.input-group-btn {
    position: relative;
    font-size: inherit;
    white-space: nowrap;
    background: #2f2f2f;
    background-color: #2f2f2f;
    border: none;
}

.input-group-btn:hover {
    background: #2a2a2a;
    background-color: #2a2a2a;
    border: none;
}

.input-group-btn:first-child&gt;.btn,
.input-group-btn:first-child&gt;.btn-group {
    background: #2f2f2f;
    background-color: #2f2f2f;
    border: none;
    margin-left: 2px;
    margin-right: -1px;
    font-size: inherit;
}

.input-group-btn:first-child&gt;.btn:hover,
.input-group-btn:first-child&gt;.btn-group:hover {
    background: #2a2a2a;
    background-color: #2a2a2a;
    border: none;
    font-size: inherit;
    transition: 200ms ease;
}

div.modal .btn-group&gt;.btn:first-child {
    background: #2f2f2f;
    background-color: #2f2f2f;
    border: 1px solid #2c2c2c;
    margin-top: 0px !important;
    margin-left: 0px;
    margin-bottom: 2px;
}

div.modal .btn-group&gt;.btn:first-child:hover {
    background: #2a2a2a;
    background-color: #2a2a2a;
    border: 1px solid #2a2a2a;
    transition: 200ms ease;
}

div.modal&gt;button,
div.modal-footer&gt;button {
    background: #2f2f2f;
    background-color: #2f2f2f;
    border-color: #2f2f2f;
}

div.modal&gt;button:hover,
div.modal-footer&gt;button:hover {
    background: #2a2a2a;
    background-color: #2a2a2a;
    border-color: #2a2a2a;
    transition: 200ms ease;
}

.modal-content {
    font-family: sans-serif;
    font-size: 12.0pt;
    position: relative;
    background: #2f2f2f;
    background-color: #2f2f2f;
    border: none;
    border-radius: 1px;
    background-clip: padding-box;
    outline: none;
}

.modal-header {
    font-family: sans-serif;
    font-size: 9pt;
    color: #f8f8f0;
    background: #2f2f2f;
    background-color: #2f2f2f;
    border-color: rgba(93, 92, 82, .25);
    padding: 12px;
    min-height: 16.4286px;
}

.modal-content h4 {
    font-family: sans-serif;
    font-size: 16pt;
    color: #f8f8f0;
    padding: 5px;
}

.modal-body {
    background-color: #232323;
    position: relative;
    padding: 15px;
}

.modal-footer {
    padding: 8px;
    text-align: right;
    background-color: #232323;
    border-top: none;
}

.alert-info {
    background-color: #2f2f2f;
    border-color: rgba(93, 92, 82, .25);
    color: #f8f8f0;
}

.modal-header .close {
    margin-top: -5px;
    font-size: 25pt;
}

.modal-backdrop,
.modal-backdrop.in {
    opacity: 0.85;
    background-color: notebook-bg;
}

div.panel,
div.panel-default,
.panel,
.panel-default {
    font-family: sans-serif;
    font-size: 9pt;
    background-color: #232323;
    color: #f8f8f0;
    margin-bottom: 14px;
    border: 0;
    box-shadow: none;
}

div.panel&gt;.panel-heading,
div.panel-default&gt;.panel-heading {
    font-size: 14pt;
    color: #f8f8f0;
    background: #2f2f2f;
    background-color: #2f2f2f;
    border: 0;
}

.modal .modal-dialog {
    min-width: 950px;
    margin: 50px auto;
}

div.container-fluid {
    margin-right: auto;
    margin-left: auto;
    padding-left: 0px;
    padding-right: 5px;
}

div.form-control,
.form-control {
    font-family: sans-serif;
    font-size: initial;
    color: #f8f8f0;
    background-color: #282828;
    border: 1px solid #282828 !important;
    margin-left: 2px;
    box-shadow: none;
    transition: border-color 0.15s ease-in-out 0s, box-shadow 0.15s ease-in-out 0s;
}

.form-control-static {
    min-height: inherit;
    height: inherit;
}

.form-group.list-group-item {
    color: #f8f8f0;
    background-color: #232323;
    border-color: rgba(93, 92, 82, .25);
    margin-bottom: 0px;
}

.form-group .input-group {
    float: left;
}

input,
button,
select,
textarea {
    background-color: #282828;
    font-weight: normal;
    border: 1px solid rgba(93, 92, 82, .25);
}

select.form-control.select-xs {
    height: 33px;
    font-size: 9pt;
}

.toolbar select,
.toolbar label {
    width: auto;
    vertical-align: middle;
    margin-right: 0px;
    margin-bottom: 0px;
    display: inline;
    font-size: 92%;
    margin-left: 10px;
    padding: 0px;
    background: #2f2f2f !important;
    background-color: #2f2f2f !important;
    border: 2px solid #2f2f2f !important;
}

.form-control:focus {
    border-color: #a6e22e;
    outline: 2px solid #49483e;
    -webkit-box-shadow: none;
}

::-webkit-input-placeholder {
    color: #75715e;
}

::-moz-placeholder {
    color: #75715e;
}

:-ms-input-placeholder {
    color: #75715e;
}

:-moz-placeholder {
    color: #75715e;
}

[dir="ltr"] #find-and-replace .input-group-btn+.form-control {
    border: 2px solid rgba(93, 92, 82, .25) !important;
}

[dir="ltr"] #find-and-replace .input-group-btn+.form-control:focus {
    border-color: #a6e22e;
    outline: 2px solid #49483e;
    -webkit-box-shadow: none;
    box-shadow: none;
}

div.output.output_scroll {
    box-shadow: none;
}

::-webkit-scrollbar {
    width: 11px;
    max-height: 9px;
    background-color: #2d2d2d;
    border-radius: 3px;
    border: none;
}

::-webkit-scrollbar-track {
    background: #2d2d2d;
    border: none;
    width: 11px;
    max-height: 9px;
}

::-webkit-scrollbar-thumb {
    border-radius: 2px;
    border: none;
    background: #49483e;
    background-clip: content-box;
    width: 11px;
}

HTML,
body,
div,
dl,
dt,
dd,
ul,
ol,
li,
h1,
h2,
h3,
h4,
h5,
h6,
pre,
code,
form,
fieldset,
legend,
input,
button,
textarea,
p,
blockquote,
th,
td,
span,
a {
    text-rendering: geometricPrecision;
    -webkit-font-smoothing: subpixel-antialiased;
    font-weight: 400;
}

div.input_area {
    background-color: #282828;
    background: #282828;
    padding-right: 1.2em;
    border: 0px;
    border-radius: 0px;
    border-top-right-radius: 4px;
    border-bottom-right-radius: 4px;
}

div.cell {
    padding: 0px;
    background: #282828;
    background-color: #282828;
    border: medium solid #1e1e1e;
    border-radius: 4px;
    top: 0;
}

div.cell.selected {
    background: #282828;
    background-color: #282828;
    border: medium solid #1e1e1e;
    padding: 0px;
    border-radius: 5px;
}

.edit_mode div.cell.selected {
    padding: 0px;
    background: #282828;
    background-color: #282828;
    border: medium solid #1e1e1e;
    border-radius: 5px;
}

div.cell.edit_mode {
    padding: 0px;
    background: #282828;
    background-color: #282828;
}

div.CodeMirror-sizer {
    margin-left: 0px;
    margin-bottom: -21px;
    border-right-width: 16px;
    min-height: 37px;
    padding-right: 0px;
    padding-bottom: 0px;
    margin-top: 0px;
}

div.cell.selected:before,
.edit_mode div.cell.selected:before,
div.cell.selected:before,
div.cell.selected.jupyter-soft-selected:before {
    background: #282828 !important;
    border: none;
    border-radius: 3px;
    position: absolute;
    display: block;
    top: 0px;
    left: 0px;
    width: 0px;
    height: 100%;
}

div.cell.text_cell.selected::before,
.edit_mode div.cell.text_cell.selected:before,
div.cell.text_cell.selected:before,
div.cell.text_cell.selected.jupyter-soft-selected:before {
    background: #282828 !important;
    background-color: #282828 !important;
    border-color: #57564b !important;
}

div.cell.code_cell .input {
    border-left: 5px solid #282828 !important;
    border-radius: 3px;
    border-bottom-left-radius: 3px;
    border-top-left-radius: 3px;
}

div.cell.code_cell.selected .input {
    border-left: 5px solid #57564b !important;
    border-radius: 3px;
}

.edit_mode div.cell.code_cell.selected .input {
    border-left: 5px solid #33322b !important;
    border-radius: 3px;
}

.edit_mode div.cell.selected:before {
    height: 100%;
    border-left: 5px solid #33322b !important;
    border-radius: 3px;
}

div.cell.jupyter-soft-selected,
div.cell.selected.jupyter-soft-selected {
    border-left-color: #33322b !important;
    border-left-width: 0px !important;
    padding-left: 7px !important;
    border-right-color: #33322b !important;
    border-right-width: 0px !important;
    background: #33322b !important;
    border-radius: 6px !important;
}

div.cell.selected.jupyter-soft-selected .input {
    border-left: 5px solid #282828 !important;
}

div.cell.selected.jupyter-soft-selected {
    border-left-color: #57564b;
    border-color: #1e1e1e;
    padding-left: 7px;
    border-radius: 6px;
}

div.cell.code_cell.selected .input {
    border-left: none;
    border-radius: 3px;
}

div.cell.selected.jupyter-soft-selected .prompt,
div.cell.text_cell.selected.jupyter-soft-selected .prompt {
    top: 0;
    border-left: #282828 !important;
    border-radius: 2px;
}

div.cell.text_cell.selected.jupyter-soft-selected .input_prompt {
    border-left: none !important;
}

div.cell.text_cell.jupyter-soft-selected,
div.cell.text_cell.selected.jupyter-soft-selected {
    border-left-color: #33322b !important;
    border-left-width: 0px !important;
    padding-left: 26px !important;
    border-right-color: #33322b !important;
    border-right-width: 0px !important;
    background: #33322b !important;
    border-radius: 5px !important;
}

div.cell.jupyter-soft-selected .input,
div.cell.selected.jupyter-soft-selected .input {
    border-left-color: #33322b !important;
}

div.prompt,
.prompt {
    font-family: monospace, monospace;
    font-size: 9pt !important;
    font-weight: normal;
    color: #75715e;
    line-height: 170%;
    padding: 0px;
    padding-top: 4px;
    padding-left: 0px;
    padding-right: 1px;
    text-align: right !important;
    min-width: 11.5ex !important;
    width: 11.5ex !important;
}

div.prompt.input_prompt {
    font-size: 9pt !important;
    background-color: #282828;
    border-top: 0px;
    border-top-right-radius: 0px;
    border-bottom-left-radius: 0px;
    border-bottom-right-radius: 0px;
    padding-right: 3px;
    min-width: 11.5ex;
    width: 11.5ex !important;
}

div.cell.code_cell .input_prompt {
    border-right: 2px solid #49483e;
}

div.cell.selected .prompt {
    top: 0;
}

.edit_mode div.cell.selected .prompt {
    top: 0;
}

.edit_mode div.cell.selected .prompt {
    top: 0;
}

.run_this_cell {
    visibility: hidden;
    color: transparent;
    padding-top: 0px;
    padding-bottom: 0px;
    padding-left: 3px;
    padding-right: 12px;
    width: 1.5ex;
    width: 0ex;
    background: transparent;
    background-color: transparent;
}

div.code_cell:hover div.input .run_this_cell {
    visibility: visible;
}

div.cell.code_cell.rendered.selected .run_this_cell:hover {
    background-color: #1e1e1e;
    background: #1e1e1e;
    color: #57564b !important;
}

div.cell.code_cell.rendered.unselected .run_this_cell:hover {
    background-color: #1e1e1e;
    background: #1e1e1e;
    color: #57564b !important;
}

i.fa-step-forward.fa {
    display: inline-block;
    font: normal normal normal 9px "FontAwesome";
}

.fa-step-forward:before {
    content: "\f04b";
}

div.cell.selected.jupyter-soft-selected .run_this_cell,
div.cell.selected.jupyter-soft-selected .run_this_cell:hover,
div.cell.unselected.jupyter-soft-selected .run_this_cell:hover,
div.cell.code_cell.rendered.selected.jupyter-soft-selected .run_this_cell:hover,
div.cell.code_cell.rendered.unselected.jupyter-soft-selected .run_this_cell:hover {
    background-color: #33322b !important;
    background: #33322b !important;
    color: #33322b !important;
}

div.output_wrapper {
    background-color: #232323;
    border: 0px;
    left: 0px;
    margin-bottom: 0em;
    margin-top: 0em;
    border-top-right-radius: 0px;
    border-top-left-radius: 0px;
}

div.output_subarea.output_text.output_stream.output_stdout,
div.output_subarea.output_text {
    font-family: monospace, monospace;
    font-size: 8.5pt !important;
    line-height: 150% !important;
    background-color: #232323;
    color: #cccccc;
    border-top-right-radius: 0px;
    border-top-left-radius: 0px;
    margin-left: 11.5px;
}

div.output_area pre {
    font-family: monospace, monospace;
    font-size: 8.5pt !important;
    line-height: 151% !important;
    color: #cccccc;
    border-top-right-radius: 0px;
    border-top-left-radius: 0px;
}

div.output_area {
    display: -webkit-box;
}

div.output_html {
    font-family: monospace, monospace;
    font-size: 8.5pt;
    color: #cccccc;
    background-color: #232323;
    background: #232323;
}

div.output_subarea {
    overflow-x: auto;
    padding: 1.2em !important;
    -webkit-box-flex: 1;
    -moz-box-flex: 1;
    box-flex: 1;
    flex: 1;
}

div.btn.btn-default.output_collapsed {
    background: #222222;
    background-color: #222222;
    border-color: #222222;
}

div.btn.btn-default.output_collapsed:hover {
    background: #1d1d1d;
    background-color: #1d1d1d;
    border-color: #1d1d1d;
}

div.prompt.output_prompt {
    font-family: monospace, monospace;
    font-weight: bold !important;
    background-color: #232323;
    color: transparent;
    border-bottom-left-radius: 4px;
    border-top-right-radius: 0px;
    border-top-left-radius: 0px;
    border-bottom-right-radius: 0px;
    min-width: 11.5ex !important;
    width: 11.5ex !important;
    border-right: 2px solid transparent;
}

div.out_prompt_overlay.prompt {
    font-family: monospace, monospace;
    font-weight: bold !important;
    background-color: #232323;
    border-bottom-left-radius: 2px;
    border-top-right-radius: 0px;
    border-top-left-radius: 0px;
    border-bottom-right-radius: 0px;
    min-width: 11.5ex !important;
    width: 11.5ex !important;
    border-right: 2px solid transparent;
    color: transparent;
}

div.out_prompt_overlay.prompt:hover {
    background-color: #49483e;
    box-shadow: none !important;
    border: none;
    border-bottom-left-radius: 2px;
    -webkit-border-: 2px;
    -moz-border-radius: 2px;
    border-top-right-radius: 0px;
    border-top-left-radius: 0px;
    min-width: 11.5ex !important;
    width: 11.5ex !important;
    border-right: 2px solid #49483e !important;
}

div.cell.code_cell .output_prompt {
    border-right: 2px solid transparent;
    color: transparent;
}

div.cell.selected .output_prompt,
div.cell.selected .out_prompt_overlay.prompt {
    border-left: 5px solid #33322b;
    border-right: 2px solid #232323;
    border-radius: 0px !important;
}

.edit_mode div.cell.selected .output_prompt,
.edit_mode div.cell.selected .out_prompt_overlay.prompt {
    border-left: 5px solid #33322b;
    border-right: 2px solid #232323;
    border-radius: 0px !important;
}

div.text_cell,
div.text_cell_render pre,
div.text_cell_render {
    font-family: sans-serif;
    font-size: 9pt;
    line-height: 130% !important;
    color: #f8f8f0;
    background: #282828;
    background-color: #282828;
    border-radius: 0px;
}

div .text_cell_render {
    padding: 0.4em 0.4em 0.4em 0.4em;
}

div.cell.text_cell .CodeMirror-lines {
    padding-top: .7em !important;
    padding-bottom: .4em !important;
    padding-left: .5em !important;
    padding-right: .5em !important;
    margin-top: .4em;
    margin-bottom: .3em;
}

div.cell.text_cell.unrendered div.input_area,
div.cell.text_cell.rendered div.input_area {
    background-color: #282828;
    background: #282828;
    border: 0px;
    border-radius: 2px;
}

div.cell.text_cell .CodeMirror,
div.cell.text_cell .CodeMirror pre {
    line-height: 170% !important;
}

div.cell.text_cell.rendered.selected {
    font-family: sans-serif;
    line-height: 170% !important;
    background: #282828;
    background-color: #282828;
    border-radius: 0px;
}

div.cell.text_cell.unrendered.selected {
    font-family: sans-serif;
    line-height: 170% !important;
    background: #282828;
    background-color: #282828;
    border-radius: 0px;
}

div.cell.text_cell.selected {
    font-family: sans-serif;
    line-height: 170% !important;
    background: #282828;
    background-color: #282828;
    border-radius: 0px;
}

.edit_mode div.cell.text_cell.selected {
    font-family: sans-serif;
    line-height: 170% !important;
    background: #282828;
    background-color: #282828;
    border-radius: 0px;
}

div.text_cell.unrendered,
div.text_cell.unrendered.selected,
div.edit_mode div.text_cell.unrendered {
    font-family: sans-serif;
    line-height: 170% !important;
    background: #282828;
    background-color: #282828;
    border-radius: 0px;
}

div.cell.text_cell .prompt {
    border-right: 0;
    min-width: 11.5ex !important;
    width: 11.5ex !important;
}

div.cell.text_cell.rendered .prompt {
    font-family: monospace, monospace;
    font-size: 9.5pt !important;
    font-weight: normal;
    color: #75715e !important;
    text-align: right !important;
    min-width: 14.5ex !important;
    width: 14.5ex !important;
    background-color: #282828;
    border-right: 2px solid #49483e;
    border-left: 4px solid #282828;
}

div.cell.text_cell.unrendered .prompt {
    font-family: monospace, monospace;
    font-size: 9.5pt !important;
    font-weight: normal;
    color: #75715e !important;
    text-align: right !important;
    min-width: 14.5ex !important;
    width: 14.5ex !important;
    border-right: 2px solid #49483e;
    border-left: 4px solid #282828;
    background-color: #282828;
}

div.cell.text_cell.rendered .prompt {
    border-right: 2px solid #49483e;
}

div.cell.text_cell.rendered.selected .prompt {
    top: 0;
    border-left: 4px solid #57564b;
    border-right: 2px solid #49483e;
}

div.text_cell.unrendered.selected .prompt,
div.text_cell.rendered.selected .prompt {
    top: 0;
    background: #282828;
    border-left: 4px solid #33322b;
    border-right: 2px solid #49483e;
}

div.rendered_html code {
    font-family: monospace, monospace;
    font-size: 11pt;
    padding-top: 3px;
    padding-left: 2px;
    color: #f8f8f0;
    background: #282828;
    background-color: #282828;
}

pre,
code,
kbd,
samp {
    white-space: pre-wrap;
}

.well code,
code {
    font-family: monospace, monospace;
    font-size: 11pt !important;
    line-height: 170% !important;
    color: #f8f8f0;
    background: #282828;
    background-color: #282828;
    border-color: #282828;
}

kbd {
    padding: 1px;
    font-size: 11pt;
    font-weight: 800;
    color: #f8f8f0;
    background-color: transparent !important;
    border: 0;
    box-shadow: none;
}

pre {
    display: block;
    padding: 8.5px;
    margin: 0 0 9px;
    font-size: 12.0pt;
    line-height: 1.42857143;
    color: #f8f8f0;
    background-color: #282828;
    border: 1px solid #282828;
    border-radius: 2px;
}

div.rendered_html {
    color: #f8f8f0;
}

.rendered_html *+ul {
    margin-top: .4em;
    margin-bottom: .3em;
}

.rendered_html *+p {
    margin-top: .5em;
    margin-bottom: .5em;
}

div.rendered_html pre {
    font-family: monospace, monospace;
    font-size: 11pt !important;
    line-height: 170% !important;
    color: #f8f8f0 !important;
    background: #282828;
    background-color: #282828;
    max-width: 80%;
    border-radius: 0px;
    border-left: 3px solid #282828;
    max-width: 80%;
    border-radius: 0px;
    padding-left: 5px;
    margin-left: 6px;
}

div.text_cell_render pre,
div.text_cell_render code {
    font-family: monospace, monospace;
    font-size: 11pt !important;
    line-height: 170% !important;
    color: #f8f8f0;
    background: #1e1e1e;
    background-color: #1e1e1e;
    max-width: 80%;
    border-radius: 0px;
    border-left: none;
}

div.text_cell_render pre {
    border-left: 3px solid #49483e !important;
    max-width: 80%;
    border-radius: 0px;
    padding-left: 5px;
    margin-left: 6px;
}

div.text_cell_render h1,
div.rendered_html h1,
div.text_cell_render h2,
div.rendered_html h2,
div.text_cell_render h3,
div.rendered_html h3,
div.text_cell_render h4,
div.rendered_html h4,
div.text_cell_render h5,
div.rendered_html h5 {
    font-family: sans-serif;
    margin: 0.4em .2em .3em .2em !important;
}

.rendered_html h1:first-child,
.rendered_html h2:first-child,
.rendered_html h3:first-child,
.rendered_html h4:first-child,
.rendered_html h5:first-child,
.rendered_html h6:first-child {
    margin-top: 0.2em !important;
    margin-bottom: 0.2em !important;
}

.rendered_html h1,
.text_cell_render h1 {
    color: #a6e22e !important;
    font-size: 200%;
    text-align: left;
    font-style: normal;
    font-weight: normal;
}

.rendered_html h2,
.text_cell_render h2 {
    color: #a6e22e !important;
    font-size: 170%;
    font-style: normal;
    font-weight: normal;
}

.rendered_html h3,
.text_cell_render h3 {
    color: #a6e22e !important;
    font-size: 140%;
    font-style: normal;
    font-weight: normal;
}

.rendered_html h4,
.text_cell_render h4 {
    color: #a6e22e !important;
    font-size: 110%;
    font-style: normal;
    font-weight: normal;
}

.rendered_html h5,
.text_cell_render h5 {
    color: #a6e22e !important;
    font-size: 100%;
    font-style: normal;
    font-weight: normal;
}

hr {
    margin-top: 8px;
    margin-bottom: 10px;
    border: 0;
    border-top: 1px solid #a6e22e;
}

.rendered_html hr {
    color: #a6e22e;
    background-color: #a6e22e;
    margin-right: 2em;
}

#complete&gt;select&gt;option:hover {
    background: rgba(93, 92, 82, .25);
    background-color: rgba(93, 92, 82, .25);
}

div#_vivaldi-spatnav-focus-indicator._vivaldi-spatnav-focus-indicator {
    position: absolute;
    z-index: 9999999999;
    top: 0px;
    left: 0px;
    box-shadow: none;
    pointer-events: none;
    border-radius: 2px;
}

.rendered_html tr,
.rendered_html th,
.rendered_html td {
    text-align: left;
    vertical-align: middle;
    padding: 0.42em 0.47em;
    line-height: normal;
    white-space: normal;
    max-width: none;
    border: none;
}

.rendered_html td {
    font-family: sans-serif !important;
    font-size: 9.3pt;
}

.rendered_html table {
    font-family: sans-serif !important;
    margin-left: 8px;
    margin-right: auto;
    border: none;
    border-collapse: collapse;
    border-spacing: 0;
    color: #cccccc;
    table-layout: fixed;
}

.rendered_html thead {
    font-family: sans-serif !important;
    font-size: 10.3pt !important;
    background: #1e1e1e;
    color: #cccccc;
    border-bottom: 1px solid #1e1e1e;
    vertical-align: bottom;
}

.rendered_html tbody tr:nth-child(odd) {
    background: #282828;
}

.rendered_html tbody tr {
    background: #202020;
}

.rendered_html tbody tr:hover:nth-child(odd) {
    background: #252525;
}

.rendered_html tbody tr:hover {
    background: #1e1e1e;
}

.rendered_html *+table {
    margin-top: .05em;
}

div.widget-area {
    background-color: #232323;
    background: #232323;
    color: #cccccc;
}

div.widget-area a {
    font-family: sans-serif;
    font-size: 12.0pt;
    font-weight: normal;
    font-style: normal;
    color: #f8f8f0;
    text-shadow: none !important;
}

div.widget-area a:hover,
div.widget-area a:focus {
    font-family: sans-serif;
    font-size: 12.0pt;
    font-weight: normal;
    font-style: normal;
    color: #f8f8f0;
    background: rgba(93, 92, 82, .25);
    background-color: rgba(93, 92, 82, .25);
    border-color: transparent;
    background-image: none;
    text-shadow: none !important;
}

div.widget_item.btn-group&gt;button.btn.btn-default.widget-combo-btn,
div.widget_item.btn-group&gt;button.btn.btn-default.widget-combo-btn:hover {
    background: #2c2c2c;
    background-color: #2c2c2c;
    border: 2px solid #2c2c2c !important;
    font-size: inherit;
    z-index: 0;
}

div.jupyter-widgets.widget-hprogress.widget-hbox {
    display: inline-table !important;
    width: 38% !important;
    margin-left: 10px;
}

div.jupyter-widgets.widget-hprogress.widget-hbox .widget-label,
div.widget-hbox .widget-label,
.widget-hbox .widget-label,
.widget-inline-hbox .widget-label,
div.widget-label {
    text-align: -webkit-auto !important;
    margin-left: 15px !important;
    max-width: 240px !important;
    min-width: 100px !important;
    vertical-align: text-top !important;
    color: #cccccc !important;
    font-size: 14px !important;
}

.widget-hprogress .progress {
    flex-grow: 1;
    height: 20px;
    margin-top: auto;
    margin-left: 12px;
    margin-bottom: auto;
    width: 300px;
}

.progress {
    overflow: hidden;
    height: 22px;
    margin-bottom: 10px;
    padding-left: 10px;
    background-color: #49483e !important;
    border-radius: 2px;
    -webkit-box-shadow: none;
    box-shadow: none;
    z-index: 10;
}

.progress-bar-danger {
    background-color: #e74c3c !important;
}

.progress-bar-info {
    background-color: #3498db !important;
}

.progress-bar-warning {
    background-color: #ff914d !important;
}

.progress-bar-success {
    background-color: #83a83b !important;
}

.widget-select select {
    margin-left: 12px;
}

.rendered_html :link {
    font-family: sans-serif;
    font-size: 100%;
    color: #a6e22e;
    text-decoration: underline;
}

.rendered_html :visited,
.rendered_html :visited:active,
.rendered_html :visited:focus {
    color: #acdf45;
}

.rendered_html :visited:hover,
.rendered_html :link:hover {
    font-family: sans-serif;
    font-size: 100%;
    color: #97dc0b;
}

div.cell.text_cell a.anchor-link:link {
    font-size: inherit;
    text-decoration: none;
    padding: 0px 20px;
    visibility: none;
    color: rgba(0, 0, 0, .32);
}

div.cell.text_cell a.anchor-link:link:hover {
    font-size: inherit;
    color: #a6e22e;
}

.navbar-text {
    margin-top: 4px;
    margin-bottom: 0px;
}

#clusters&gt;a {
    color: #a6e22e;
    text-decoration: underline;
    cursor: auto;
}

#clusters&gt;a:hover {
    color: #ae81ff;
    text-decoration: underline;
    cursor: auto;
}

#nbextensions-configurator-container&gt;div.row.container-fluid.nbext-selector&gt;h3 {
    font-size: 17px;
    margin-top: 5px;
    margin-bottom: 8px;
    height: 24px;
    padding: 4px 0 4px 0;
}

div#nbextensions-configurator-container.container,
#nbextensions-configurator-container.container {
    width: 100%;
    margin-right: auto;
    margin-left: auto;
}

div.nbext-selector&gt;nav&gt;.nav&gt;li&gt;a {
    font-family: sans-serif;
    font-size: 10.5pt;
    padding: 2px 5px;
}

div.nbext-selector&gt;nav&gt;.nav&gt;li&gt;a:hover {
    background: transparent;
}

div.nbext-selector&gt;nav&gt;.nav&gt;li:hover {
    background-color: rgba(93, 92, 82, .25) !important;
    background: rgba(93, 92, 82, .25) !important;
}

div.nbext-selector&gt;nav&gt;.nav&gt;li.active:hover {
    background: transparent !important;
    background-color: transparent !important;
}

.nav-pills&gt;li.active&gt;a,
.nav-pills&gt;li.active&gt;a:active,
.nav-pills&gt;li.active&gt;a:hover,
.nav-pills&gt;li.active&gt;a:focus {
    color: #f8f8f2;
    background-color: rgba(93, 92, 82, .25) !important;
    background: rgba(93, 92, 82, .25) !important;
    -webkit-backface-visibility: hidden;
    -webkit-font-smoothing: subpixel-antialiased !important;
}

div.nbext-readme&gt;.nbext-readme-contents&gt;.rendered_html {
    font-family: sans-serif;
    font-size: 11.5pt;
    line-height: 145%;
    padding: 1em 1em;
    color: #f8f8f0;
    background-color: #282828;
    -webkit-box-shadow: none;
    -moz-box-shadow: none;
    box-shadow: none;
}

.nbext-icon,
.nbext-desc,
.nbext-compat-div,
.nbext-enable-btns,
.nbext-params {
    margin-bottom: 8px;
    font-size: 11.5pt;
}

div.nbext-readme&gt;.nbext-readme-contents {
    padding: 0;
    overflow-y: hidden;
}

div.nbext-readme&gt;.nbext-readme-contents:not(:empty) {
    margin-top: 0.5em;
    margin-bottom: 2em;
    border: none;
    border-top-color: rgba(148, 204, 114, .2);
}

.nbext-showhide-incompat {
    padding-bottom: 0.5em;
    color: #888888;
    font-size: 10.5pt;
}

.nbext-filter-menu.dropdown-menu&gt;li&gt;a:hover,
.nbext-filter-menu.dropdown-menu&gt;li&gt;a:focus,
.nbext-filter-menu.dropdown-menu&gt;li&gt;a.ui-state-focus {
    color: #f8f8f0 !important;
    background-color: rgba(93, 92, 82, .25) !important;
    background: rgba(93, 92, 82, .25) !important;
    border-color: rgba(93, 92, 82, .25) !important;
}

.nbext-filter-input-wrap&gt;.nbext-filter-input-subwrap,
.nbext-filter-input-wrap&gt;.nbext-filter-input-subwrap&gt;input {
    border: none;
    outline: none;
    background-color: transparent;
    padding: 0;
    vertical-align: middle;
    margin-top: -2px;
}

span.rendered_html code {
    background-color: transparent;
    color: #f8f8f0;
}

#nbextensions-configurator-container&gt;div.row.container-fluid.nbext-selector {
    padding-left: 0px;
    padding-right: 0px;
}

.nbext-filter-menu {
    max-height: 55vh !important;
    overflow-y: auto;
    outline: none;
    border: none;
}

.nbext-filter-menu:hover {
    border: none;
}

.alert-warning {
    background-color: #232323;
    border-color: #232323;
    color: #f8f8f0;
}

.notification_widget.danger {
    color: #ffffff;
    background-color: #e74c3c;
    border-color: #e74c3c;
    padding-right: 5px;
}

#nbextensions-configurator-container&gt;div.nbext-buttons.tree-buttons.no-padding.pull-right&gt;span&gt;button {
    border: none !important;
}

button#refresh_running_list {
    border: none !important;
}

mark,
.mark {
    background-color: #282828;
    color: #f8f8f0;
    padding: .15em;
}

a.text-warning,
a.text-warning:hover {
    color: #75715e;
}

a.text-warning.bg-warning {
    background-color: #1e1e1e;
}

span.bg-success.text-success {
    background-color: transparent;
    color: #a6e22e;
}

span.bg-danger.text-danger {
    background-color: #1e1e1e;
    color: #f92672;
}

.has-success .input-group-addon {
    color: #a6e22e;
    border-color: transparent;
    background: inherit;
    background-color: rgba(83, 180, 115, .10);
}

.has-success .form-control {
    border-color: #a6e22e;
    -webkit-box-shadow: inset 0 1px 1px rgba(0, 0, 0, 0.025);
    box-shadow: inset 0 1px 1px rgba(0, 0, 0, 0.025);
}

.has-error .input-group-addon {
    color: #f92672;
    border-color: transparent;
    background: inherit;
    background-color: rgba(192, 57, 67, .10);
}

.has-error .form-control {
    border-color: #f92672;
    -webkit-box-shadow: inset 0 1px 1px rgba(0, 0, 0, 0.025);
    box-shadow: inset 0 1px 1px rgba(0, 0, 0, 0.025);
}

.kse-input-group-pretty&gt;kbd {
    font-family: monospace, monospace;
    color: #f8f8f0;
    font-weight: normal;
    background: transparent;
}

.kse-input-group-pretty&gt;kbd {
    font-family: monospace, monospace;
    color: #f8f8f0;
    font-weight: normal;
    background: transparent;
}

div.nbext-enable-btns .btn[disabled],
div.nbext-enable-btns .btn[disabled]:hover,
.btn-default.disabled,
.btn-default[disabled] {
    background: #2c2c2c;
    background-color: #2c2c2c;
    color: #f3f3e6;
}

label#Keyword-Filter {
    display: none;
}

.input-group .nbext-list-btn-add,
.input-group-btn:last-child&gt;.btn-group&gt;.btn {
    background: #2f2f2f;
    background-color: #2f2f2f;
    border-color: #2f2f2f;
    border: 2px solid #2f2f2f;
}

.input-group .nbext-list-btn-add:hover,
.input-group-btn:last-child&gt;.btn-group&gt;.btn:hover {
    background: #2a2a2a;
    background-color: #2a2a2a;
    border-color: #2a2a2a;
    border: 2px solid #2a2a2a;
}

#notebook-container&gt;div.cell.code_cell.rendered.selected&gt;div.widget-area&gt;div.widget-subarea&gt;div&gt;div.widget_item.btn-group&gt;button.btn.btn-default.dropdown-toggle.widget-combo-carrot-btn {
    background: #2f2f2f;
    background-color: #2f2f2f;
    border-color: #2f2f2f;
}

#notebook-container&gt;div.cell.code_cell.rendered.selected&gt;div.widget-area&gt;div.widget-subarea&gt;div&gt;div.widget_item.btn-group&gt;button.btn.btn-default.dropdown-toggle.widget-combo-carrot-btn:hover {
    background: #2a2a2a;
    background-color: #2a2a2a;
    border-color: #2a2a2a;
}

.ui-widget-content {
    background: #2f2f2f;
    background-color: #2f2f2f;
    border: 2px solid #2f2f2f;
    color: #f8f8f0;
}

div.collapsible_headings_toggle {
    color: rgba(93, 92, 82, .5) !important;
}

div.collapsible_headings_toggle:hover {
    color: #a6e22e !important;
}

.collapsible_headings_toggle .h1,
.collapsible_headings_toggle .h2,
.collapsible_headings_toggle .h3,
.collapsible_headings_toggle .h4,
.collapsible_headings_toggle .h5,
.collapsible_headings_toggle .h6 {
    margin: 0.3em .4em 0em 0em !important;
    line-height: 1.2 !important;
}

div.collapsible_headings_toggle .fa-caret-down:before,
div.collapsible_headings_toggle .fa-caret-right:before {
    font-size: xx-large;
    transition: transform 1000ms;
    transform: none !important;
}

.collapsible_headings_collapsed.collapsible_headings_ellipsis .rendered_html h1:after,
.collapsible_headings_collapsed.collapsible_headings_ellipsis .rendered_html h2:after,
.collapsible_headings_collapsed.collapsible_headings_ellipsis .rendered_html h3:after,
.collapsible_headings_collapsed.collapsible_headings_ellipsis .rendered_html h4:after,
.collapsible_headings_collapsed.collapsible_headings_ellipsis .rendered_html h5:after,
.collapsible_headings_collapsed.collapsible_headings_ellipsis .rendered_html h6:after {
    position: absolute;
    right: 0;
    bottom: 20% !important;
    content: "[\002026]";
    color: rgba(93, 92, 82, .5) !important;
    padding: 0.5em 0em 0em 0em !important;
}

.collapsible_headings_ellipsis .rendered_html h1,
.collapsible_headings_ellipsis .rendered_html h2,
.collapsible_headings_ellipsis .rendered_html h3,
.collapsible_headings_ellipsis .rendered_html h4,
.collapsible_headings_ellipsis .rendered_html h5,
.collapsible_headings_ellipsis .rendered_html h6,
.collapsible_headings_toggle .fa {
    transition: transform 1000ms !important;
    -webkit-transform: inherit !important;
    -moz-transform: inherit !important;
    -ms-transform: inherit !important;
    -o-transform: inherit !important;
    transform: inherit !important;
    padding-right: 0px !important;
}

#toc-wrapper {
    z-index: 90;
    position: fixed !important;
    display: flex;
    flex-direction: column;
    overflow: hidden;
    padding: 10px;
    border-style: solid;
    border-width: thin;
    border-right-width: medium !important;
    background-color: #1e1e1e !important;
}

#toc-wrapper.ui-draggable.ui-resizable.sidebar-wrapper {
    border-color: rgba(93, 92, 82, .25) !important;
}

#toc a,
#navigate_menu a,
.toc {
    color: #f8f8f0 !important;
    font-size: 11pt !important;
}

#toc li&gt;span:hover {
    background-color: rgba(93, 92, 82, .25) !important;
}

#toc a:hover,
#navigate_menu a:hover,
.toc {
    color: #f8f8f2 !important;
    font-size: 11pt !important;
}

#toc-wrapper .toc-item-num {
    color: #a6e22e !important;
    font-size: 11pt !important;
}

input.raw_input {
    font-family: monospace, monospace;
    font-size: 11pt !important;
    color: #f8f8f0;
    background-color: #282828;
    border-color: #252525;
    background: #252525;
    width: auto;
    vertical-align: baseline;
    padding: 0em 0.25em;
    margin: 0em 0.25em;
    -webkit-box-shadow: none;
    box-shadow: none;
}

audio,
video {
    display: inline;
    vertical-align: middle;
    align-content: center;
    margin-left: 20%;
}

.cmd-palette .modal-body {
    padding: 0px;
    margin: 0px;
}

.cmd-palette form {
    background: #293547;
    background-color: #293547;
}

.typeahead-field input:last-child,
.typeahead-hint {
    background: #293547;
    background-color: #293547;
    z-index: 1;
}

.typeahead-field input {
    font-family: sans-serif;
    color: #f8f8f0;
    border: none;
    font-size: 28pt;
    display: inline-block;
    line-height: inherit;
    padding: 3px 10px;
    height: 70px;
}

.typeahead-select {
    background-color: #293547;
}

body&gt;div.modal.cmd-palette.typeahead-field {
    display: table;
    border-collapse: separate;
    background-color: #2b3850;
}

.typeahead-container button {
    font-family: sans-serif;
    font-size: 28pt;
    background-color: #2f2f2f;
    border: none;
    display: inline-block;
    line-height: inherit;
    padding: 3px 10px;
    height: 70px;
}

.typeahead-search-icon {
    min-width: 40px;
    min-height: 55px;
    display: block;
    vertical-align: middle;
    text-align: center;
}

.typeahead-container button:focus,
.typeahead-container button:hover {
    color: #f8f8f0;
    background-color: #2a2a2a;
    border-color: #2a2a2a;
}

.typeahead-list&gt;li.typeahead-group.active&gt;a,
.typeahead-list&gt;li.typeahead-group&gt;a,
.typeahead-list&gt;li.typeahead-group&gt;a:focus,
.typeahead-list&gt;li.typeahead-group&gt;a:hover {
    display: none;
}

.typeahead-dropdown&gt;li&gt;a,
.typeahead-list&gt;li&gt;a {
    color: #f8f8f0;
    text-decoration: none;
}

.typeahead-dropdown,
.typeahead-list {
    font-family: sans-serif;
    font-size: 9pt;
    color: #f8f8f0;
    background-color: #202937;
    border: none;
    background-clip: padding-box;
    margin-top: 0px;
    padding: 3px 2px 3px 0px;
    line-height: 1.7;
}

.typeahead-dropdown&gt;li.active&gt;a,
.typeahead-dropdown&gt;li&gt;a:focus,
.typeahead-dropdown&gt;li&gt;a:hover,
.typeahead-list&gt;li.active&gt;a,
.typeahead-list&gt;li&gt;a:focus,
.typeahead-list&gt;li&gt;a:hover {
    color: #f8f8f0;
    background-color: #2b3850;
    border-color: #2b3850;
}

.command-shortcut:before {
    content: "(command)";
    padding-right: 3px;
    color: #75715e;
}

.edit-shortcut:before {
    content: "(edit)";
    padding-right: 3px;
    color: #75715e;
}

ul.typeahead-list i {
    margin-left: 1px;
    width: 18px;
    margin-right: 10px;
}

ul.typeahead-list {
    max-height: 50vh;
    overflow: auto;
}

.typeahead-list&gt;li {
    position: relative;
    border: none;
}

div.input.typeahead-hint,
input.typeahead-hint,
body&gt;div.modal.cmd-palette.in&gt;div&gt;div&gt;div&gt;form&gt;div&gt;div.typeahead-field&gt;span.typeahead-query&gt;input.typeahead-hint {
    color: #75715e !important;
    background-color: transparent;
    padding: 3px 10px;
}

.typeahead-dropdown&gt;li&gt;a,
.typeahead-list&gt;li&gt;a {
    display: block;
    padding: 5px;
    clear: both;
    font-weight: 400;
    line-height: 1.7;
    border: 1px solid #202937;
    border-bottom-color: rgba(93, 92, 82, .5);
}

body&gt;div.modal.cmd-palette.in&gt;div {
    min-width: 750px;
    margin: 150px auto;
}

.typeahead-container strong {
    font-weight: bolder;
    color: #a6e22e;
}

#find-and-replace #replace-preview .match,
#find-and-replace #replace-preview .insert {
    color: #ffffff;
    background-color: #57564b;
    border-color: #57564b;
    border-style: solid;
    border-width: 1px;
    border-radius: 0px;
}

#find-and-replace #replace-preview .replace .match {
    background-color: #f92672;
    border-color: #f92672;
    border-radius: 0px;
}

#find-and-replace #replace-preview .replace .insert {
    background-color: #a6e22e;
    border-color: #a6e22e;
    border-radius: 0px;
}

.jupyter-dashboard-menu-item.selected::before {
    font-family: 'FontAwesome' !important;
    content: '\f00c' !important;
    position: absolute !important;
    color: #a6e22e !important;
    left: 0px !important;
    top: 13px !important;
    font-size: 12px !important;
}

.shortcut_key,
span.shortcut_key {
    display: inline-block;
    width: 16ex;
    text-align: right;
    font-family: monospace;
}

.jupyter-keybindings {
    padding: 1px;
    line-height: 24px;
    border-bottom: 1px solid rgba(93, 92, 82, .25);
}

.jupyter-keybindings i {
    background: #282828;
    font-size: small;
    padding: 5px;
    margin-left: 7px;
}

div#short-key-bindings-intro.well,
.well {
    background-color: #2f2f2f;
    border: 1px solid #2f2f2f;
    color: #f8f8f0;
    border-radius: 2px;
    -webkit-box-shadow: none;
    box-shadow: none;
}

#texteditor-backdrop {
    background: #1e1e1e;
    background-color: #1e1e1e;
}

#texteditor-backdrop #texteditor-container .CodeMirror-gutter,
#texteditor-backdrop #texteditor-container .CodeMirror-gutters {
    background: #49483e;
    background-color: #49483e;
    color: #75715e;
}

.edit_app #menubar .navbar {
    margin-bottom: 0px;
}

#texteditor-backdrop #texteditor-container {
    padding: 0px;
    background-color: #282828;
    box-shadow: none;
}

.terminal-app {
    background: #1e1e1e;
}

.terminal-app&gt;#header {
    background: #1e1e1e;
}

.terminal-app .terminal {
    font-family: monospace, monospace;
    font-size: 11pt;
    line-height: 170%;
    color: #f8f8f0;
    background: #282828;
    padding: 0.4em;
    border-radius: 2px;
    -webkit-box-shadow: none;
    box-shadow: none;
}

.terminal .xterm-viewport {
    background-color: #282828;
    color: #f8f8f0;
    overflow-y: auto;
}

.terminal .xterm-color-0 {
    color: #a6e22e;
}

.terminal .xterm-color-1 {
    color: #a6e22e;
}

.terminal .xterm-color-2 {
    color: #f92672;
}

.terminal .xterm-color-3 {
    color: #a6e22e;
}

.terminal .xterm-color-4 {
    color: #ae81ff;
}

.terminal .xterm-color-5 {
    color: #e6db74;
}

.terminal .xterm-color-6 {
    color: #a6e22e;
}

.terminal .xterm-color-7 {
    color: #a6e22e;
}

.terminal .xterm-color-8 {
    color: #a6e22e;
}

.terminal .xterm-color-9 {
    color: #e6db74;
}

.terminal .xterm-color-10 {
    color: #a6e22e;
}

.terminal .xterm-color-14 {
    color: #a6e22e;
}

.terminal .xterm-bg-color-15 {
    background-color: #282828;
}

.terminal:not(.xterm-cursor-style-underline):not(.xterm-cursor-style-bar) .terminal-cursor {
    background-color: #a6e22e;
    color: #282828;
}

.terminal:not(.focus) .terminal-cursor {
    outline: 1px solid #a6e22e;
    outline-offset: -1px;
}

.celltoolbar {
    font-size: 100%;
    padding-top: 3px;
    border-color: transparent;
    border-bottom: thin solid rgba(148, 204, 114, .2);
    background: transparent;
}

.cell-tag,
.tags-input input,
.tags-input button {
    color: #f8f8f0;
    background-color: #1e1e1e;
    background-image: none;
    border: 1px solid #f8f8f0;
    border-radius: 1px;
    box-shadow: none;
    width: inherit;
    font-size: inherit;
    height: 22px;
    line-height: 22px;
}

#notebook-container&gt;div.cell.code_cell.rendered.selected&gt;div.input&gt;div.inner_cell&gt;div.ctb_hideshow.ctb_show&gt;div&gt;div&gt;button,
#notebook-container&gt;div.input&gt;div.inner_cell&gt;div.ctb_hideshow.ctb_show&gt;div&gt;div&gt;button {
    font-size: 10pt;
    color: #f8f8f0;
    background-color: #1e1e1e;
    background-image: none;
    border: 1px solid #f8f8f0;
    border-radius: 1px;
    box-shadow: none;
    width: inherit;
    font-size: inherit;
    height: 22px;
    line-height: 22px;
}

div#pager #pager-contents {
    background: #1e1e1e !important;
    background-color: #1e1e1e !important;
}

div#pager pre {
    color: #f8f8f0 !important;
    background: #282828 !important;
    background-color: #282828 !important;
    padding: 0.4em;
}

div#pager .ui-resizable-handle {
    top: 0px;
    height: 8px;
    background: #a6e22e !important;
    border-top: 1px solid #a6e22e;
    border-bottom: 1px solid #a6e22e;
}

div.CodeMirror,
div.CodeMirror pre {
    font-family: monospace, monospace;
    font-size: 11pt;
    line-height: 170%;
    color: #f8f8f0;
}

div.CodeMirror-lines {
    padding-bottom: .9em;
    padding-left: .5em;
    padding-right: 1.5em;
    padding-top: .7em;
}

span.ansiblack,
.ansi-black-fg {
    color: #282828;
}

span.ansiblue,
.ansi-blue-fg,
.ansi-blue-intense-fg {
    color: #66d9ef;
}

span.ansigray,
.ansi-gray-fg,
.ansi-gray-intense-fg {
    color: #888888;
}

span.ansigreen,
.ansi-green-fg {
    color: #a6e22e;
}

.ansi-green-intense-fg {
    color: #888888;
}

span.ansipurple,
.ansi-purple-fg,
.ansi-purple-intense-fg {
    color: #ae81ff;
}

span.ansicyan,
.ansi-cyan-fg,
.ansi-cyan-intense-fg {
    color: #ae81ff;
}

span.ansiyellow,
.ansi-yellow-fg,
.ansi-yellow-intense-fg {
    color: #e6db74;
}

span.ansired,
.ansi-red-fg,
.ansi-red-intense-fg {
    color: #f92672;
}

div.output-stderr {
    background-color: #f92672;
}

div.output-stderr pre {
    color: #f8f8f2;
}

div.js-error {
    color: #f92672;
}

.ipython_tooltip {
    font-family: monospace, monospace;
    font-size: 11pt;
    line-height: 170%;
    border: 2px solid #141414;
    background: #282828;
    background-color: #282828;
    border-radius: 2px;
    overflow-x: visible;
    overflow-y: visible;
    box-shadow: none;
    position: absolute;
    z-index: 1000;
}

.ipython_tooltip .tooltiptext pre {
    font-family: monospace, monospace;
    font-size: 11pt;
    line-height: 170%;
    background: #282828;
    background-color: #282828;
    color: #f8f8f0;
    overflow-x: visible;
    overflow-y: visible;
    max-width: 900px;
}

div#tooltip.ipython_tooltip {
    overflow-x: wrap;
    overflow-y: visible;
    max-width: 800px;
}

div.tooltiptext.bigtooltip {
    overflow-x: visible;
    overflow-y: scroll;
    height: 400px;
    max-width: 800px;
}

.cm-s-ipython.CodeMirror {
    font-family: monospace, monospace;
    font-size: 9pt;
    background: #282828;
    color: #f8f8f0;
    border-radius: 2px;
    font-style: normal;
    font-weight: normal;
}

.cm-s-ipython div.CodeMirror-selected {
    background: #49483e;
}

.CodeMirror-gutters {
    border: none;
    border-right: 1px solid #49483e !important;
    background-color: #49483e !important;
    background: #49483e !important;
    border-radius: 0px;
    white-space: nowrap;
}

.cm-s-ipython .CodeMirror-gutters {
    background: #282828 !important;
    border: none;
    border-radius: 0px;
    width: 36px;
}

.cm-s-ipython .CodeMirror-linenumber {
    color: #75715e;
}

.CodeMirror-sizer {
    margin-left: 40px;
}

.CodeMirror-linenumber,
div.CodeMirror-linenumber,
.CodeMirror-gutter.CodeMirror-linenumberdiv.CodeMirror-gutter.CodeMirror-linenumber {
    padding-right: 1px;
    margin-left: 0px;
    margin: 0px;
    width: 26px !important;
    padding: 0px;
    text-align: right;
}

.CodeMirror-linenumber {
    color: #75715e;
    left: 0px !important;
}

.cm-s-ipython .CodeMirror-cursor {
    border-left: 2px solid #0095ff !important;
}

.cm-s-ipython span.cm-comment {
    color: #75715e;
    font-style: italic;
}

.cm-s-ipython span.cm-atom {
    color: #ae81ff;
}

.cm-s-ipython span.cm-number {
    color: #ae81ff;
}

.cm-s-ipython span.cm-property {
    color: #f8f8f0;
}

.cm-s-ipython span.cm-attribute {
    color: #f8f8f0;
}

.cm-s-ipython span.cm-keyword {
    color: #f92672;
    font-weight: normal;
}

.cm-s-ipython span.cm-string {
    color: #e6db74;
}

.cm-s-ipython span.cm-meta {
    color: #fd971f;
}

.cm-s-ipython span.cm-operator {
    color: #a6e22e;
}

.cm-s-ipython span.cm-builtin {
    color: #a6e22e;
}

.cm-s-ipython span.cm-variable {
    color: #f8f8f0;
}

.cm-s-ipython span.cm-variable-2 {
    color: #a6e22e;
}

.cm-s-ipython span.cm-variable-3 {
    color: #fd971f;
}

.cm-s-ipython span.cm-def {
    color: #a6e22e;
    font-weight: normal;
}

.cm-s-ipython span.cm-error {
    background: rgba(249, 38, 114, .4);
}

.cm-s-ipython span.cm-tag {
    color: #ae81ff;
}

.cm-s-ipython span.cm-link {
    color: #a6e22e;
}

.cm-s-ipython span.cm-storage {
    color: #ae81ff;
}

.cm-s-ipython span.cm-entity {
    color: #a6e22e;
}

.cm-s-ipython span.cm-quote {
    color: #e6db74;
}

div.CodeMirror span.CodeMirror-matchingbracket {
    color: #ffffff;
    font-weight: bold;
    background-color: #49483e;
}

div.CodeMirror span.CodeMirror-nonmatchingbracket {
    color: #ffffff;
    font-weight: bold;
    background: rgba(249, 38, 114, .4) !important;
}

.cm-header-1 {
    font-size: 215%;
}

.cm-header-2 {
    font-size: 180%;
}

.cm-header-3 {
    font-size: 150%;
}

.cm-header-4 {
    font-size: 120%;
}

.cm-header-5 {
    font-size: 100%;
}

.cm-s-default .cm-hr {
    color: #a6e22e;
}

div.cell.text_cell .cm-s-default .cm-header {
    font-family: sans-serif;
    font-weight: normal;
    color: #a6e22e !important;
    margin-top: 0.3em !important;
    margin-bottom: 0.3em !important;
}

div.cell.text_cell .cm-s-default span.cm-variable-2 {
    color: #f8f8f0 !important;
}

div.cell.text_cell .cm-s-default span.cm-variable-3 {
    color: #fd971f !important;
}

.cm-s-default span.cm-comment {
    color: #75715e !important;
}

.cm-s-default .cm-tag {
    color: #529b2f;
}

.cm-s-default .cm-builtin {
    color: #a6e22e;
}

.cm-s-default .cm-string {
    color: #e6db74;
}

.cm-s-default .cm-keyword {
    color: #f92672;
}

.cm-s-default .cm-number {
    color: #ae81ff;
}

.cm-s-default .cm-error {
    color: #ae81ff;
}

.cm-s-default .cm-link {
    color: #a6e22e;
}

.cm-s-default .cm-atom {
    color: #ae81ff;
}

.cm-s-default .cm-def {
    color: #a6e22e;
}

.CodeMirror-cursor {
    border-left: 2px solid #0095ff !important;
    border-right: none;
    width: 0;
}

.cm-s-default div.CodeMirror-selected {
    background: #49483e;
}

.cm-s-default .cm-selected {
    background: #49483e;
}

.MathJax_Display,
.MathJax {
    border: 0 !important;
    font-size: 100% !important;
    text-align: center !important;
    margin: 0em !important;
    line-height: 2.25 !important;
}

.MathJax:focus,
body :focus .MathJax {
    display: inline-block !important;
}

.MathJax:focus,
body :focus .MathJax {
    display: inline-block !important;
}

.completions {
    position: absolute;
    z-index: 110;
    overflow: hidden;
    border: medium solid #49483e;
    box-shadow: none;
    line-height: 1;
}

.completions select {
    background: #282828;
    background-color: #282828;
    outline: none;
    border: none;
    padding: 0px;
    margin: 0px;
    margin-left: 2px;
    overflow: auto;
    font-family: monospace, monospace;
    font-size: 11pt;
    color: #f8f8f0;
    width: auto;
}

/* div#maintoolbar {
    display: none !important;
}

#header-container {
    display: none !important;
} */

&lt;script&gt;MathJax.Hub.Config( {
        "HTML-CSS": {

            /*preferredFont: "TeX",*/
            /*availableFonts: ["TeX", "STIX"],*/
            styles: {

                scale: 100,
                ".MathJax_Display": {
                    "font-size": "100%",
                }
            }
        }
    }

);
&lt;/script&gt;
</code></pre></div></div>

<p><br /></p>
<h2 id="there-is-another-way-too">There is another way too:</h2>

<p>Refer this for more: <a href="https://github.com/dunovank/jupyter-themes">jupyter-themes</a></p>

<p>Things to do now:</p>

<ul>
  <li>
    <p>Install jupyter themes : <code class="language-plaintext highlighter-rouge">pip install jupyterthemes</code></p>
  </li>
  <li>
    <p>Simply use it by: <code class="language-plaintext highlighter-rouge">jt [commands]</code></p>
  </li>
</ul>

<p>My favorite one is:</p>

<blockquote>
  <p>jt -t grade3 -T -N -fs 9 -nfs 9 -tfs 9 -cellw 1200</p>
</blockquote>

<p><br />
Here, <code class="language-plaintext highlighter-rouge">-t</code> means use <code class="language-plaintext highlighter-rouge">grade3</code> theme, <code class="language-plaintext highlighter-rouge">-T</code> stands for <em>Toolbars on</em>, <code class="language-plaintext highlighter-rouge">-N</code> stands for <em>Notebook name on</em>, <code class="language-plaintext highlighter-rouge">-fs</code> means use <em>font size 9</em>,
<code class="language-plaintext highlighter-rouge">-nfs</code> means use <em>notebook font size 9</em>, <code class="language-plaintext highlighter-rouge">-tfs</code> means use toolbar <em>font size 9</em> and finally <code class="language-plaintext highlighter-rouge">-cellw</code> means <em>use 1200 as the width for the notebook workspace</em>.</p>

<p><br /></p>
<h4 id="you-might-want-to-check-out-the-original-repository-mentioned-in-the-link-above-to-try-out-different-themes-and-others-interesting-stuffs">You might want to check out the original repository mentioned in the link above to try out different themes and others interesting stuffs.</h4>]]></content><author><name>Pramesh Bajracharya</name><email>pe.messh@gmail.com</email></author><category term="python" /><category term="ai" /><category term="tools" /><summary type="html"><![CDATA[Make Jupyter Notebooks easier on the eyes with custom themes, fonts, and cell styling.]]></summary><media:thumbnail xmlns:media="http://search.yahoo.com/mrss/" url="https://prameshbajra.com/static/assets/img/og/jupyter-notebook.png" /><media:content medium="image" url="https://prameshbajra.com/static/assets/img/og/jupyter-notebook.png" xmlns:media="http://search.yahoo.com/mrss/" /></entry><entry><title type="html">Why NODEJS?</title><link href="https://prameshbajra.com/blog/nodejs/" rel="alternate" type="text/html" title="Why NODEJS?" /><published>2019-04-05T00:00:00+00:00</published><updated>2019-04-05T00:00:00+00:00</updated><id>https://prameshbajra.com/blog/nodejs</id><content type="html" xml:base="https://prameshbajra.com/blog/nodejs/"><![CDATA[<p>“<strong>Node.js</strong> is a platform built on Chrome’s JavaScript runtime for easily building fast, scalable network applications. Node.js uses an event-driven, non-blocking I/O model that makes it lightweight and efficient, perfect for data-intensive real-time applications that run across distributed devices.” – This is what the NODEJS webpage says but if you are a beginner then this will hardly ring a bell. So, let me break it down.</p>

<p><strong>Event-driven</strong> means that the server only reacts when an event occurs. This allow us to create high performance, highly scalable, “real-time” application. <strong>Non-blocking I/O  model</strong> means that you can run your I/O request asynchronously without blocking your application. In this programming model open/read/write/update operation on devices and resources managed by the file-system don’t block the calling thread. For e.g. A real time chat app, interactive games can be created with very high performance using NODE. 
<br /><br /></p>
<h2 id="my-thoughts-"><u>My thoughts :</u></h2>

<p>My feeling is that Node.js is especially suited for applications where you’d like to maintain a persistent connection from the browser back to the server. Doing heavy load on many of the web’s giants, like <strong>Ruby on Rails</strong> (Ruby Framework) or <strong>Django</strong> (Python Framework), would create immense load on the server, because each active client eats up one server process but NODE handles this in a different, better way. It’s worth mentioning that Ruby and Python both have tools to do this sort of thing (<strong>event machine</strong> and <strong>twisted</strong>, respectively), but that <strong>Node.js</strong> does it exceptionally well, and from the ground up.</p>

<p>It’s also worth pointing out that <strong>Node.js</strong> is also great for situations in which you’ll be reusing a lot of code across the client/server gap. The Express framework makes this really easy, and a lot of developers, including me, are suggesting this might be the future of web development.</p>

<p>All I can say from my experience that it’s a whole lot of fun to write code in NODE, and a big part of this is spending less time thinking about how you’re going to plan certain logic. It runs Javascript, so you can use the same language on server and client, and even share some code between them.
<br /><br /></p>
<h2 id="-just-a-fact-"><u> Just a fact :</u></h2>
<p>Companies like <strong>NetFlix, PayPal, LinkedIn, Walmart, Uber, Ebay, NASA, Google, Yahoo, Mozilla, Github, Microsoft, New York Times, Wall street journal, GoDaddy</strong> and many others use NODEJS in production. 
<br /><br /></p>
<h2 id="-the-fun-part-"><u> The Fun Part :</u></h2>

<p>So why should one be using NODE? Let’s point out the obvious.</p>

<ul>
  <li>
    <p>One of the great thing about <strong>NODEJS</strong> is, it’s everywhere. Yes, you hear that right. <strong>EVERYWHERE!</strong> You can write <em>web applications, desktop applications, mobile applications, cloud services, Internet Of Things projects, APIs</em> and many more using NODE.</p>
  </li>
  <li>
    <p><strong>Open Source:</strong> NODEJS is an open source platform, which means it is easily accessible and maintained by the best developers around the world. It’s source code is easily available. It is secure, flexible and free.</p>
  </li>
  <li>
    <p><strong>The ever-growing NPM packages:</strong> Being an open-source technology, <strong>NodeJS</strong> has a shared repository of good-to-go tools and modules. The number of modules in the Node Package Manager (NPM) has increased at a exponential pace, overtaking the RoR (Ruby on Rails) gems and PHP bundles. At over <em>350,000</em> packages, the npm registry contains more than double the next most populated package registry (which is the Apache Maven repository). In fact, it is currently the <em>largest package registry</em> in the world. In the preceding four weeks, users installed 18 billion packages. Daily 500 packages are uploaded to the npm community. This simply means that you will find what you are searching for.</p>
  </li>
  <li>
    <p><strong>Cross Platform:</strong> <strong>Node.js</strong> is cross-platform means it works on <em>Windows, OSX and Linux</em>. A large number of the Node.js community write Node.js on OSX and then deploy to Linux servers. Applications made from NODEJS also can run on both iOS and android.</p>
  </li>
  <li>
    <p><strong>Lightweight and Extensible:</strong> <strong>Node.js</strong> is based on JavaScript which can be executed on client side as well as server side. Also, it supports exchange of data using JSON which is easily consumed by JavaScript. This makes it light weight as compared to other frameworks. <em>Node.js is open source</em>. Hence you can extend it as per your needs.</p>
  </li>
  <li>
    <p><strong>Easy to Learn:</strong> According to Node.js’s 2016 User Survey Javascript is one of the most popular programming languages for front-end development. Nearly every front-end developer is familiar with this universal language. Therefore, it is much easier for them to switch to using Node.js at the back-end. It requires less effort and less time to learn and work with, even for a junior Javascript programmer.</p>
  </li>
</ul>

<p><br />
Personally, I love <em>JavaScript</em> and its weirdness. So these were my small thoughts on <em>why one should consider <strong>NODEJS</strong>.</em>
If you are already using or familiar with <strong>NODE</strong> then leave your thoughts in the comment below and why you use <strong>NODE</strong>. I would love to read your answers.</p>]]></content><author><name>Pramesh Bajracharya</name><email>pe.messh@gmail.com</email></author><category term="web" /><summary type="html"><![CDATA[Covering the what, when, and why of Node.js — and when reaching for it actually pays off.]]></summary><media:thumbnail xmlns:media="http://search.yahoo.com/mrss/" url="https://prameshbajra.com/static/assets/img/og/nodejs.png" /><media:content medium="image" url="https://prameshbajra.com/static/assets/img/og/nodejs.png" xmlns:media="http://search.yahoo.com/mrss/" /></entry><entry><title type="html">Ransomeware : Android</title><link href="https://prameshbajra.com/blog/ransomeware/" rel="alternate" type="text/html" title="Ransomeware : Android" /><published>2019-03-01T00:00:00+00:00</published><updated>2019-03-01T00:00:00+00:00</updated><id>https://prameshbajra.com/blog/ransomeware</id><content type="html" xml:base="https://prameshbajra.com/blog/ransomeware/"><![CDATA[<p><strong>“Ransomware”</strong> threat is on the rise, and cyber criminals are making millions of dollars by victimizing as many people as they can—with <strong>WannaCry, NotPetya and LeakerLocker</strong> being the ransomware threats that made headlines recently.</p>

<p><strong>What’s BAD?</strong> Hacker even started selling <strong>ransomware-as-a-service (RaaS)</strong> kits in an attempt to spread this creepy threat more easily, so that even a non-tech user can create their own ransomware and distribute the threat to a wider audience.</p>

<p><strong>The WORSE</strong> — You could see a massive increase in the number of ransomware campaigns during the next several months, thanks to new Android apps available for anyone to download that let them quickly and easily create Android ransomware with their own devices.</p>

<p>Security researchers at Antivirus firm <strong>Symantec</strong> have spotted some Android apps available on hacking forums and through advertisements on a social networking messaging service popular in China, which let any wannabe hacker download and use <strong>Trojan Development Kits (TDKs)</strong>.
<br />
<br /></p>
<blockquote>
  <p><strong>How to Create Your Own Android Ransomware?</strong></p>
</blockquote>

<p>With an easy-to-use interface, these apps are no different from any other Android app apart from the fact that it allows users to create their custom mobile malware with little to no programming knowledge. You do not need to be a computer specialist or a good programmer to do this.</p>

<p>To create customized ransomware, users can download one such app (for security reasons links are not shared), install and open it, where it offers to choose from the following options, which are displayed on the app’s on-screen for.</p>

<p>The message that is to be shown on the locked screen of the infected device</p>

<ul>
  <li>
    <p>The key to be used to unlock that infected device</p>
  </li>
  <li>
    <p>The icon to be used by their malware</p>
  </li>
  <li>
    <p>Custom mathematical operations to randomize the code</p>
  </li>
  <li>
    <p>Type of animation to be displayed on the infected device</p>
  </li>
</ul>

<p>Once all of the information has been filled in, users just require hitting the <strong>“Create”</strong> button.</p>

<p>If the user hasn’t been created before, the app will prompt him/her to subscribe to the service before proceeding. The app allows the user to start an online chat with its developer where he/she can arrange a one-time payment.</p>

<p>After the payment has been made, the “<em>malware is created and stored in the external storage in ready-to-ship condition.</em>” and then the user can continue with the process, making as many as victims as the user can.
<br /><br />
“<em>Anyone unlucky enough to be tricked into installing the malware will end up with a locked device held to ransom.</em>” researchers say.</p>

<p>“<em>The malware created using this automation process follows the typical Lockdroid behavior of locking the device’s screen with a <strong>SYSTEM_ALERT_WINDOW</strong> and displaying a text field for the victim to enter the unlock code.</em>”</p>

<p>The Lockdroid ransomware has the ability to lock the infected device, change the device PIN, and delete all of its user data through a factory reset, and even prevent the user from uninstalling the malware.</p>

<p>Such apps allow anyone interested in hacking and criminal activities to develop a ready-to-use piece of ransomware malware just by using their smartphones without any need to write a single line of code or without any programming and computer skills.</p>

<p>“However, these apps are not just useful for aspiring and inexperienced cyber criminals as even hardened malware authors could find these easy-to-use kits an efficient alternative to putting the work in themselves,” the researchers say.</p>

<p>So, get ready to expect an increase in mobile ransomware variants in coming months. <br /><br /></p>

<blockquote>
  <p><strong>How to Protect Your Android Devices from Ransomware Attacks?</strong></p>
</blockquote>

<p>In order to protect against such threats on mobile devices, you are recommended to:</p>

<ul>
  <li>
    <p>Always keep regular backups of your important data.</p>
  </li>
  <li>
    <p>Make sure that you run an active anti-virus security suite of tools on your machine.</p>
  </li>
  <li>
    <p>Avoid downloading apps from unknown sites and third-party app stores.</p>
  </li>
  <li>
    <p>Always pay close attention to the permissions requested by an app, even if it is downloaded from an official app store.</p>
  </li>
  <li>
    <p>Do not open any email attachments from unknown sources.</p>
  </li>
  <li>
    <p>Finally, browse the Internet safely.</p>
  </li>
</ul>]]></content><author><name>Pramesh Bajracharya</name><email>pe.messh@gmail.com</email></author><category term="security" /><summary type="html"><![CDATA[Ransomware-as-a-Service is a real, purchasable thing. A look at how it reaches Android phones and what it does once there.]]></summary><media:thumbnail xmlns:media="http://search.yahoo.com/mrss/" url="https://prameshbajra.com/static/assets/img/og/ransomeware.png" /><media:content medium="image" url="https://prameshbajra.com/static/assets/img/og/ransomeware.png" xmlns:media="http://search.yahoo.com/mrss/" /></entry><entry><title type="html">VBScript magic : Make your computer greet you!</title><link href="https://prameshbajra.com/blog/vbscript/" rel="alternate" type="text/html" title="VBScript magic : Make your computer greet you!" /><published>2019-02-05T00:00:00+00:00</published><updated>2019-02-05T00:00:00+00:00</updated><id>https://prameshbajra.com/blog/vbscript</id><content type="html" xml:base="https://prameshbajra.com/blog/vbscript/"><![CDATA[<p>Using a small code snippet in <strong>VBScript</strong> we can make our computer talk to us or let’s just say greet us everytime our computer is turned on.</p>

<p>To make this happen follow the instruction:<br /></p>

<ul>
  <li>
    <p>Open any text editor and paste the code below and save it as “<strong>name.vbs</strong>”. Remember that the extension must be “<strong>.vbs</strong>” but the filename can be anything you want.</p>
  </li>
  <li>
    <p>Copy the below given code into the file you just created.</p>

    <blockquote>
      <p><code class="language-plaintext highlighter-rouge">Set Sapi = Wscript.CreateObject("SAPI.SpVoice")</code></p>

      <p><code class="language-plaintext highlighter-rouge">dim str</code></p>

      <p><code class="language-plaintext highlighter-rouge">if hour(time) &lt; 12 then</code></p>

      <p><code class="language-plaintext highlighter-rouge">Sapi.speak "Good Morning , Nice to see you. "</code></p>

      <p><code class="language-plaintext highlighter-rouge">else</code></p>

      <p><code class="language-plaintext highlighter-rouge">if hour(time) &gt; 12 then</code></p>

      <p><code class="language-plaintext highlighter-rouge">if hour(time) &gt; 16 then</code></p>

      <p><code class="language-plaintext highlighter-rouge">Sapi.speak "Good evening, Nice to see you."</code></p>

      <p><code class="language-plaintext highlighter-rouge">else</code></p>

      <p><code class="language-plaintext highlighter-rouge">Sapi.speak "Good afternoon, Nice to see you."</code></p>

      <p><code class="language-plaintext highlighter-rouge">end if</code></p>

      <p><code class="language-plaintext highlighter-rouge">end if</code></p>

      <p><code class="language-plaintext highlighter-rouge">end if</code></p>
    </blockquote>
  </li>
  <li>
    <p>Goto <strong>C:\Users&lt;your username&gt;\AppData\Roaming\Microsoft\Windows\Start Menu\Programs\Startup\</strong> and paste the above made “<strong>name.vbs</strong>” file here.</p>
  </li>
</ul>

<p>Now everytime you turn your computer on, it will greet you with different messsages according to the time.</p>

<p>Feel free to modify the code and configure this accordingly.</p>]]></content><author><name>Pramesh Bajracharya</name><email>pe.messh@gmail.com</email></author><category term="tools" /><summary type="html"><![CDATA[Make your computer greet you every time you restart or open it, using a few lines of VBScript.]]></summary><media:thumbnail xmlns:media="http://search.yahoo.com/mrss/" url="https://prameshbajra.com/static/assets/img/og/vbscript.png" /><media:content medium="image" url="https://prameshbajra.com/static/assets/img/og/vbscript.png" xmlns:media="http://search.yahoo.com/mrss/" /></entry><entry><title type="html">Why I Love VS Code and You Should Too</title><link href="https://prameshbajra.com/blog/vscode/" rel="alternate" type="text/html" title="Why I Love VS Code and You Should Too" /><published>2019-01-03T00:00:00+00:00</published><updated>2019-01-03T00:00:00+00:00</updated><id>https://prameshbajra.com/blog/vscode</id><content type="html" xml:base="https://prameshbajra.com/blog/vscode/"><![CDATA[<p><strong>Visual Studio Code</strong> is a source code editor developed by <strong>Microsoft</strong> for <em>Windows, Linux and macOS</em>. It is based on <strong>Electron</strong>, a framework which is used to deploy Node.js applications for the desktop running on the Blink layout engine.</p>

<p>It was announced on <em>April 29, 2015 by Microsoft at the 2015 Build conference</em>. On <em>April 14, 2016</em>, it was released to public. The source code is available <a href="https://github.com/Microsoft/vscode/">here on GitHub</a>.</p>

<p>So why do I love this text editor? Simple answer would be “Coz it’s awesomme.” 
Let’s see some cool features : <br /></p>

<ul>
  <li>
    <p>The UI/UX is amazing. You have to try this for yourself to see it. I’m confident you will love it. If you want to customize further on then you are provided with hundreds of themes in <strong>Extension</strong> tab.</p>

    <p>Here is a sample screenshot.</p>
  </li>
</ul>

<p><br />
    <img src="/static/assets/img/blog/vscode/SideBySide.jpg" alt="Visual Studio Code split view screenshot" width="800" height="497" style="width: 75%" loading="lazy" decoding="async" />  <br />
<br /></p>

<ul>
  <li>
    <p>It falls on the sweet spot between simple light code editor and a IDE. It’s fast, light and has features like <strong>Always-On IntelliSense</strong>, <strong>Side-by-Side Editing</strong>, <strong>Huge Language Support</strong> and blah blah blah!</p>
  </li>
  <li>
    <p>I’m a huge fan of <strong>Integrated Version Control</strong> feature. This is very handy for <em>staging</em>, <em>commiting</em> and <em>reverting</em>.</p>
  </li>
  <li>
    <p>Another cool thing is that it has <strong>Integrated Terminal</strong> which opens up many terminal windows on the bottom of the screen. You can toggle this by <code class="language-plaintext highlighter-rouge">Ctrl + `</code>.</p>
  </li>
  <li>
    <p>There is another great feature called <strong>Peek</strong> which is toggled by <code class="language-plaintext highlighter-rouge">Shift + F12</code>. While coding, you may often forget a particular function, where the function is initially defined, and what are the required parameters.
With <strong>Peek</strong>, you can select a function then hit <code class="language-plaintext highlighter-rouge">Shift + F12</code>. The selection expands into an inline window showing the complete definition of the function as well as where the function is defined. The feature currently works in <em>C, C#, JavaScript, TypeScript, .NET,</em> and a few other programming languages.</p>
  </li>
  <li>
    <p><strong>Rename All Occurrences</strong> . Refactoring is a necessary aspect of writing and maintaining clean code, but it can be quite the headache — especially when you’re refactoring a large module or an otherwise huge chunk of code. So instead of hunting through dozens of files just to rename a variable or method, let VS Code do it for you.
If you select a variable/method and hit F2, you can edit the name and it will change every instance of that variable’s name throughout the entire current working project.
If you only want to change within the current file, use the Command + F2 (on Mac) or Ctrl + F2 (on Windows) keyboard shortcut and VS Code will spawn a cursor at every instance throughout the current file.</p>
  </li>
  <li>
    <p><strong>Live Share</strong>. VS Code Live Share is a brand new feature that is still just in developer preview. It allows you to share your workspace in realtime, live editing, pin to the user to follow their cursor, group debugging and many more. It’s really helpful if you work remotely or when you need to collaborate with someone who isn’t around.</p>
  </li>
  <li>
    <p><strong>Edit Multiple Lines at Once</strong>. If you ever need to insert or delete multiple instances of text throughout a document, all you have to do is create multiple cursors. You can do this by holding down Option (on Mac) or Alt (on Windows) and clicking anywhere in the text. Every click creates a new cursor.
This is particularly useful for things like HTML, where you might want to add many instances of the same class or change the format of several hyperlinks.</p>
  </li>
  <li>
    <p>Extensions are editor’s best friend. <strong>VS Code</strong> has a market full of these which can help you get coding easily. <a href="https://marketplace.visualstudio.com/VSCode">here</a> is the link for the market if interested. Some must have for me are :</p>

    <ol>
      <li>
        <p><a href="https://marketplace.visualstudio.com/items?itemName=FallenMax.mithril-emmet">Emmet</a></p>
      </li>
      <li>
        <p><a href="https://marketplace.visualstudio.com/items?itemName=HookyQR.beautify">Beautify</a></p>
      </li>
      <li>
        <p><a href="https://marketplace.visualstudio.com/items?itemName=sandy081.todotasks">To Do Task</a></p>
      </li>
      <li>
        <p>For JavaScript Developers : <a href="https://marketplace.visualstudio.com/items?itemName=WallabyJs.quokka-vscode">QuokkaJS</a></p>
      </li>
      <li>
        <p>A clean dark theme : <a href="https://marketplace.visualstudio.com/items?itemName=zhuangtongfa.Material-theme">One Dark Pro</a></p>
      </li>
    </ol>
  </li>
</ul>

<p><br /></p>
<blockquote>
  <p>Note : Before <strong>VS Code</strong> I used <strong>Sublime text</strong> and <strong>Atom</strong>. Both were kinda nice but it wasn’t the best for me. <strong>VS Code</strong> is where I am settled for now. It’s fast and comfortable to use. I can’t think of any other reason why I should be switching. “Good work <strong>Microsoft</strong>, you guys nailed it” , I’d say.</p>
</blockquote>

<p>These are some cool things I like about <strong>VS Code</strong>. Feel free to shoot me a mail or comment to let me know about your favorite feature, extension or theme.</p>]]></content><author><name>Pramesh Bajracharya</name><email>pe.messh@gmail.com</email></author><category term="tools" /><summary type="html"><![CDATA[Make programming more convenient using VS Code and its best features.]]></summary><media:thumbnail xmlns:media="http://search.yahoo.com/mrss/" url="https://prameshbajra.com/static/assets/img/og/vscode.png" /><media:content medium="image" url="https://prameshbajra.com/static/assets/img/og/vscode.png" xmlns:media="http://search.yahoo.com/mrss/" /></entry></feed>